At a Glance
- Cannabis vendor QuickBooks setup takes about 10 minutes, one time.
- Every weekly settlement becomes an Invoice in your QBO with the settlement PDF attached.
- The matching PaymentReceived posts when the check is cut, deposit-routed to the bank account you choose.
- Pick your Income and Bank accounts once, map customers and items, and you are done.
- The platform handles book-closed weeks, transient API errors, and refresh tokens for you.
Setup in 6 steps
Cannabis vendor QuickBooks setup is a one-time, ~10-minute flow if you sell consignment or wholesale to a ShelfSpace retailer. The six steps below get every settlement landing in your books on its own. If you only need a quick reference, read this section — the rest of the page expands each step in detail.
- In your vendor portal, go to Settings → QuickBooks Online and click Connect to QuickBooks. Authorize on Intuit.
- Pick your Income Account (where settlement revenue posts) and a Bank Account (where settlement checks deposit). Click Save Account.
- Click Manage Customers. For each retailer, verify or pick the right QBO Customer.
- Click Manage Items. Either click Auto-create all in QBO to bootstrap the full catalog, or map items one-by-one (or pick Ignore to roll into a single fallback line).
- If you ran settlements before connecting, click Sync Historical Transactions until the unsynced count is zero (50 per click).
- Done. Future settlements push to your books on their own.
Connect your QuickBooks
Open your vendor portal, then Settings → QuickBooks Online → Connect to QuickBooks. You will be redirected to Intuit, where you authorize ShelfSpace. After authorization you land back on the settings page with a "Connected" badge.
On the same screen, the Income Account dropdown lists every Income or Other Income account from your QBO chart of accounts. Pick the one where settlement revenue should post — typically a "Sales" or "Consignment Revenue" account. The platform tries to pre-select an account whose name contains "sales" or "revenue", but verify the choice.
The Bank Account dropdown is optional but recommended. Pick the bank account where the physical settlement check actually deposits. This routes each PaymentReceived's DepositToAccountRef there, so QBO's bank feed can match the deposit. Leave it blank and payments land in Undeposited Funds for manual matching.
Click Save Account.
Map your customers
Click Manage Customers. You will see one row per ShelfSpace retailer you have settlements with. Each row's QBO Customer column shows either the QBO Customer the platform matched on a prior sync, or empty if no settlement has synced against that retailer yet.
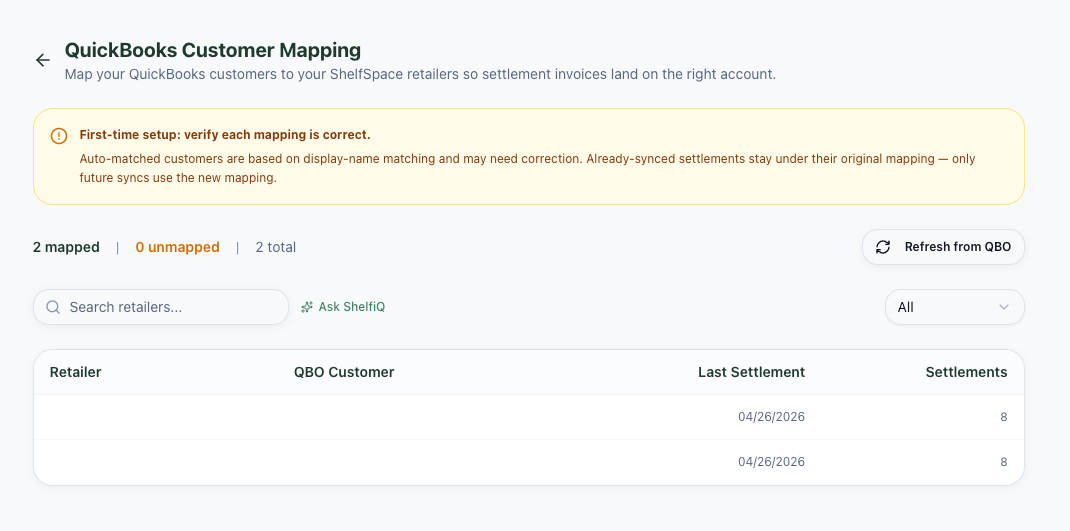
LIKE matching, which can pick the wrong record when two customers have similar names.Name-based matching can pick the wrong record when you have similarly-named entities — for example, "Acme Cannabis" vs. "Acme Wholesale LLC". Pre-mapping a retailer here before the next settlement runs is the cleanest way to guarantee correct attribution.
For each row: click the dropdown (or the Change link if it is already mapped), type to filter your QBO customers, and pick the right one. The mapping saves instantly. If a customer you expect is missing, click Refresh from QBO.
Changing a mapping does not re-link past Invoices. Already-synced settlements stay under whichever customer they were created against. Future syncs use the new mapping.
Map your items (or auto-create them)
Click Manage Items. You will see one row per Metrc product that has appeared on a settlement. Three options per row:
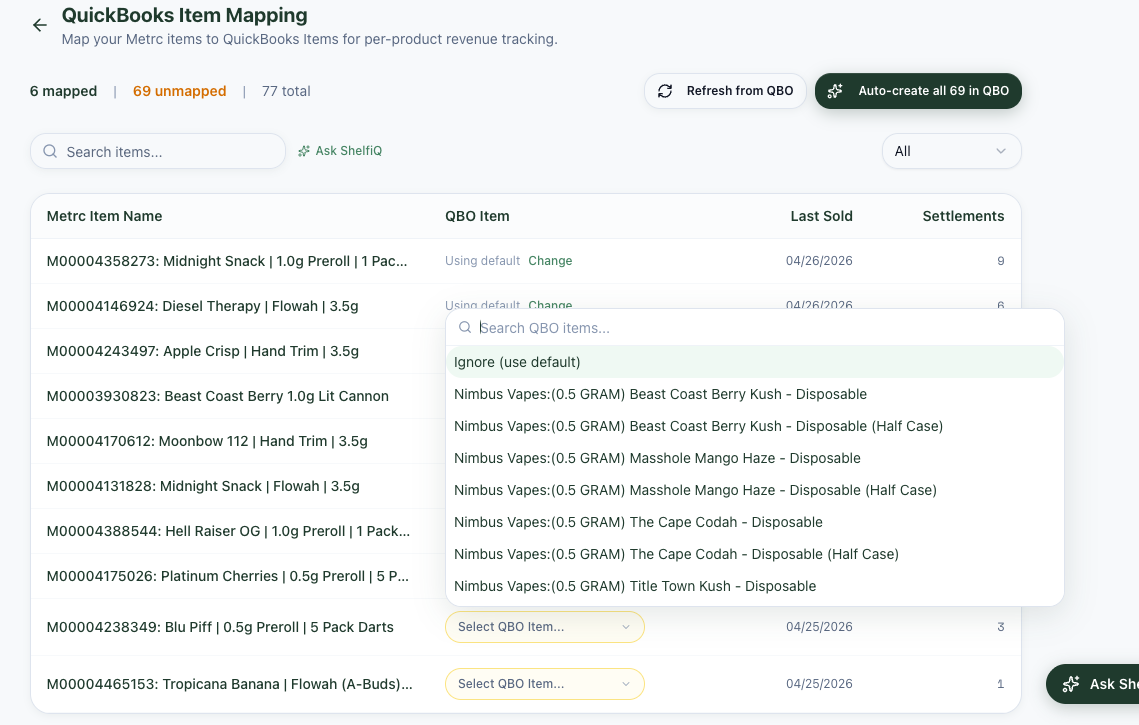
- Map to a specific QBO Item. Click the dropdown, search, and pick. Best for products you want to track individually in QBO sales reports.
- Auto-create all in QBO. Click the green button at the top. The platform creates a
Serviceitem in your QBO for every unmapped Metrc item, named identically to the Metrc item, posting to your Income Account. - Use default (Ignore). Pick Ignore (use default) in the dropdown. The item rolls up into a single fallback line called
ShelfSpace Consignment Sales.
Change any row at any time — even ones already set to "Using default" — by clicking the Change link. New mappings apply to future settlements; past Invoices keep whatever line items they synced with.
Two notes on the dropdown: the QBO catalog uses parent/child item names (e.g. Flower:Indoor:Hybrid), so the full path shows to disambiguate identical leaf names. And Bundle and Category item types are excluded — only Service, Inventory, and NonInventory items appear.
Auto-create Payment toggle (optional)
By default, ShelfSpace pushes a PaymentReceived to QBO as soon as the settlement check is issued — marks the Invoice paid, deposits to the bank account you mapped, and clears your AR aging on its own. That is the right default for vendors who want the integration to be fully hands-off.
If you would rather record deposits yourself (e.g. you reconcile via QBO's bank feed and prefer the manual Receive Payments workflow), turn off the Auto-create Payment in QuickBooks switch on the QuickBooks settings panel. With it off, ShelfSpace pushes only the Invoice for each settlement — no PaymentReceived — and you record the deposit yourself when the bank feed picks up the cleared check.
The toggle is forward-looking. Flipping it off will not undo Payments already pushed for past settlements; flipping it back on later will not auto-backfill the gap (you would click the per-settlement Push Payment button on each one).
Backfill historical settlements
If you connected QBO after already running settlements on ShelfSpace, those past settlements are not yet in your QBO. To push them, go back to Settings → QuickBooks Online and click Sync Historical Transactions. The button processes up to 50 settlements per click. If you have more than 50 unsynced, just click again until the panel shows zero pending.
Each historical settlement creates the same Invoice + PaymentReceived pair that future settlements do. If a settlement's accrual week falls inside a closed QBO period, the platform shifts the TxnDate to today for you (see Troubleshooting below) — you do not need to reopen anything.
What the platform pushes on each settlement
Once setup is complete, you do not need to touch anything. Per settlement:
- The platform creates the Invoice against the retailer (your QBO Customer), with one line per Metrc product (mapped or fallback) plus separate negative-amount lines for returns credit, discount true-up, conversion credit, and the ShelfSpace platform fee. The settlement PDF is attached.
- When the settlement check is generated, the platform creates the matching PaymentReceived (PayType: Check, RefNum: check number, deposit-routed to your bank account) and link it to the Invoice via
LinkedTxn. If you've turned off the Auto-create Payment toggle, this step is skipped — only the Invoice is pushed and you record the deposit yourself. - AR aging clears on its own (when auto-payment is on).
- Both transactions appear in your QBO instantly. The settings page shows recent sync activity with status badges (Synced / Failed / Pending / Skipped).
ShelfSpace-managed line items
The platform creates and caches a few helper QBO Items in your books on first sync. You do not need to create or maintain them:
ShelfSpace Consignment Sales— fallback line for any unmapped or ignored Metrc product.ShelfSpace - Returns Credit— negative-amount line for returns offsets.ShelfSpace - Discount True-Up— negative-amount line for aging, promotional, and operational discount adjustments.ShelfSpace - Conversion Credit— negative-amount line for unit-conversion adjustments.ShelfSpace - Platform Fee— negative-amount line for the ShelfSpace platform fee.
All five post to the Income Account you picked in step 2.
Troubleshooting
- Settlement shows "Failed": click Retry on that row. Most failures recover. Failed rows also retry every 10 minutes on their own.
- "Account Period Closed": the platform handles it — it retries with today's TxnDate. The DocNumber stays as the settlement reference and the check number stays on the PaymentReceived's
PaymentRefNum, so your bank-feed match still works. - Wrong customer on a posted Invoice: open Manage Customers, click Change, and pick the right one. Future settlements use the new mapping. To re-route the existing Invoice, edit it directly in QBO.
- New QBO item or customer not in the dropdown: click Refresh from QBO.
- Connection expired banner: click Reconnect to QuickBooks. QBO refresh tokens expire after 100 days of inactivity. Reconnecting takes 10 seconds and resumes everything.
- You deleted the Invoice in QBO directly: click Re-sync to QBO on that settlement. ShelfSpace detects the deleted Invoice and pushes a fresh one. Caveat: if you had already linked a check Payment in QBO for that settlement, deleting the Invoice does not auto-delete the Payment — you'll have an orphan unapplied Payment in QBO that you'll need to delete or re-apply manually.
Need help with setup?
Email Chris at chris@shelfspace.pro, or message ShelfiQ at shelfiq@inbound.shelfspace.pro — ShelfiQ has full context on your account and can answer most "where do I see X" or "why did Y happen" questions instantly. The deeper version of this guide, with extra context for prospects, is in our blog post Cannabis Vendor QuickBooks Setup: A Step-by-Step Guide.