At a Glance
- Step-by-step receiving SOP for your dispensary's inventory team
- Click Receive, upload the signed invoice and Metrc manifest, confirm each line, confirm the total
- Adjust quantities for short, damaged, or non-compliant items — what you receive is what gets paid
- Every action is logged and visible in the vendor's portal — no shadow communication
- Inventory clerks don't touch financials; the role ends at the Received tab
Who this SOP is for
This is the receiving playbook for the person on your team who physically takes possession of cannabis deliveries at the dock — counts the boxes, signs the manifest, and puts product on shelves. In ShelfSpace, that person logs in under the Retailer Inventory role, which a retailer admin creates from My Account → Team. The role can see deliveries and mark them received, but cannot see payment amounts, run checks, or change AP settings. Receiving is the entire job.
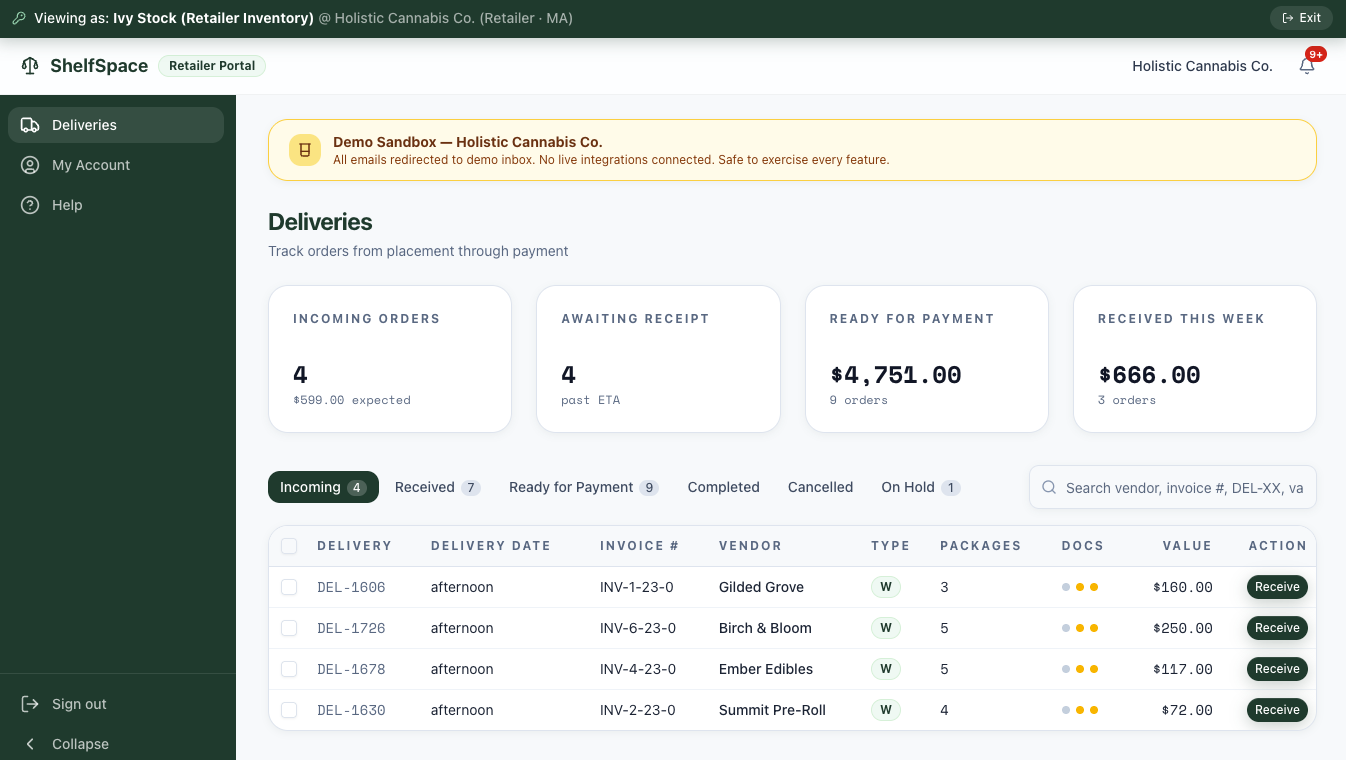
When you log in, the dashboard opens straight to Deliveries. Six tabs run across the top — Incoming, Received, Ready for Payment, Completed, Cancelled, On Hold — but the only one you act on is Incoming. The rest are visible so you can confirm a delivery moved forward after you signed it off.
Where deliveries come from
By the time a truck pulls up to your dock, the delivery already exists in your Incoming tab. There are two ways it got there:
- Your buyer or GM uploaded the vendor's invoice PDF on the Deliveries page, which ShelfiQ parses into a structured delivery record.
- Your buyer forwarded the vendor's invoice email to your store's ShelfiQ AP inbox. ShelfiQ reads the attachment, identifies the vendor, and creates the delivery without anyone clicking through. See Manage Cannabis Deliveries by Email for that flow.
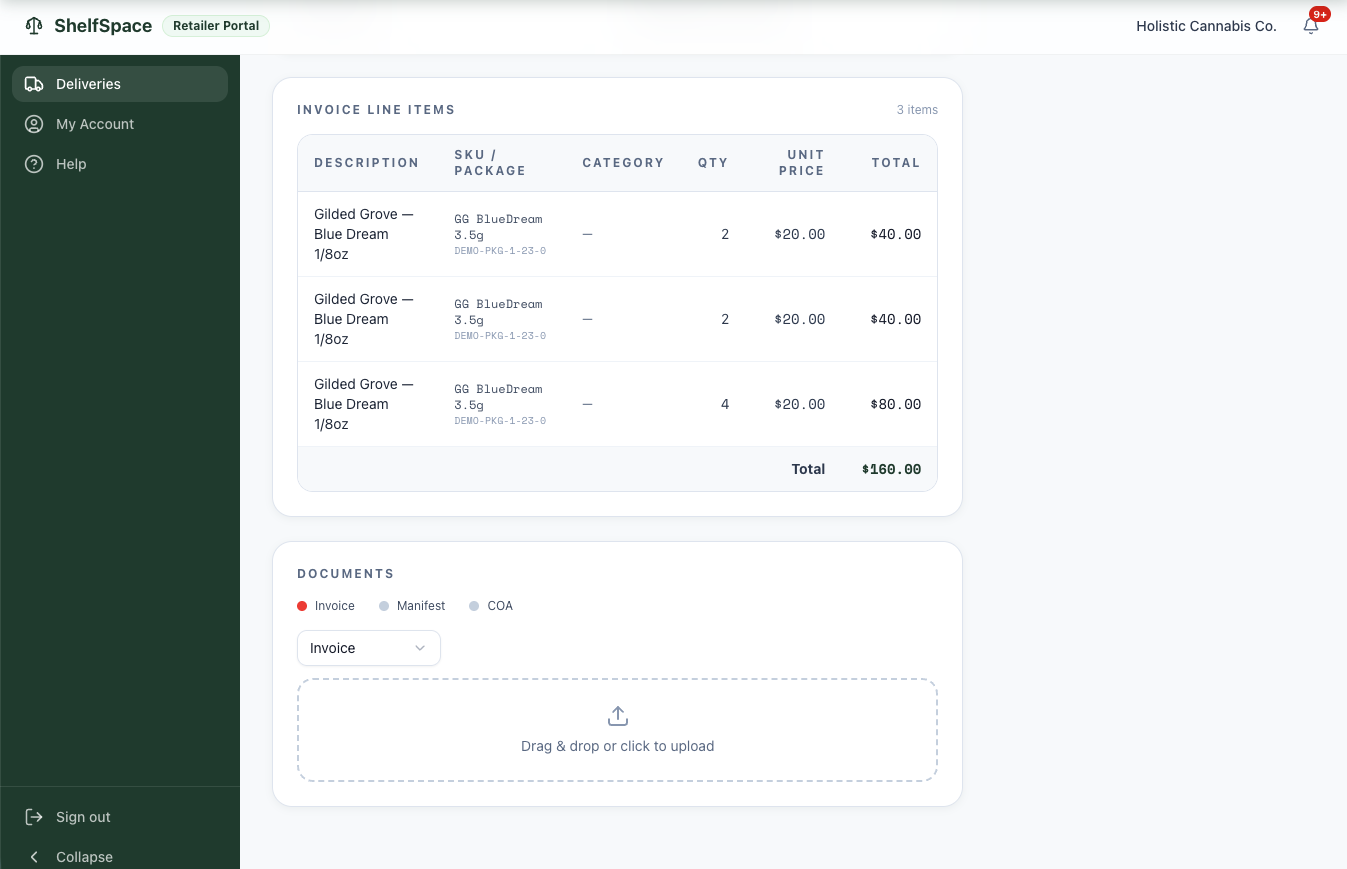
Either path produces the same thing: a delivery with the vendor name, invoice number, expected package count, line items, and dollar total — all pre-populated before product hits the floor.
The receiving dashboard
The Incoming tab is your daily worklist. Four stat cards across the top show what's on deck and what's flowing through behind you.
Open a delivery
Let's walk through receiving a Gilded Grove delivery — invoice INV-1-23-0, 3 packages, $160.00. Clicking the row opens the delivery detail page.
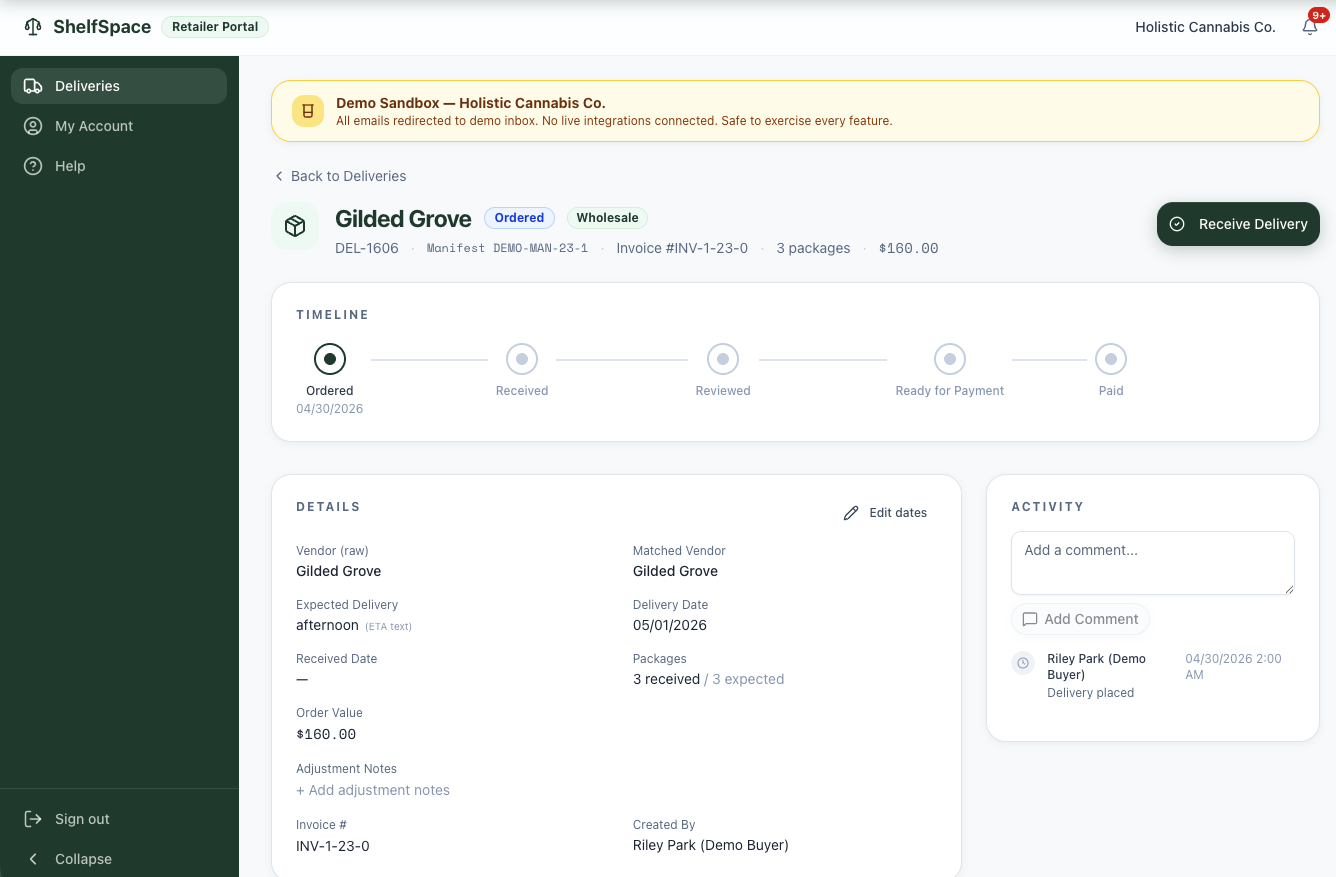
Verify the vendor name and invoice number match the paper invoice in your hand. When the physical delivery is sitting in front of you and the boxes look like they match what's on the screen, click the Receive Delivery button in the top right to start the three-step receive flow.
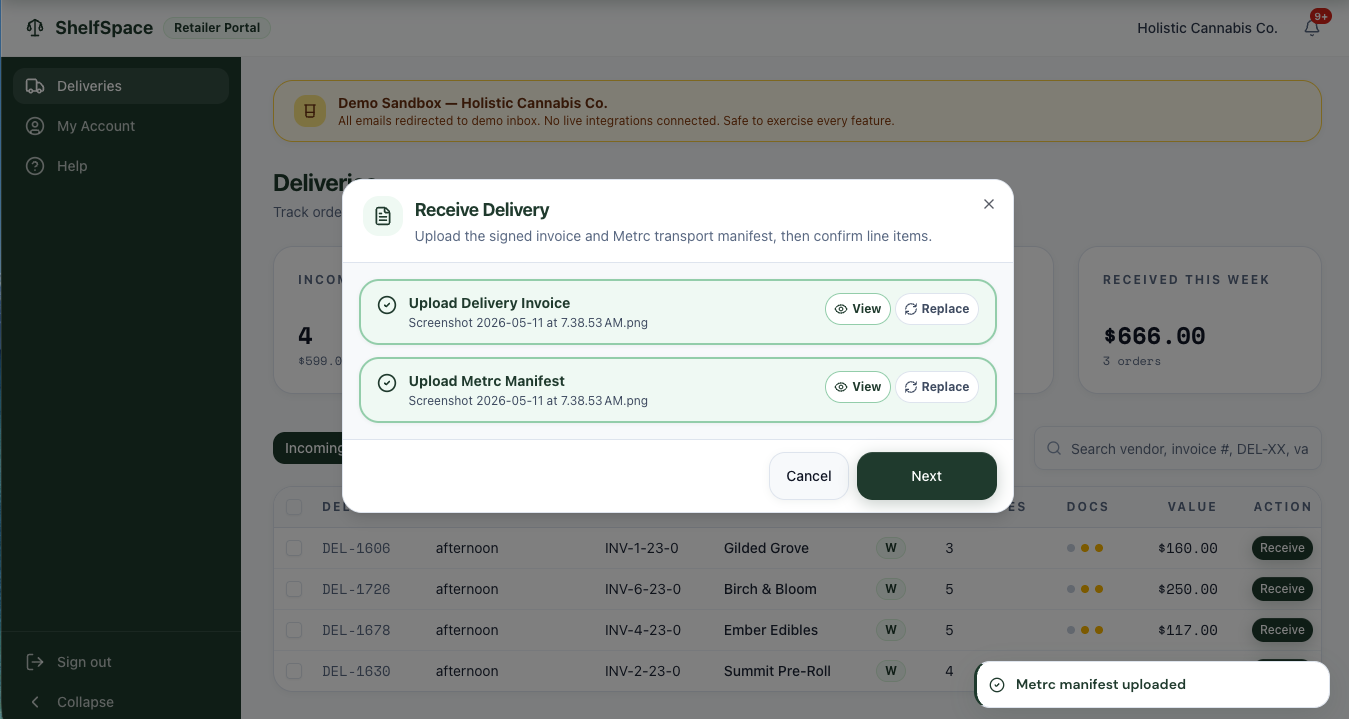
Step 1 — Upload the signed invoice and Metrc manifest
The first step of receiving is attaching the two pieces of physical evidence that came with the truck.
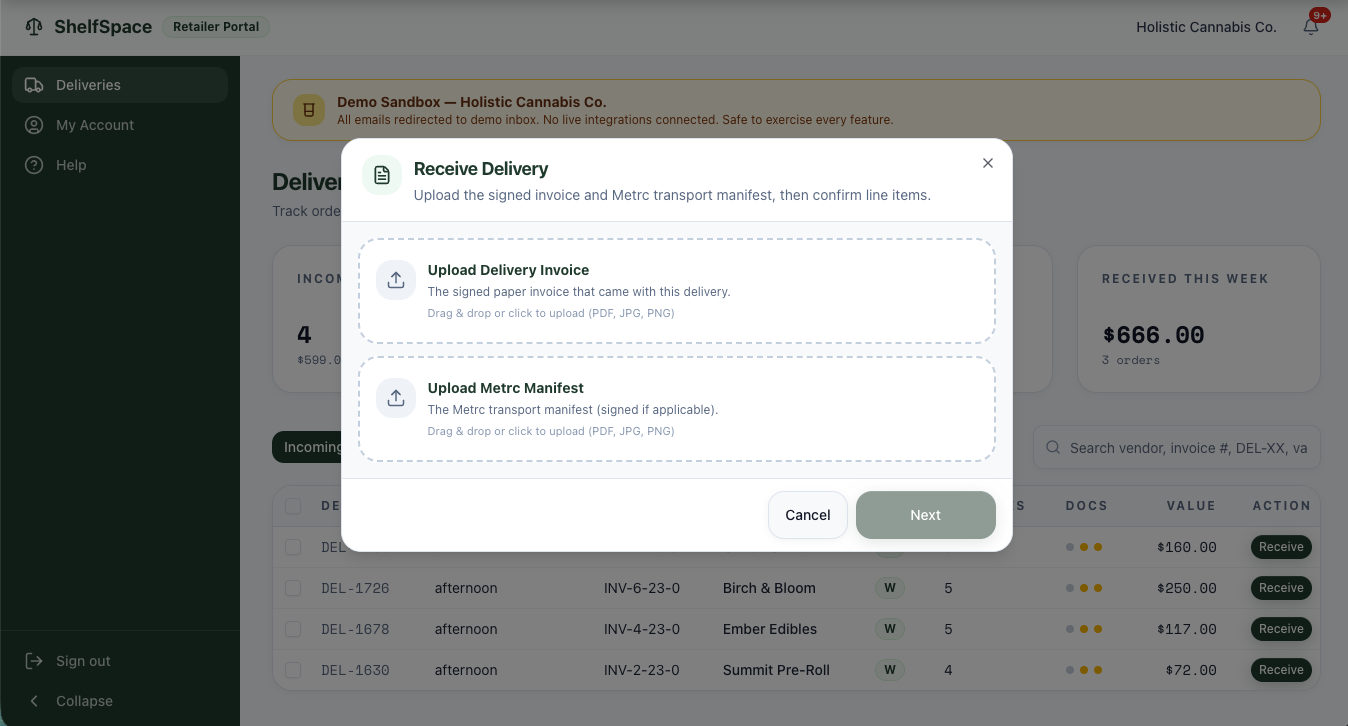
Both documents are required, and both matter:
- The signed paper invoice is your contemporaneous record of what the vendor delivered and what your team signed for. If anything is disputed later — a wrong quantity, a missing line, a pricing mismatch — this is the document of truth.
- The Metrc transport manifest is a regulatory requirement in every track-and-trace state. Keeping it on the delivery record means it's findable for a compliance audit or a state inspection without anyone digging through a file cabinet — and it ties the physical chain-of-custody to your digital record of receipt.
Step 2 — Confirm what physically arrived
This is the single most important step in the entire SOP. The screen now shows every line item from the vendor's invoice, side-by-side with a disposition picker and a received-quantity field.
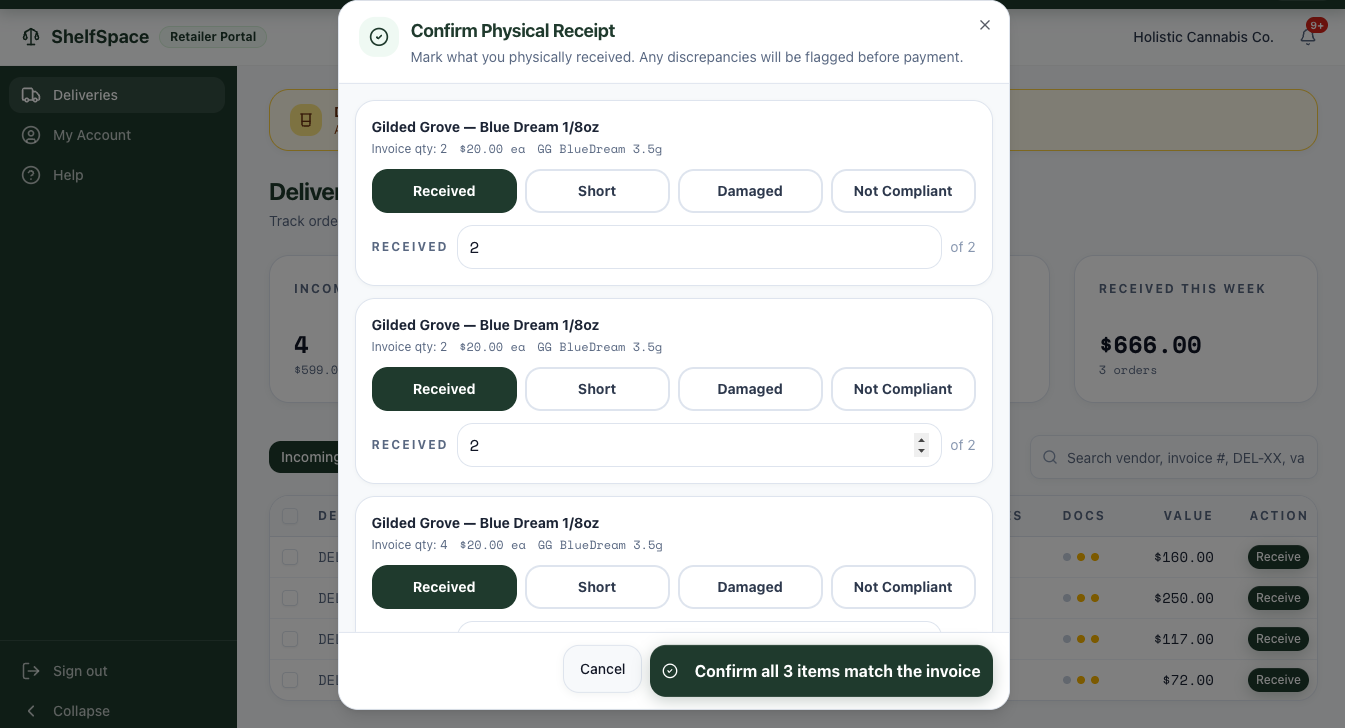
For every line, mark exactly what happened:
- Received — the exact invoiced quantity arrived in good condition. Default state.
- Short — fewer units arrived than were invoiced. Drop the received quantity to what you actually counted.
- Damaged — units arrived broken, leaking, melted, or otherwise unsellable. Drop the quantity to good units only.
- Not Compliant — anything that fails compliance: mislabeled, wrong batch, COA mismatch, suspected contamination. Quarantine the affected product and return it to the vendor with the driver if possible.
Anything you mark other than Received opens a notes field. Write what happened and what you did with the product — for example, "two jars shattered in transit, returned to driver, photo taken with shift manager." Detailed notes here are gold during a vendor dispute, an audit, or a compliance review.
Adjustments flow straight to the dollar total. If you mark 2 of 8 units as Short, the invoice you'll pay drops by those 2 units' worth. This is how the platform prevents overpayment — paying for product you never actually got on shelf and would later have to destroy in Metrc anyway, which creates both a financial loss and a compliance footprint. Catching shorts at the dock is the only place to catch them cleanly.
If you mark any line Short on a delivery that's linked to Metrc packages, the dialog shows one extra checkbox: Push corrected quantities to Metrc. Leave it checked and the platform reduces the matching Metrc package quantities to what you actually received — a compliance change to your Metrc records, handled for you. Uncheck it to skip and adjust those packages in Metrc yourself. Short quantities write automatically; damaged units that need a waste-weight entry you still handle in Metrc. The checkbox only appears when there's a short line and the delivery has linked Metrc packages.
When the Metrc manifest doesn't match
When you open a delivery for review, the platform shows a manifest verdict comparing the invoice lines to the Metrc transfer. Most read reconciled or match and need nothing from you. Two are worth a look:
- Review — the Metrc transfer includes a package the invoice never billed. On a cannabis wholesale delivery, the review screen shows a Shipped but not on the invoice panel listing those packages, each with an Add free ($0) button. Adding one records the package as free / unbilled so your records reconcile with Metrc — it does not pay for it. If the item should actually be billed, use Ask the vendor to request a corrected invoice instead. The vendor is emailed either way.
- Unreconciled — the package count or dollar total doesn't line up. Re-attach a corrected invoice, short-pay the difference, or ask the vendor, depending on what's off.
Consignment self-heals. If a consignment delivery's Metrc transfer hasn't synced by the time you mark it complete, you don't have to match it by hand. The platform watches for a single unambiguous transfer from that vendor within a 21-day window and designates the delivery automatically, usually within a day — and escalates to you if one stays undesignated for more than a couple of days.
Step 3 — Confirm the signed invoice total
The last step is a single sanity check. ShelfSpace shows you the dollar total it will hand to the AP team — either the original invoice amount, or the reduced amount after your Step 2 adjustments.
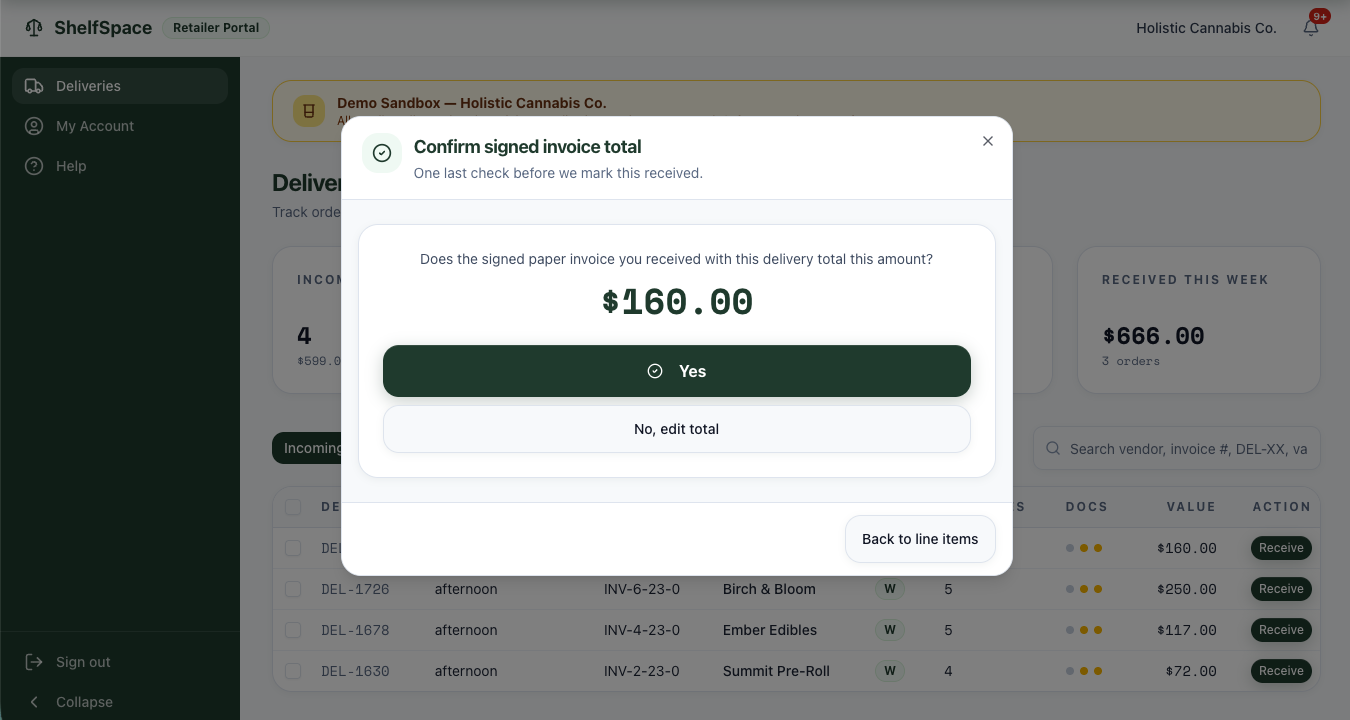
Click Yes if the screen total matches the signed paper invoice. The delivery flips to Received, and your role on this delivery is done.
Click No, edit total if there's still a mismatch — for example, the vendor's printed total is wrong, or there's a discount or promo on the paper invoice we didn't catch upstream. You can edit the total directly, or step back to line items to fix dispositions you may have missed.
After you receive
Once you confirm the total, the delivery leaves the Incoming tab and lands in Received.
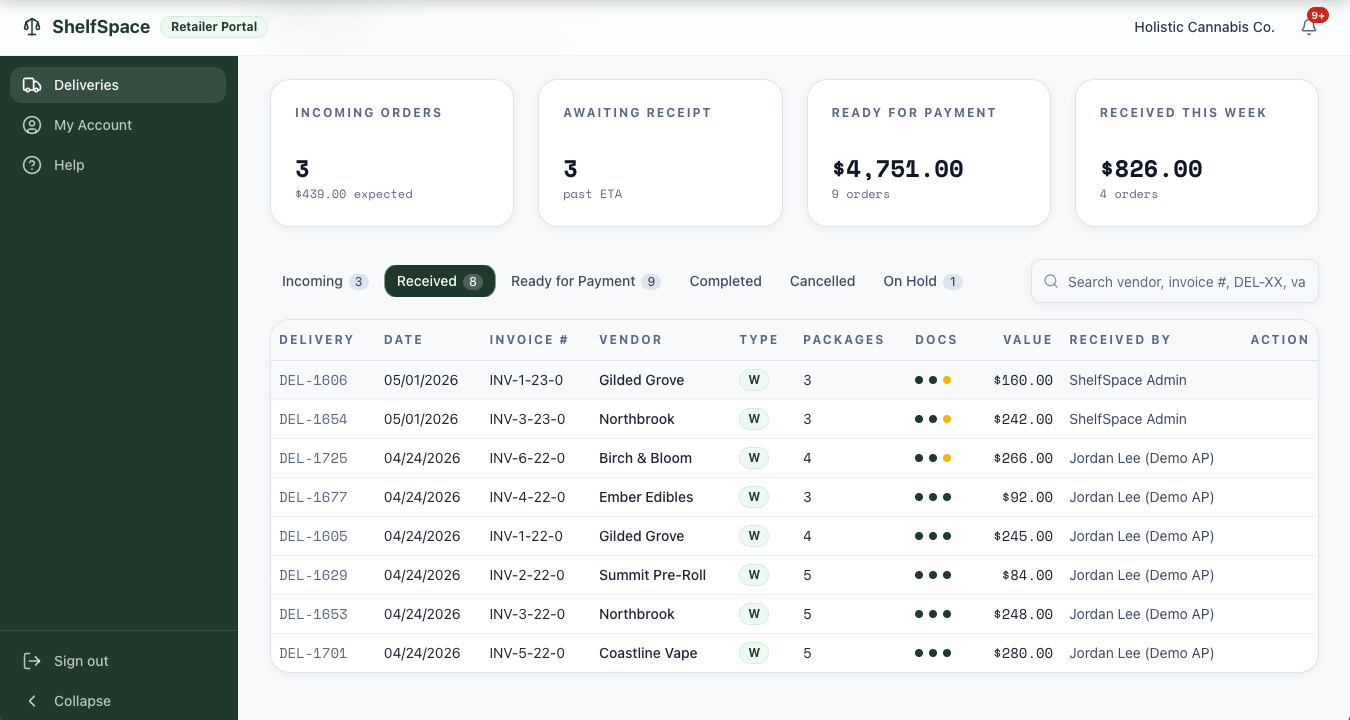
From this point, the delivery is out of your hands. The next stops are review and approval for payment, handled by your store's AP person on the platform — see Accounts Payable for how AP runs end-to-end. They re-verify the line items against the manifest, lift any holds, and approve the delivery for payment. Once approved, the delivery moves to Ready for Payment, then a check is generated and it lands in Paid and eventually Completed. See Delivery Reconciliation for what happens during the review step.
Why this process matters
Three reasons this SOP earns its keep on every single delivery:
- No overpaying vendors. Every short, damaged, or non-compliant adjustment is subtracted from what gets paid out to the vendor. You don't pay for product that never reached your shelf. See a real case study of a shorted delivery caught at the dock.
- Regulatory traceability. The signed invoice, the Metrc manifest, the per-line dispositions, the receiver's name, and the timestamp are all kept on one record — exactly what state inspectors and auditors ask for, in one place, instantly searchable.
- Vendor trust, with receipts. Adjustments flow to the vendor's invoice total on their statement; your detailed notes stay on the delivery record for the follow-up conversation. No surprise short-payments, no email back-and-forth two weeks later, no disputed credit memos two months later. Disagreements happen against a shared record, not against memory.
Receiving is the gate. Everything downstream — AP review, payment, Metrc reconciliation, credit memos, compliance reporting — depends on what gets logged here being accurate. Time well spent.