ShelfSpace Live guide

Step-by-step guide

ShelfSpace Retailer Guide

How to run vendor payments, deliveries, and settlements -- one screen at a time.

Getting Started

Start here. This chapter gets everyone -- owner, buyer, or bookkeeper -- signed in and oriented before the role-specific chapters below.

Sign in and get your bearings

You reach ShelfSpace at ourshelf.space and sign in with your work email and password. For security, we send a one-time code to your email to confirm it's you before you're in. Once you're in, the dashboard is your home screen.

1

Your dashboard at a glance

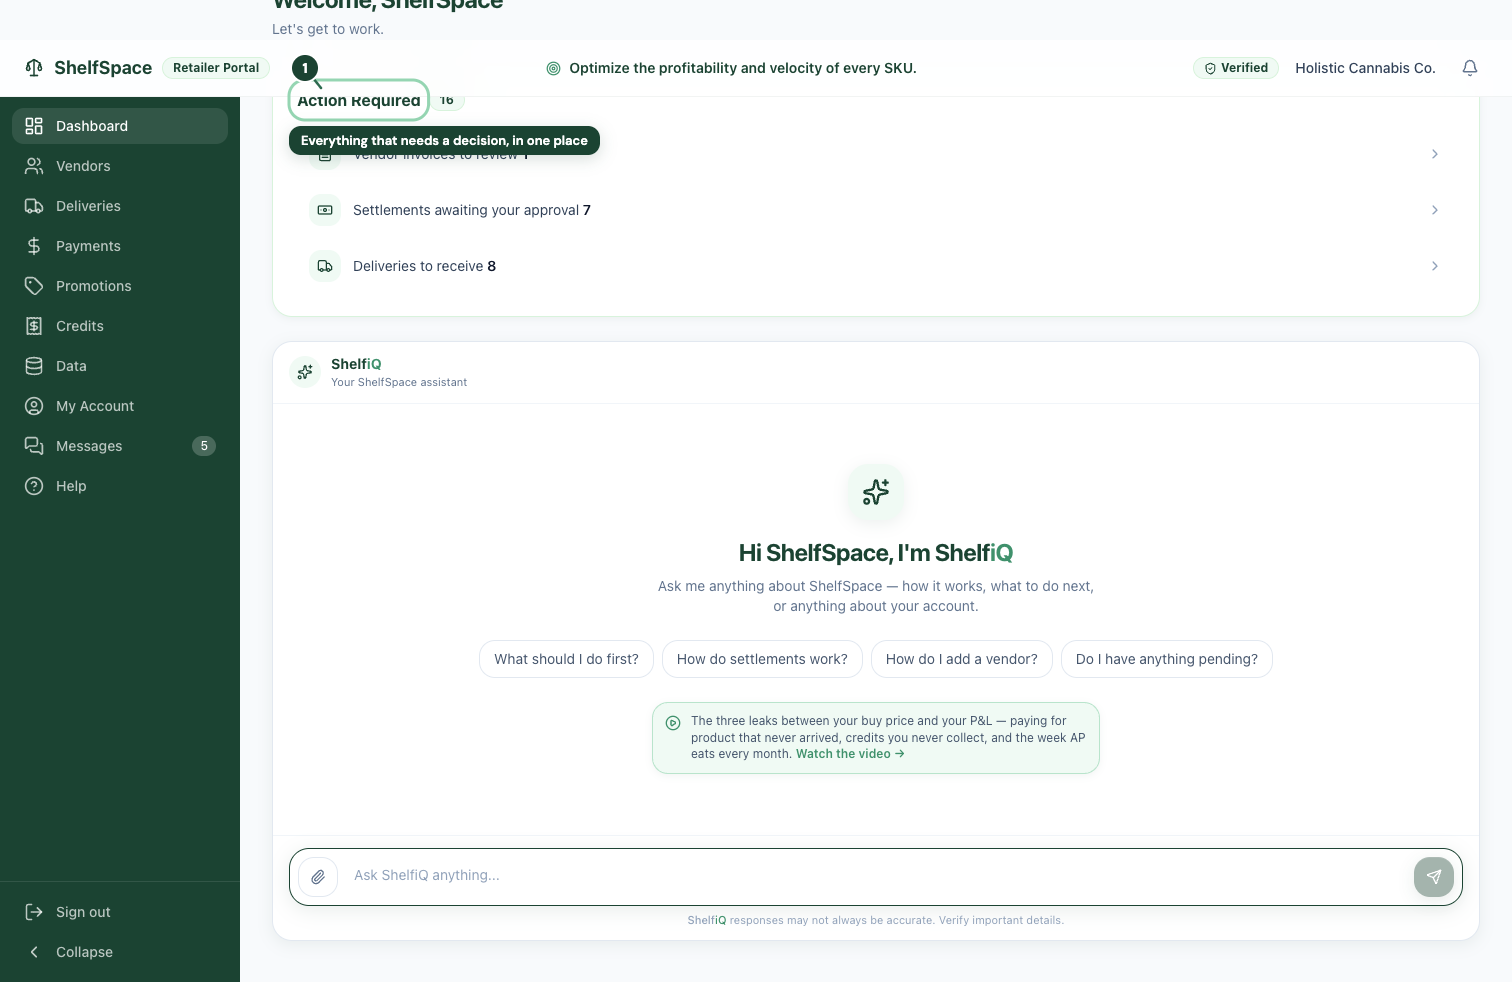
Everything that needs a decision, in one place
1Everything that needs a decision, in one place
The dashboard is your morning check-in. It lists deliveries waiting to be received, vendor bills to review, and settlements waiting for your approval -- so you can see what needs a decision without hunting for it. Handle the items here, or use the green sidebar to jump straight to any screen.
2

Find your way around

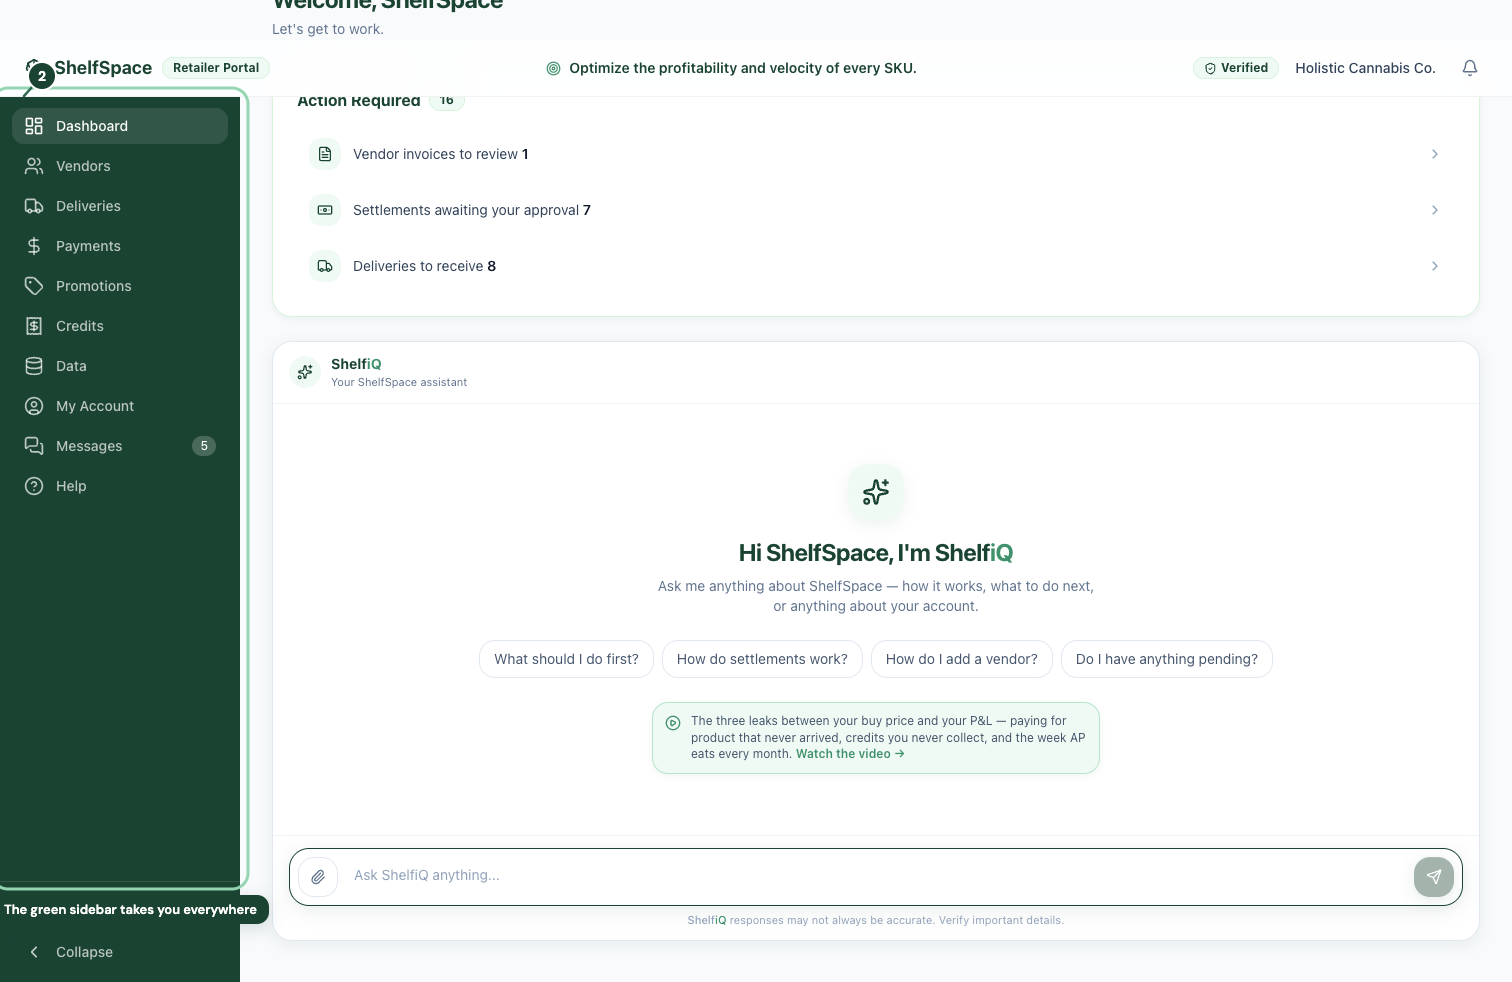
The green sidebar takes you everywhere
2The green sidebar takes you everywhere
Every screen is one click away in the green sidebar on the left. Vendors is where you manage the brands you carry, Deliveries is where you receive incoming product, Payments is where you review and send what you owe, and My Account holds your banking, business details, and team. The sidebar stays with you on every screen, so you never have to hunt for a page.

Set up your account

A few things are worth doing once, up front: add the bank account you'll pay from, complete your W-9 and resale certificate, and add the people on your team. Everything else can wait until you need it.

3

Your account, all in one place

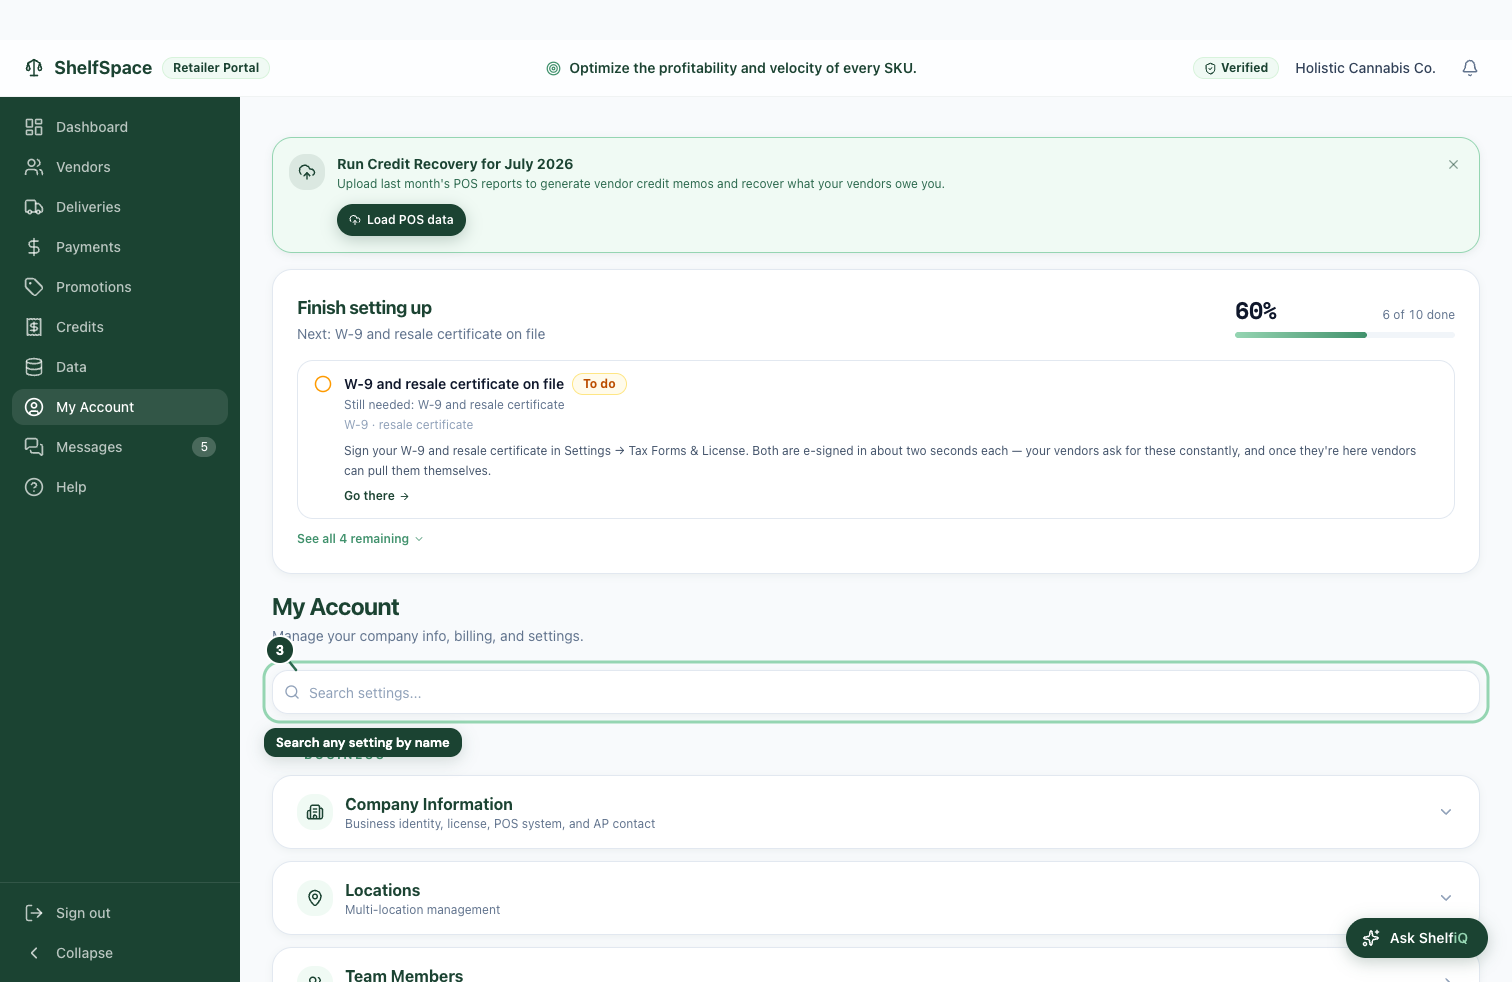
Search any setting by name
3Search any setting by name
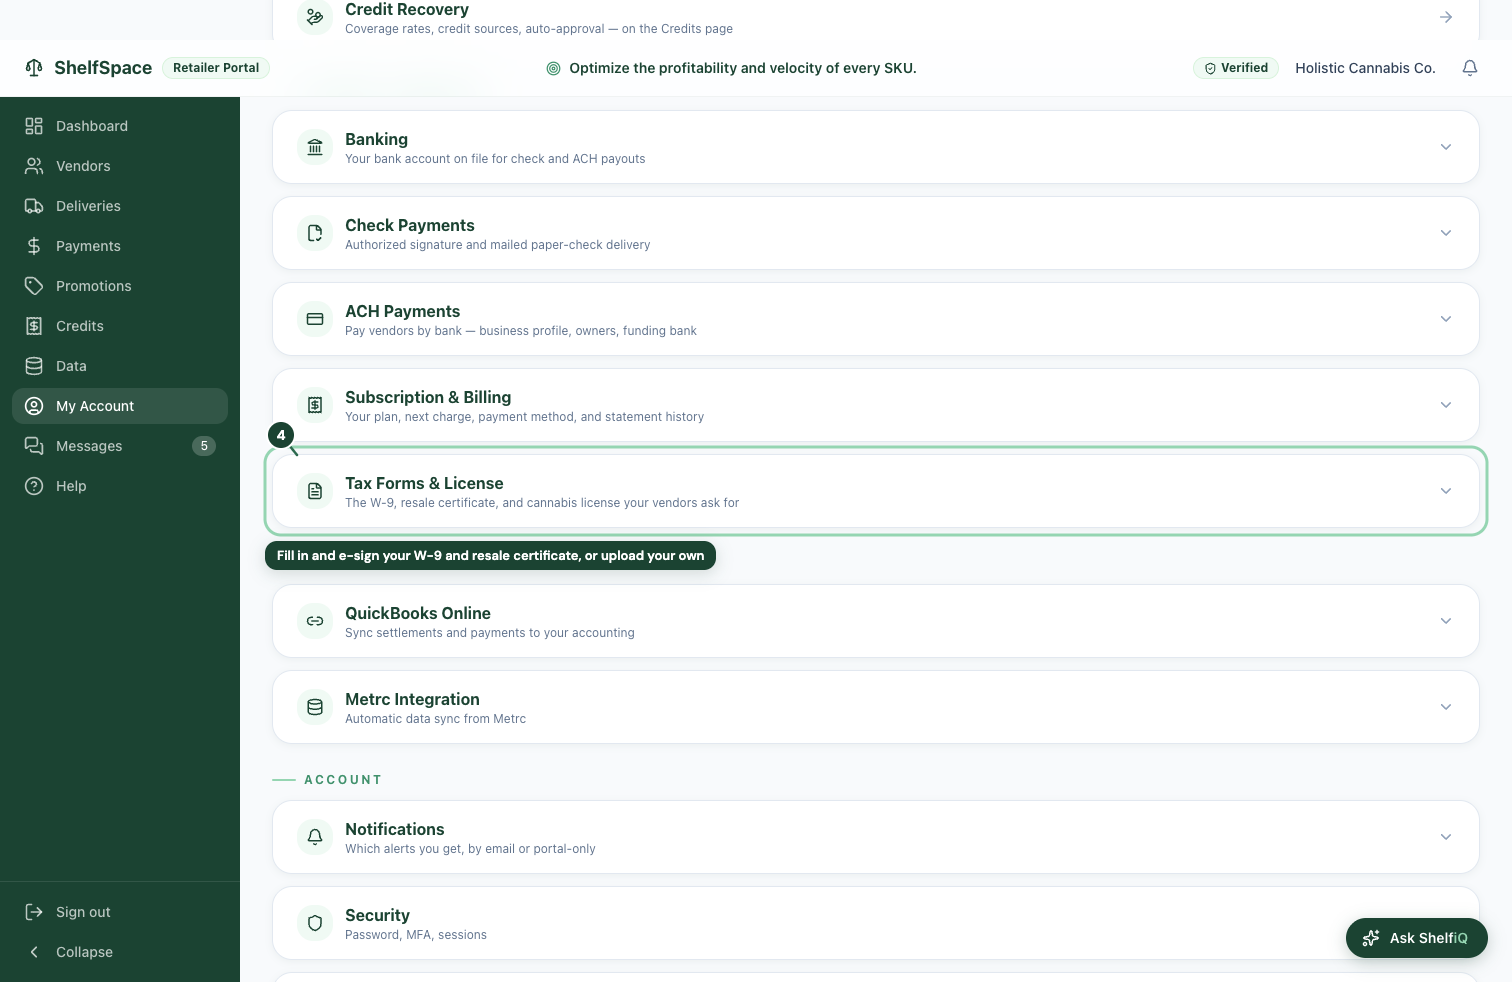
Set up your account here before your first payment run. This is where you add the bank account your vendor checks and bank transfers draw from, your business details and license, and your QuickBooks connection if you keep your books there. It's also where you complete your W-9 and resale certificate under Tax Forms & License -- fill them in and e-sign, or upload your own, so you're cleared to pay vendors and buy for resale. Type in the search box to jump straight to any setting -- you only have to do this once.
4

Complete your W-9 and resale certificate

Fill in and e-sign your W-9 and resale certificate, or upload your own
4Fill in and e-sign your W-9 and resale certificate, or upload your own
Do this once, up front. Open Tax Forms & License to complete your W-9 and resale certificate -- fill them in and e-sign right here, or upload your own copies. Your vendors ask for both before they can pay you or sell to you tax-free, so getting them on file now clears the way for everything downstream. Your cannabis license lives here too.
5

Invite your team

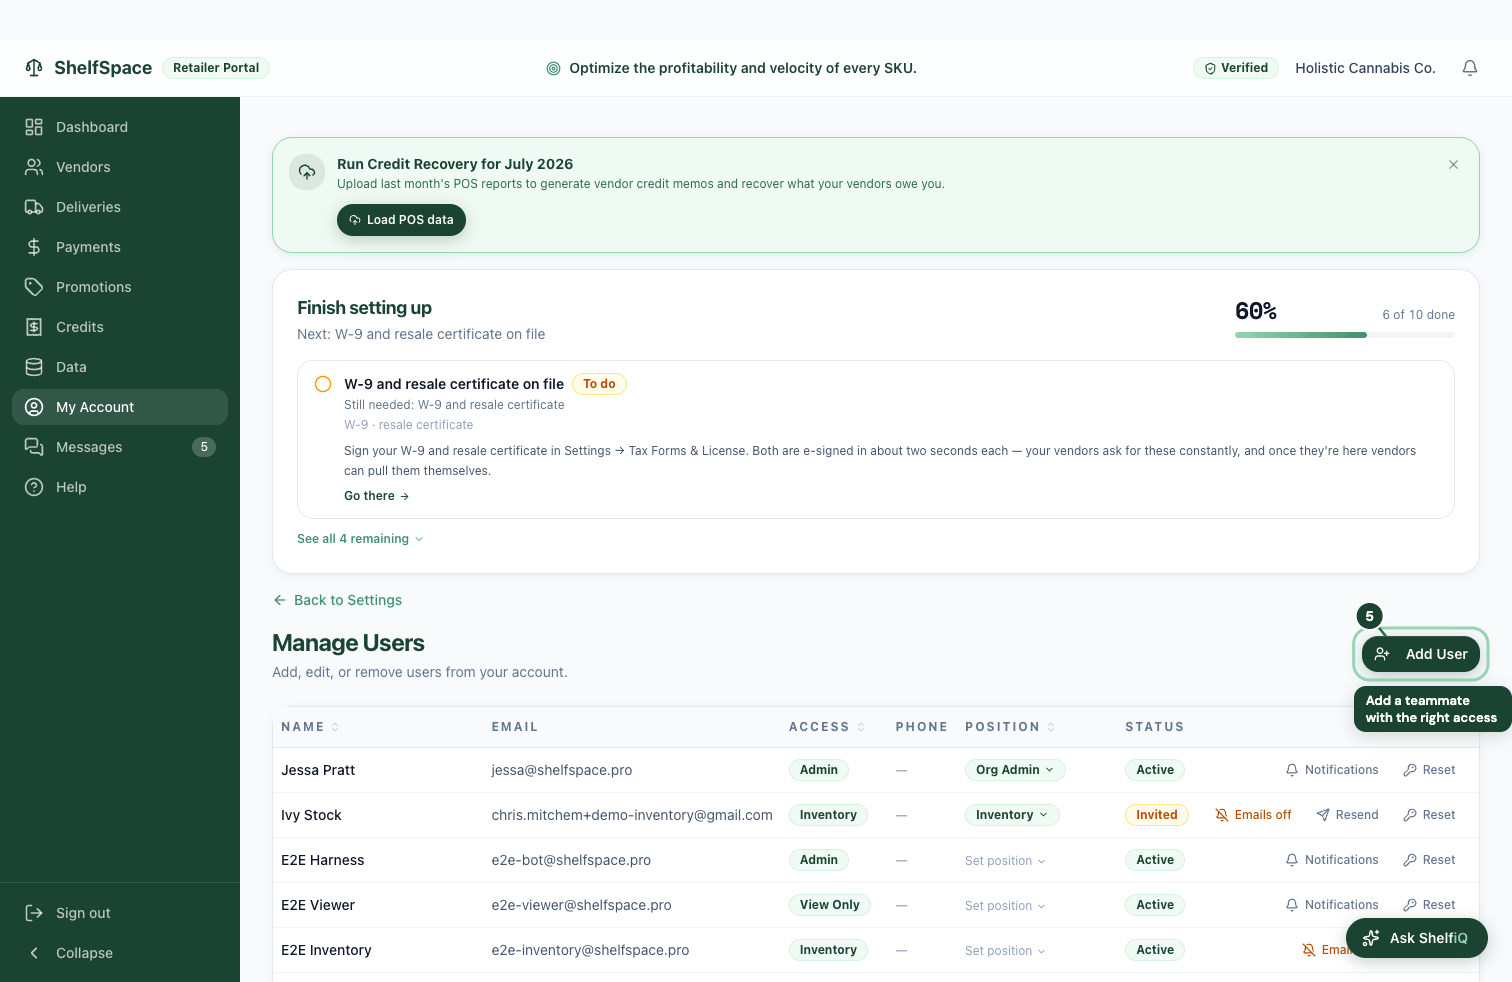
Add a teammate with the right access
5Add a teammate with the right access
Add the people who work alongside you from here. Click Add User, enter their email, and pick what they do -- their access follows automatically, so a bookkeeper sees the books and an inventory lead sees deliveries without seeing payouts. Each person gets an email invite to set their own password, and you can change or remove access any time.

Get help when you need it

Stuck on something? Help is one click away, and a real person answers.

6

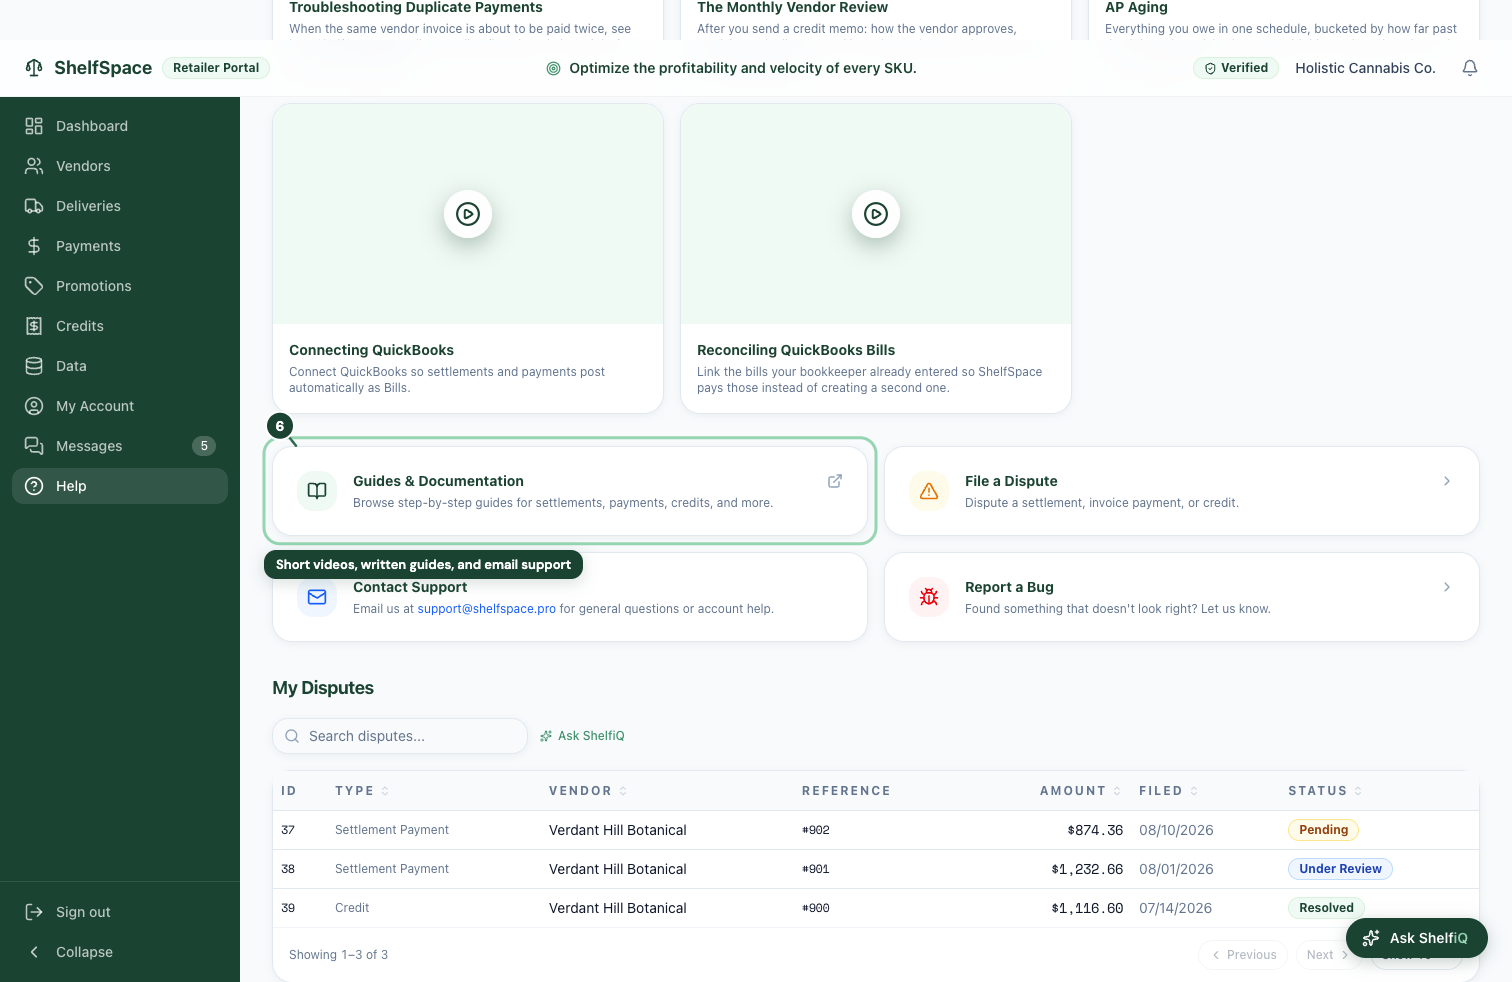
Guides, videos, and a real person

Short videos, written guides, and email support
6Short videos, written guides, and email support
Get unstuck without leaving the app. The Help page opens with short video walkthroughs and links to step-by-step written guides. If something looks wrong, email support@shelfspace.pro and a person will answer -- or file a dispute right here when a payment or credit doesn't look right. Start with the videos; most questions are a two-minute watch.

Owner & Manager

This chapter is for the owner or general manager -- anyone who runs the whole account. You have full access: manage every vendor, set the terms you pay on, review and approve each payout, and see where your money is going. Everything below is one screen at a time.

Manage your vendors

Every brand you carry lives in one list, and each vendor has its own workspace with everything about them in one place.

7

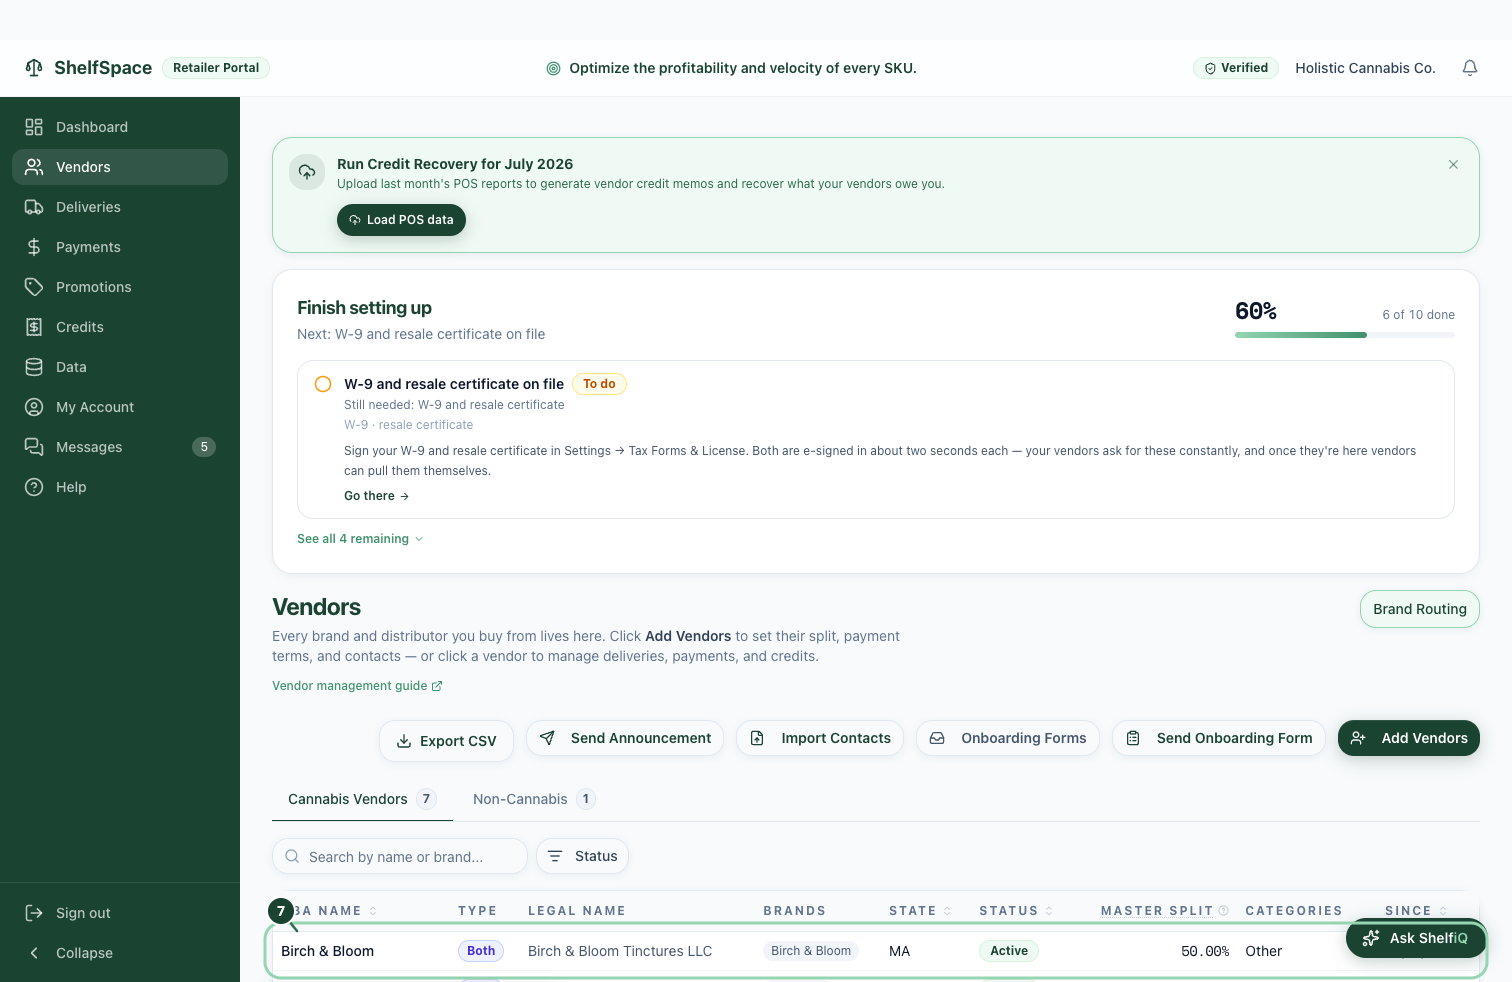
Every vendor in one list

Click any vendor to open its full workspace
7Click any vendor to open its full workspace
This is every vendor you carry. Each row shows the vendor, how you work with them -- on consignment, wholesale, or both -- and their current split. Click any row to open that vendor's workspace, or use the search box to find one fast. New vendors show up here automatically the first time their product lands in a delivery, so the list stays current on its own.
8

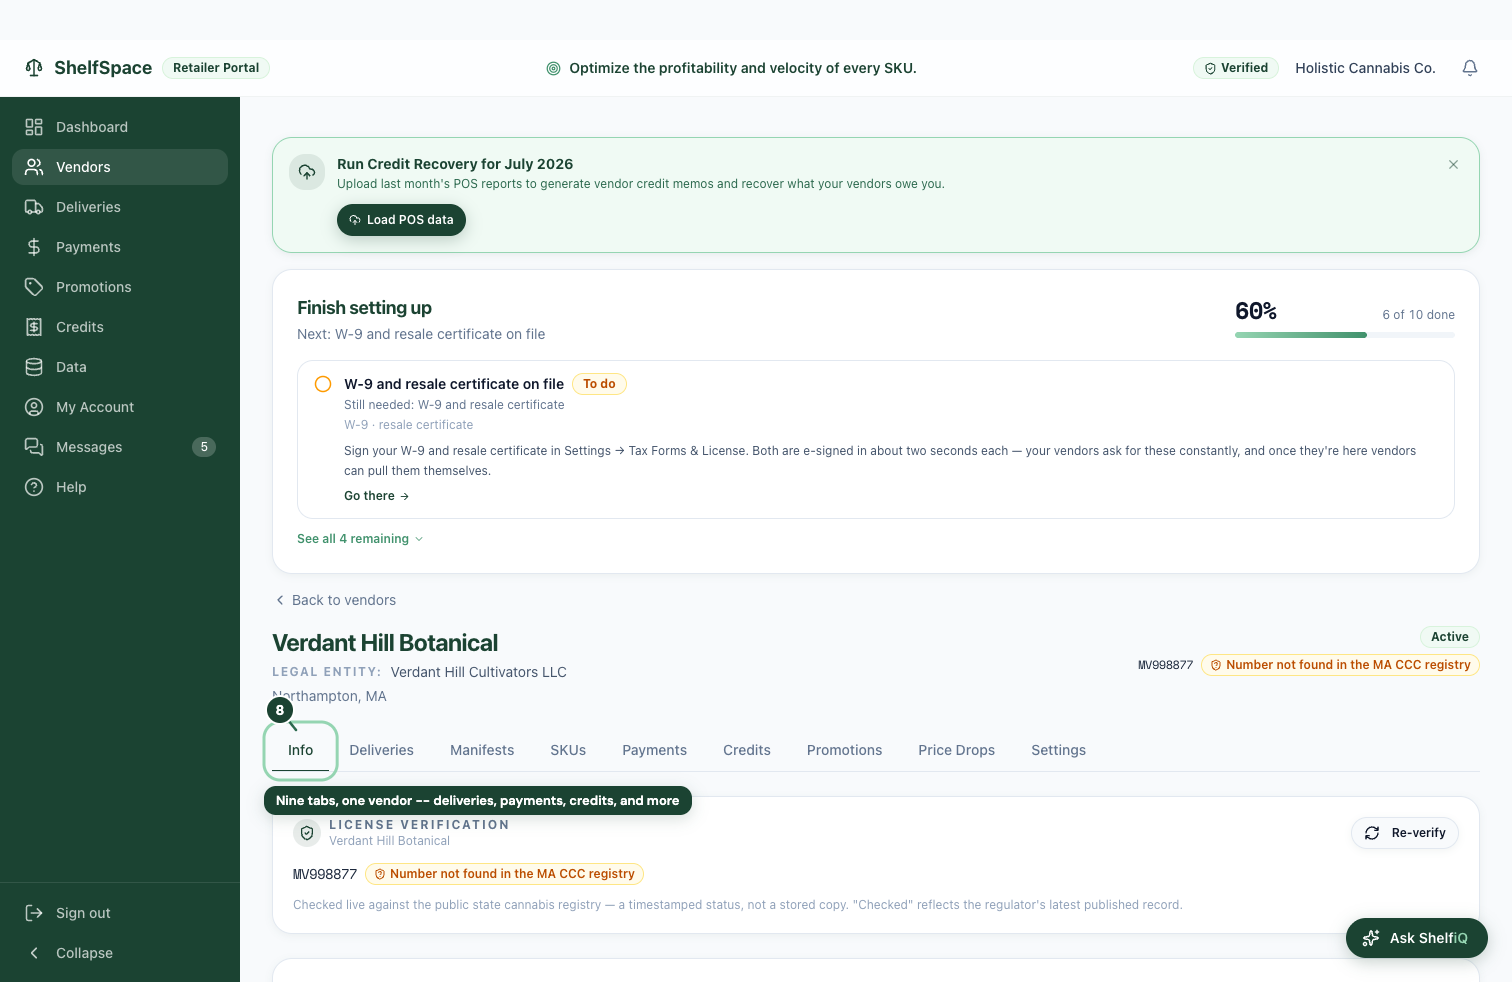
One workspace per vendor

Nine tabs, one vendor -- deliveries, payments, credits, and more
8Nine tabs, one vendor -- deliveries, payments, credits, and more
Everything about one vendor lives here, split across tabs. Info is their contact and license details, Deliveries and Manifests are what they've shipped you, SKUs is the product they carry, Payments and Credits are the money side, Promotions and Price Drops are markdown offers, and Settings is where you set your terms. Switch tabs across the top -- you never leave the vendor to see any part of the relationship.

Set your terms

You decide the terms you pay each vendor on -- splits, spending caps, and payment timing -- and changes take effect right away. There's no back-and-forth to wait on.

9

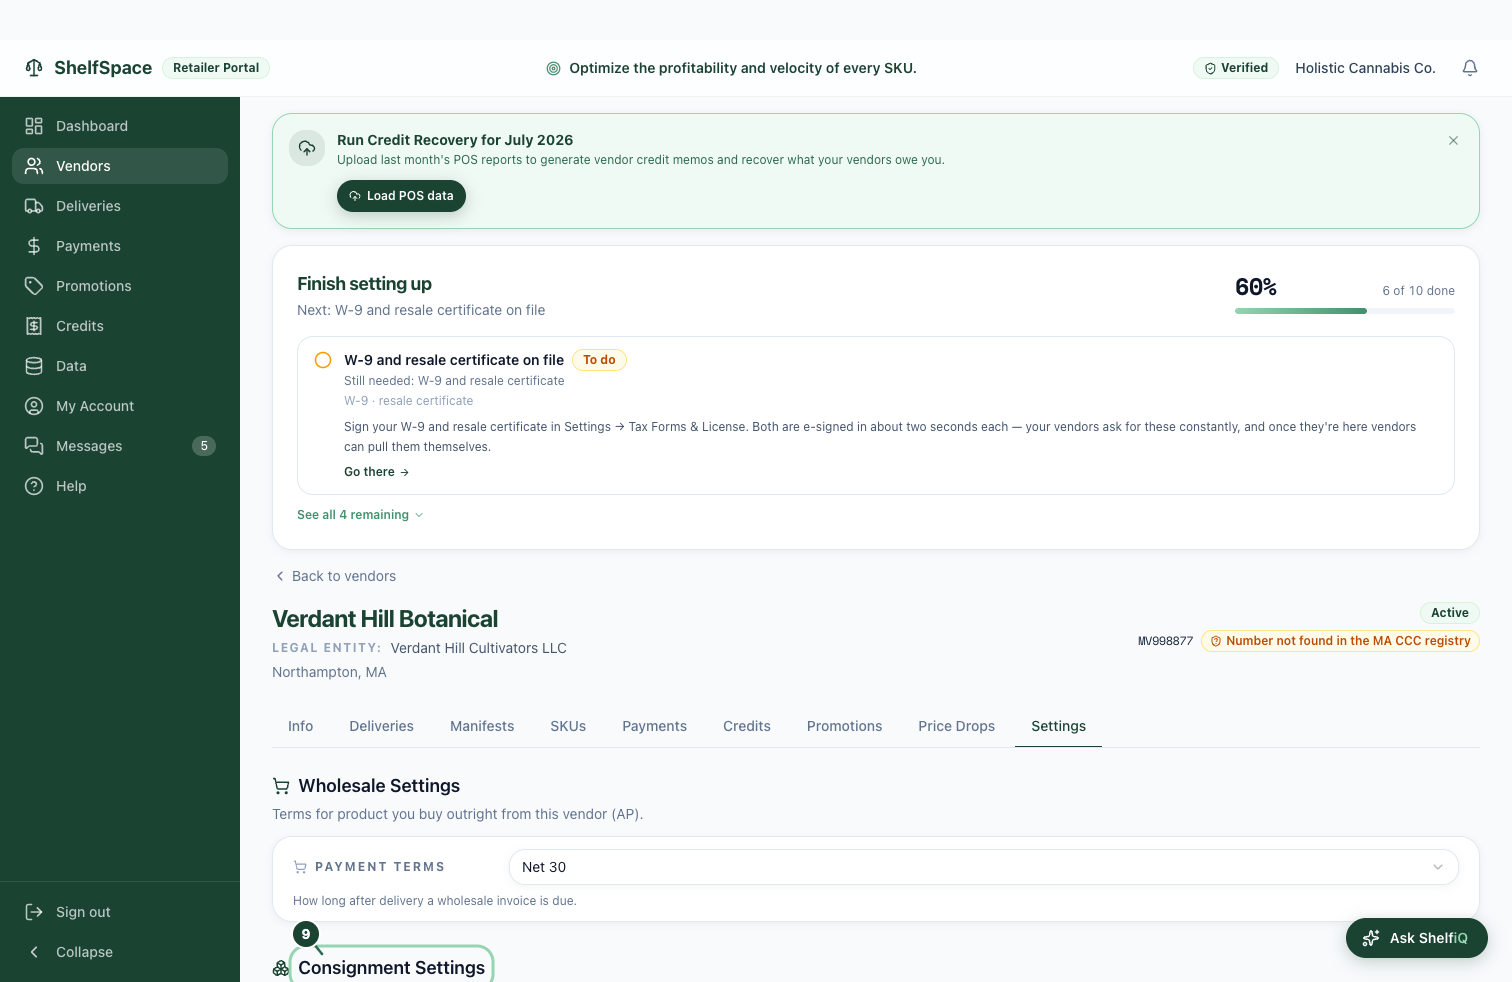
Set splits, caps, and payment terms

Your terms, set by you, effective immediately
9Your terms, set by you, effective immediately
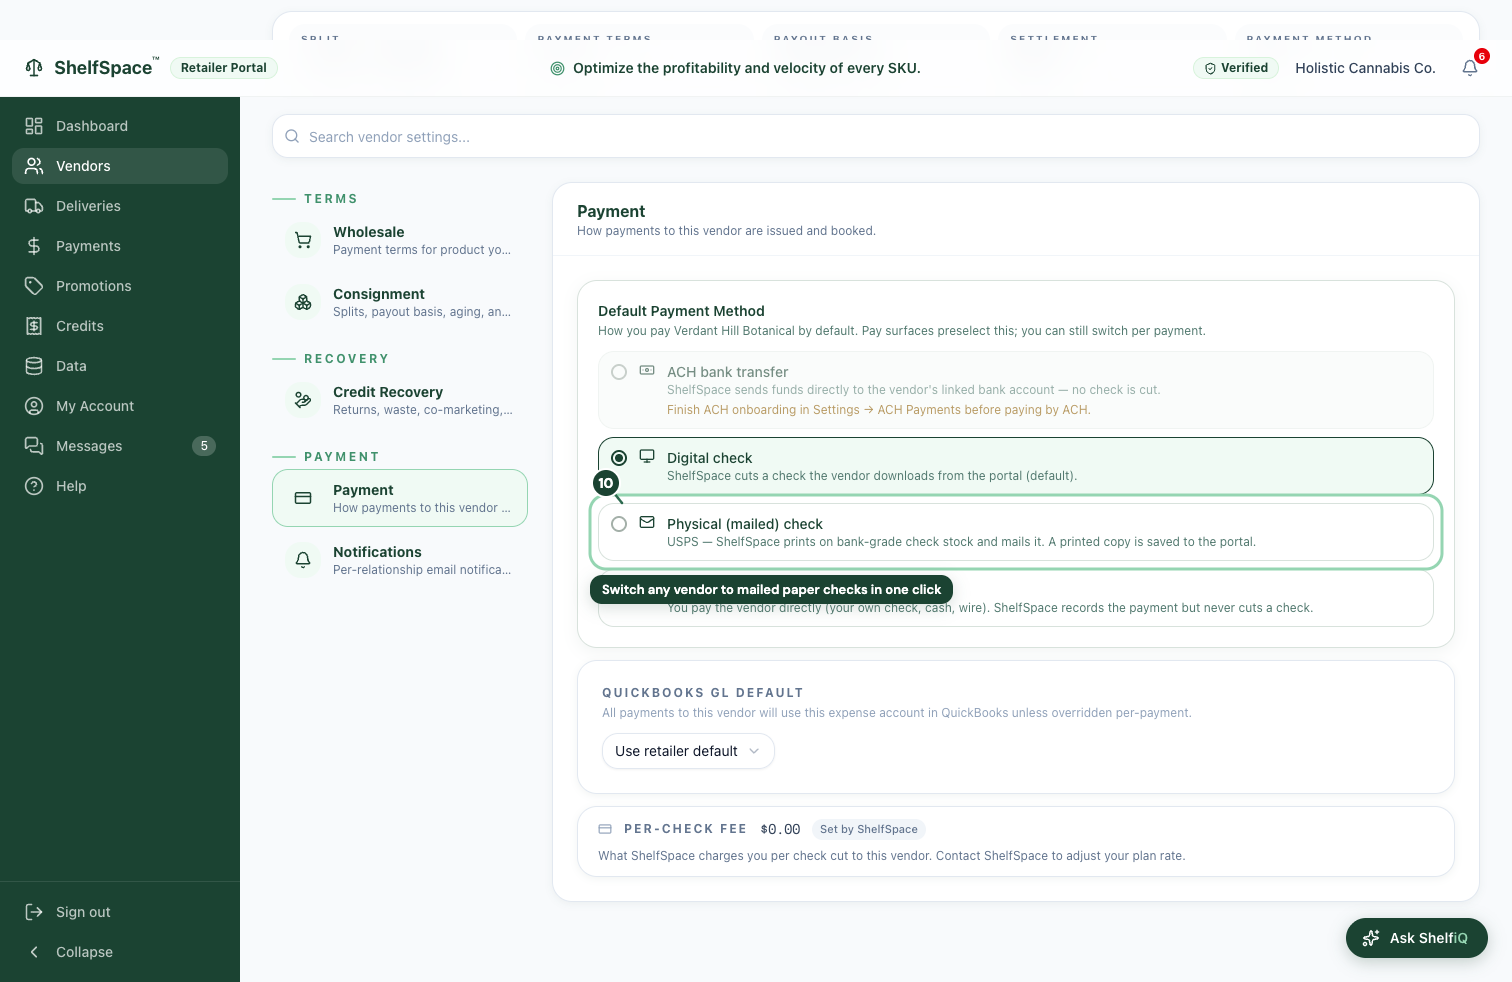
Open a vendor's Settings tab to set the terms you pay them on. For product you sell on consignment, set the profit split -- one rate for the whole vendor, or a different rate per product category -- plus any spending caps. For product you buy outright, set the payment terms (how many days after delivery a bill is due). You set these yourself and they take effect immediately; the vendor doesn't need to approve anything.

Review and approve payouts

Each week we calculate what every consignment vendor is owed and hold it for your approval. Nothing goes out until you say so.

10

Every payout in one place

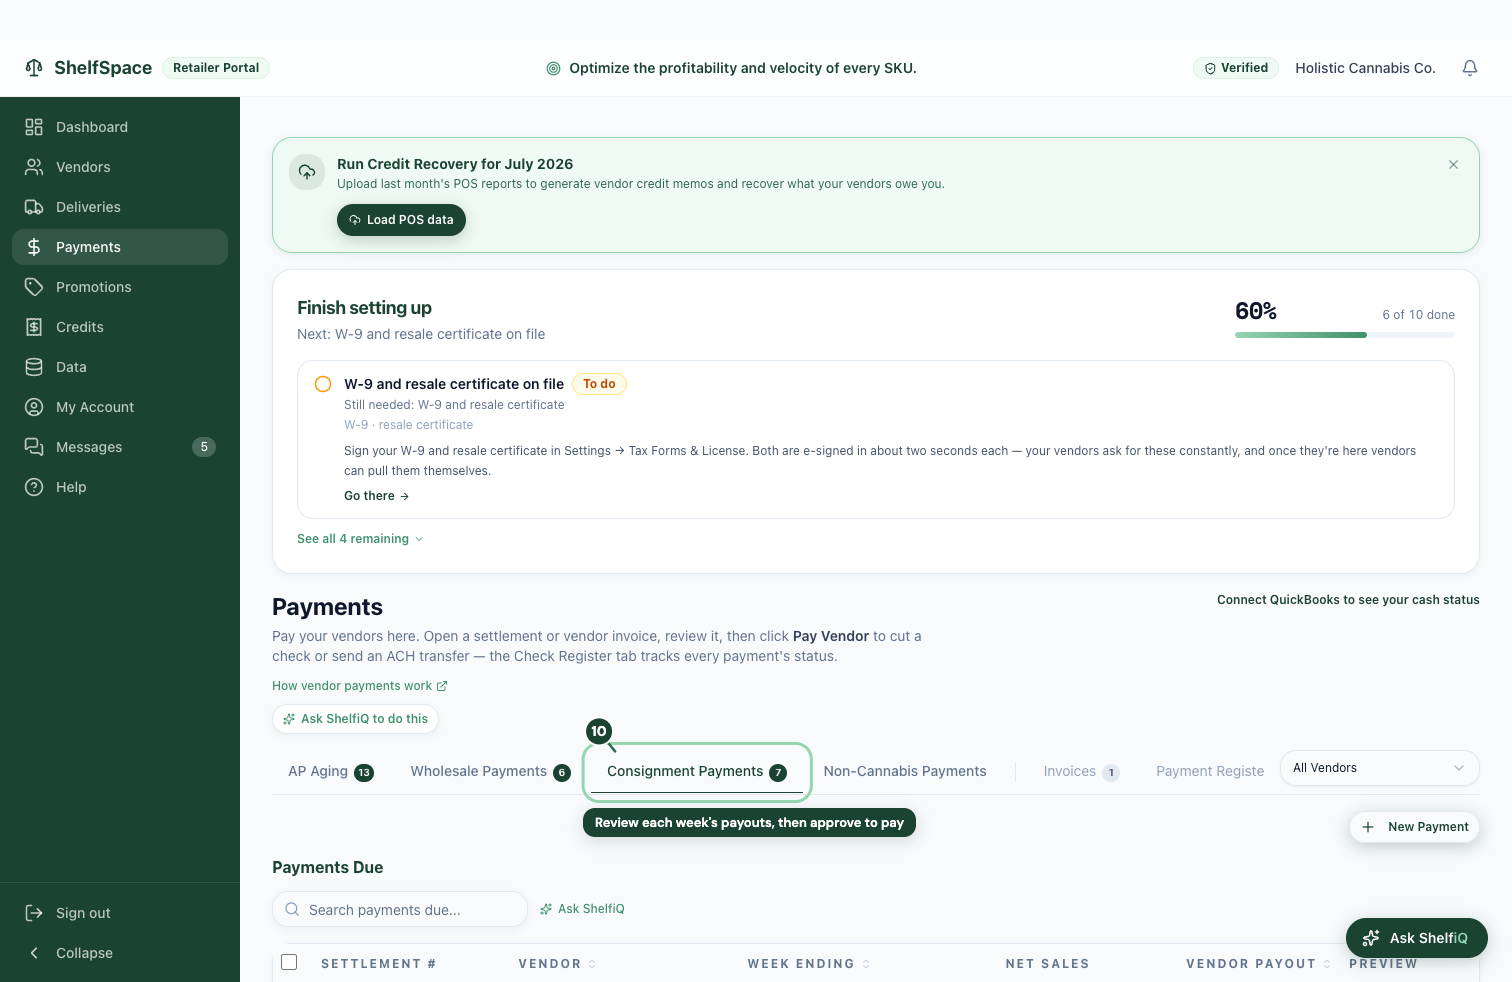
Review each week's payouts, then approve to pay
10Review each week's payouts, then approve to pay
The Payments screen is where money goes out. It opens on AP Aging -- everything you owe across wholesale, non-cannabis, and consignment in one table, grouped by how far past due it is; expand a vendor to see each invoice, and pay one bill or several at once from right here. The Consignment Payments tab lists each vendor's weekly payout waiting for your approval -- open one to review it, then approve it to send. Nothing is paid until you approve it, so you're always in control of what leaves your account. Use the Non-Cannabis Payments tab to record and pay non-cannabis bills like rent, packaging, and supplies, and you can pay part of a bill now and the rest later whenever you need to. A separate tab keeps a full record of every payment you've sent.
11

See how a payout was calculated

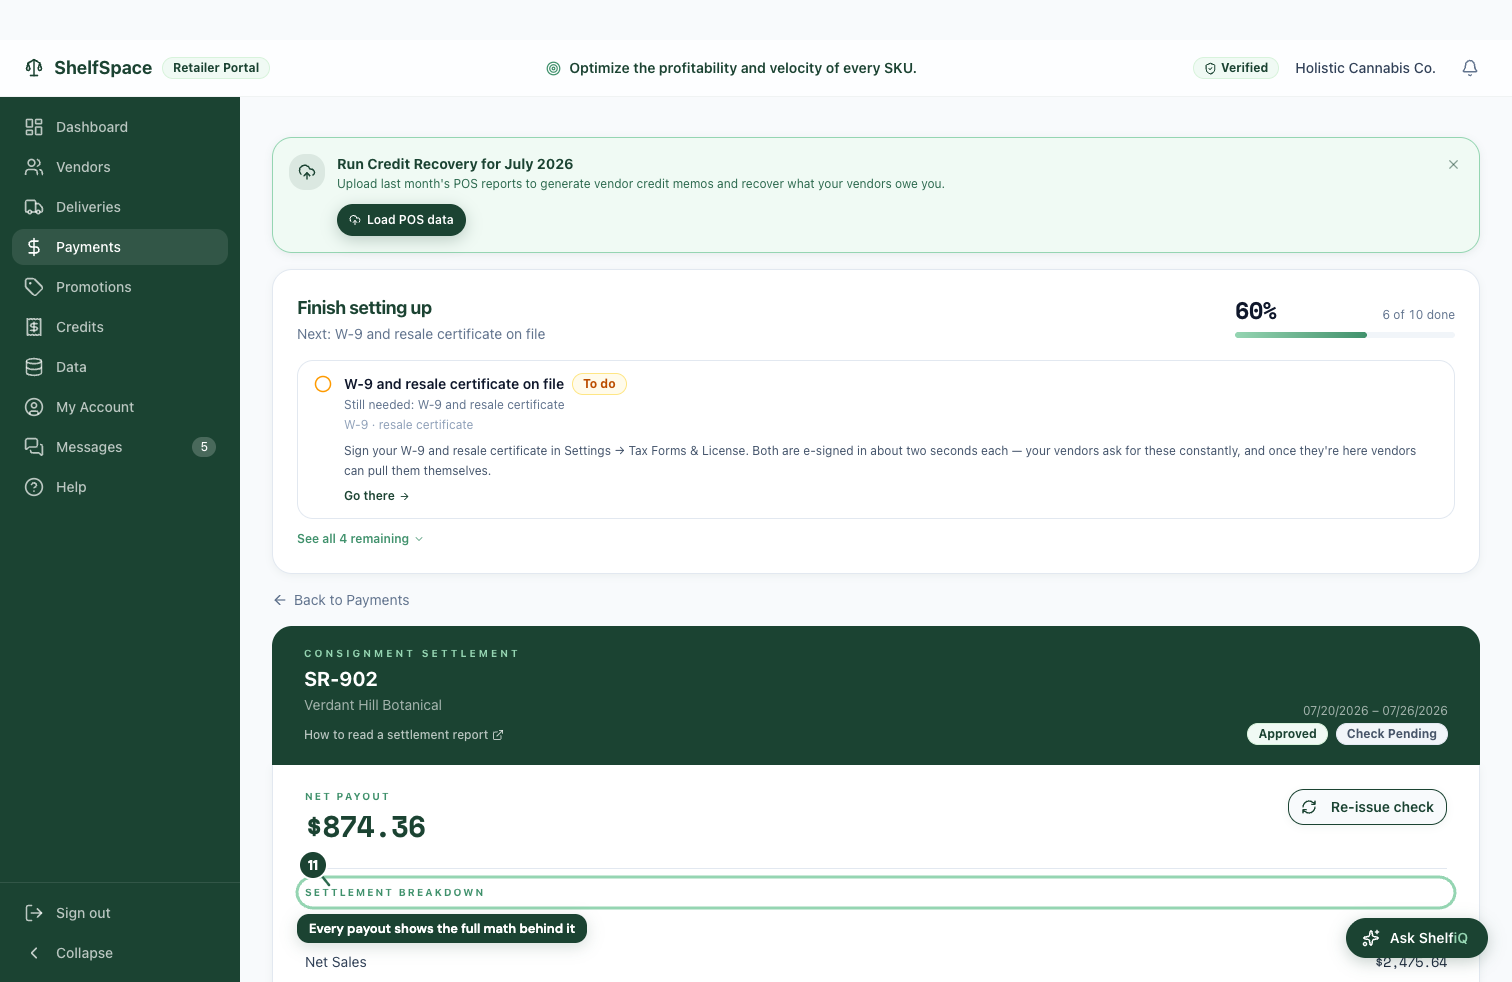
Every payout shows the full math behind it
11Every payout shows the full math behind it
Open a payout to see exactly how it was figured. The breakdown shows what sold, your split of each sale, any returns credited back, and any vendor credits netted out -- adding up to the final amount you'll pay. Every line is there, so you can check the number before you approve it and answer a vendor's question with the report in front of you. Download it as a PDF any time from this screen.

Know your numbers

One screen answers the questions an owner opens the app to ask: how healthy is my shelf, and where is cash tied up?

12

See where your cash is

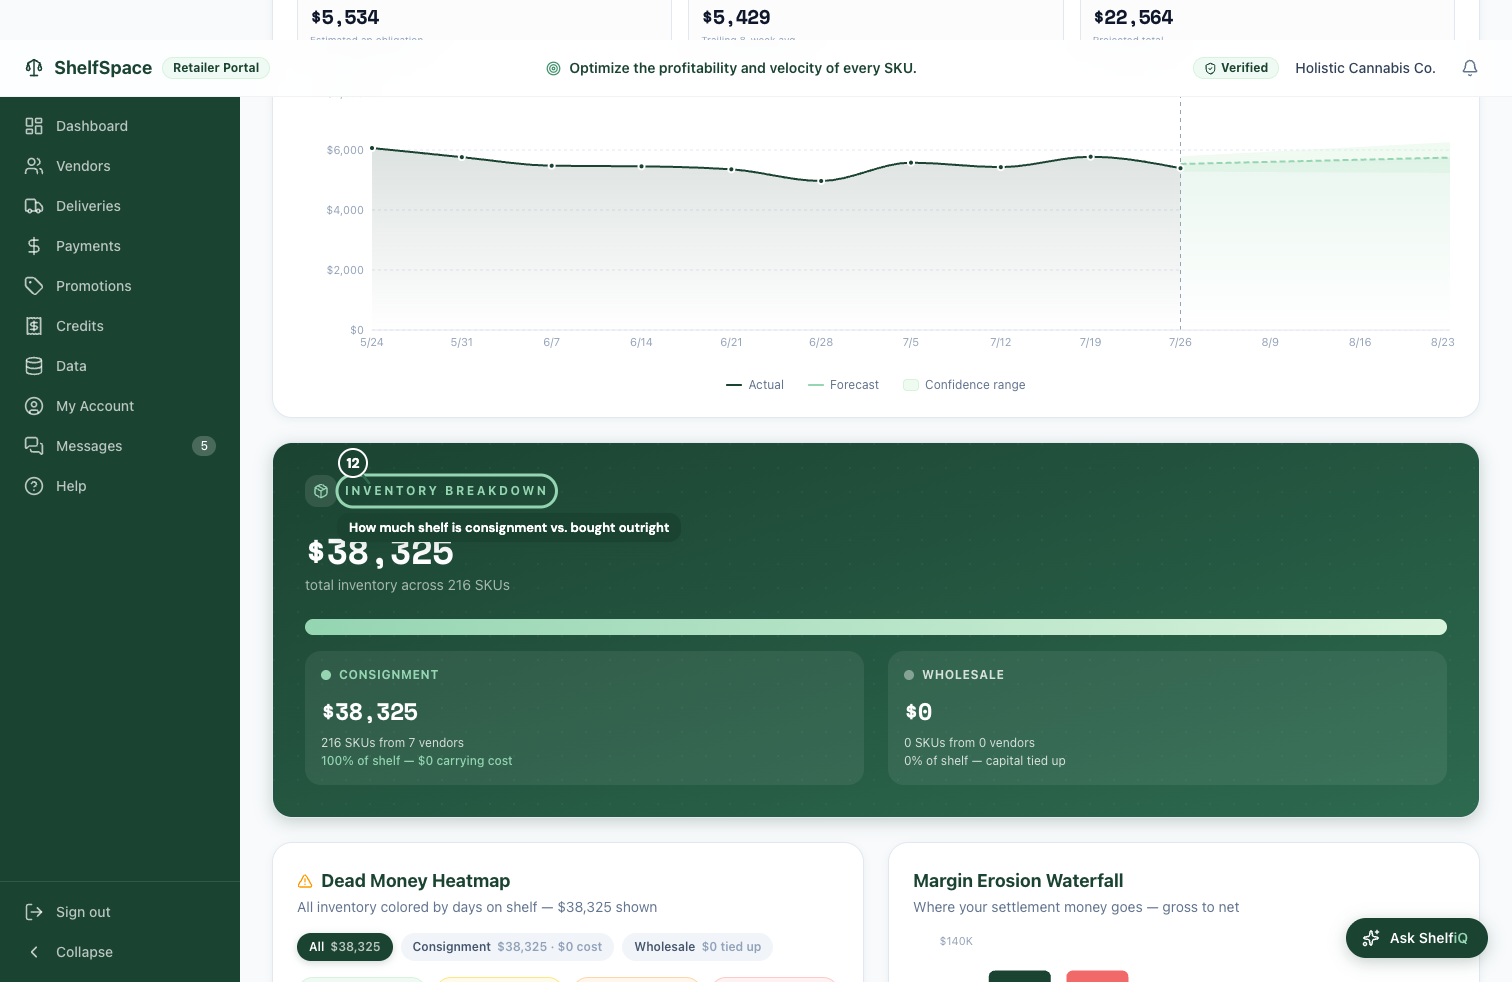
How much shelf is consignment vs. bought outright
12How much shelf is consignment vs. bought outright
Insights is your owner's-eye view. It shows how much of your shelf is product you carry on consignment -- which ties up none of your own cash -- versus product you bought outright, plus where money is sitting in slow-moving inventory. Use it to decide what to reorder, what to mark down, and which vendors to lean into. Switch between your consignment and wholesale views with the toggle at the top.

Accounts Payable

This chapter is for whoever handles the bills -- the owner, or an accounts-payable teammate. You both have the same access here: receive incoming product, check each shipment against the state's record, and pay your vendors. Each screen below can run hands-on or on autopilot -- every step shows you both.

Receive your deliveries

Incoming product lands in one dashboard. You receive each shipment, and at that moment you choose how you're paying for it -- outright (wholesale) or on consignment.

13

Every incoming shipment in one place

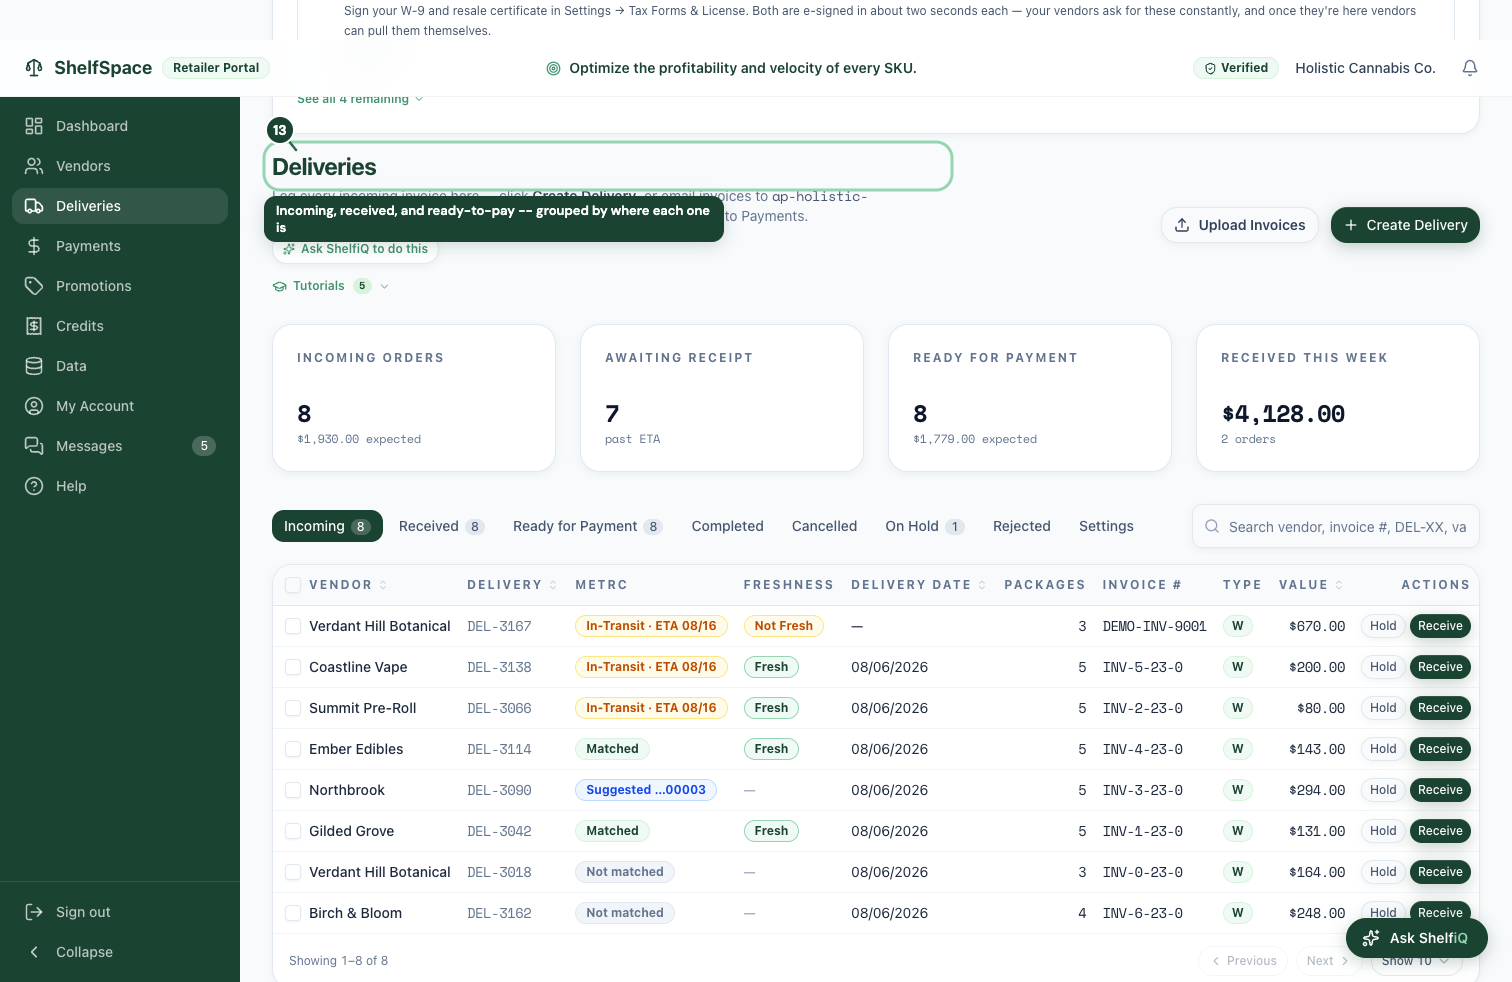
Incoming, received, and ready-to-pay -- grouped by where each one is
13Incoming, received, and ready-to-pay -- grouped by where each one is
This is your inbox for product. Deliveries are grouped by where they are: Incoming is waiting to be received, Received has arrived, and Ready for Payment is a bill you can pay. New deliveries show up on their own -- from your state sync, and whenever a vendor emails an invoice to your accounts-payable inbox, where ShelfSpace reads the invoice, matches the vendor, and drafts the delivery for you. You can also load an invoice yourself: drag in the PDF or a photo and ShelfSpace reads it, matches the vendor, and drafts the delivery the same way. Click any row to open it and receive it.
Receiving a delivery
AutomaticSwitch on auto-receive in Deliveries -> Settings, and any shipment whose invoice matches the state's manifest exactly -- every line, every package, and the totals -- is received the moment it syncs, as long as its state data is current. Anything that doesn't line up -- or that was changed or voided after it synced -- still waits for you.
ManualEvery shipment waits under Incoming until you open it and click Receive. You check it against the manifest yourself before it moves forward. This is how it works until you turn auto-receive on.
14

Load an invoice yourself

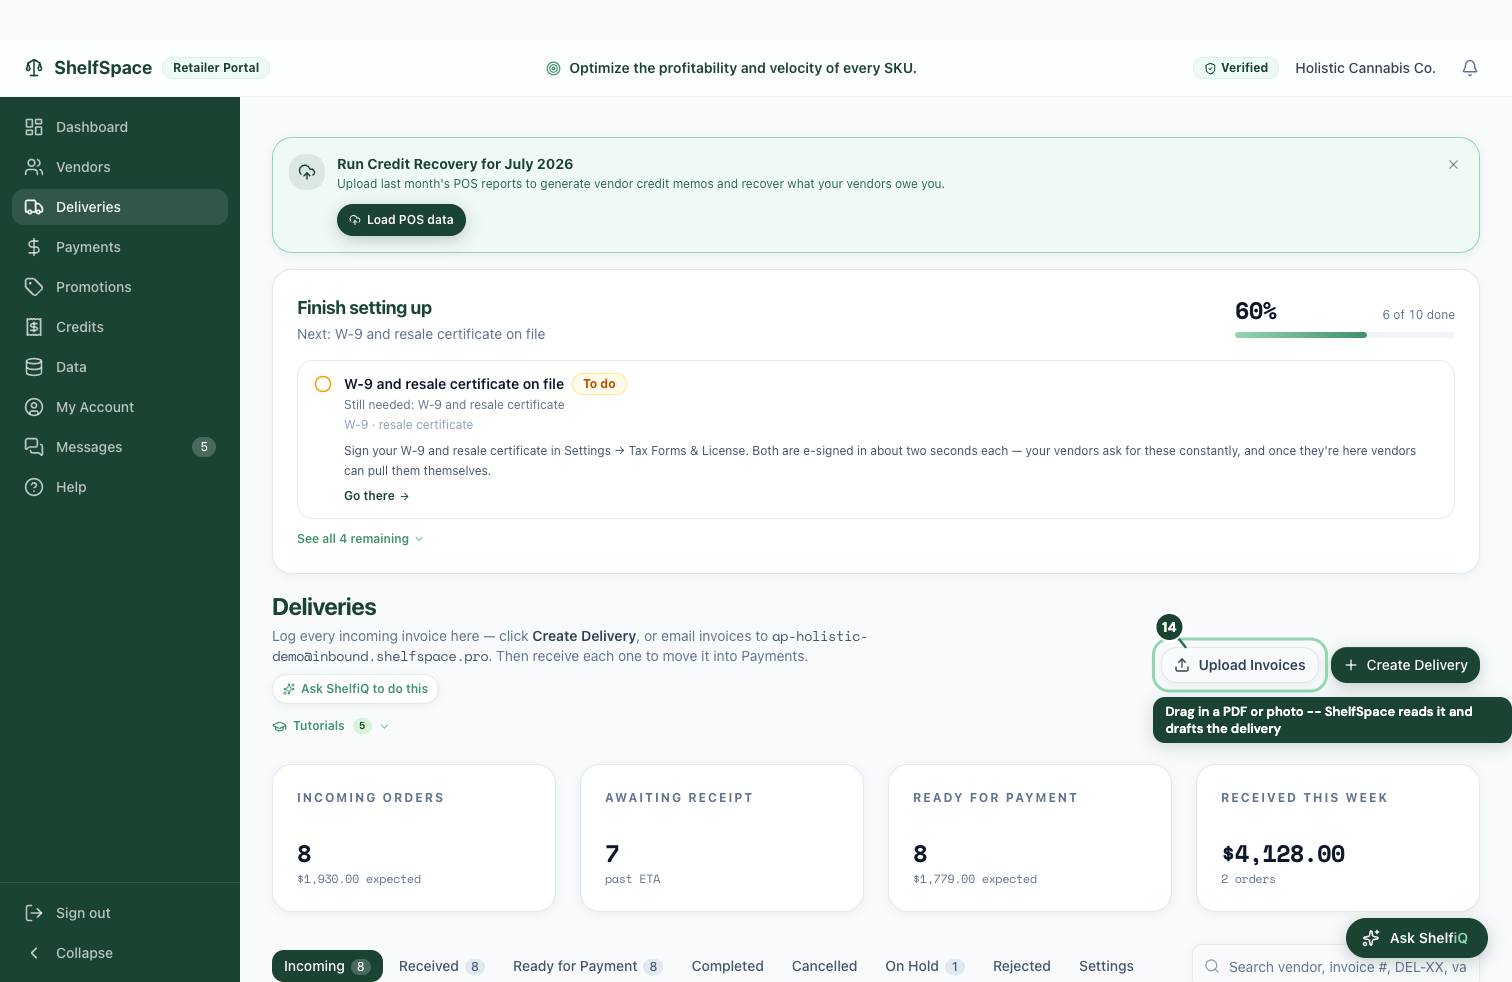
Drag in a PDF or photo -- ShelfSpace reads it and drafts the delivery
14Drag in a PDF or photo -- ShelfSpace reads it and drafts the delivery
Most deliveries arrive on their own, but you can also load one yourself. Click Upload Invoices and drag in the vendor's invoice as a PDF or a photo. ShelfSpace reads it, matches the vendor, and drafts the delivery for you -- the same as an emailed invoice -- so you never key in a bill by hand. Then open the draft and receive it like any other.
15

Receive a shipment and pick how you'll pay
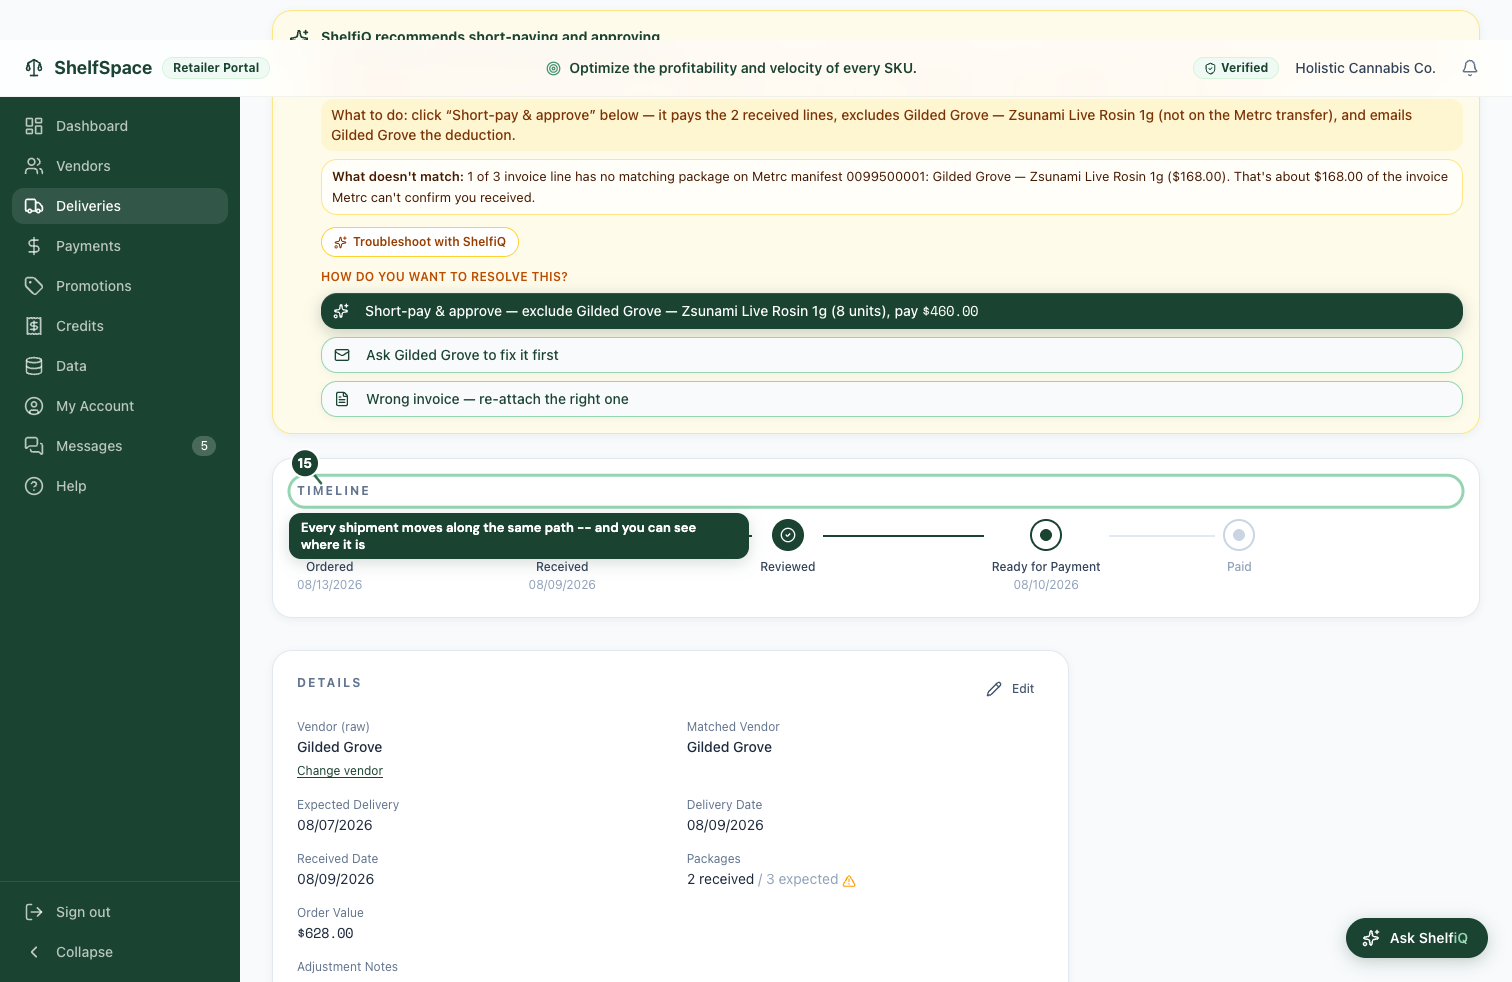
Every shipment moves along the same path -- and you can see where it is
15Every shipment moves along the same path -- and you can see where it is
Open a delivery to receive it and confirm what you're paying. When you receive, you choose per order how you're buying it: Wholesale (you bought it outright, so it becomes a bill) or Consignment (you pay from what actually sells, through a regular payout). If the invoice and the manifest don't agree, you settle it right here without overpaying -- drop a line the vendor billed but never shipped, pay a corrected amount, or flag it for your team. ShelfSpace works out the fix and shows it to you; you're the one who confirms it.
Approving a bill for payment
AutomaticTurn on auto-approve for payment and a clean, auto-received wholesale delivery moves itself to Ready for Payment. You still click to send the check -- nothing pays without you.
ManualYou review each received wholesale delivery and approve it for payment yourself before a check can go out.

Check a delivery against the state record

Every transfer is filed with the state, package by package. That filing is your independent check that the invoice is honest -- before you pay a cent.

16

The state's record of what shipped

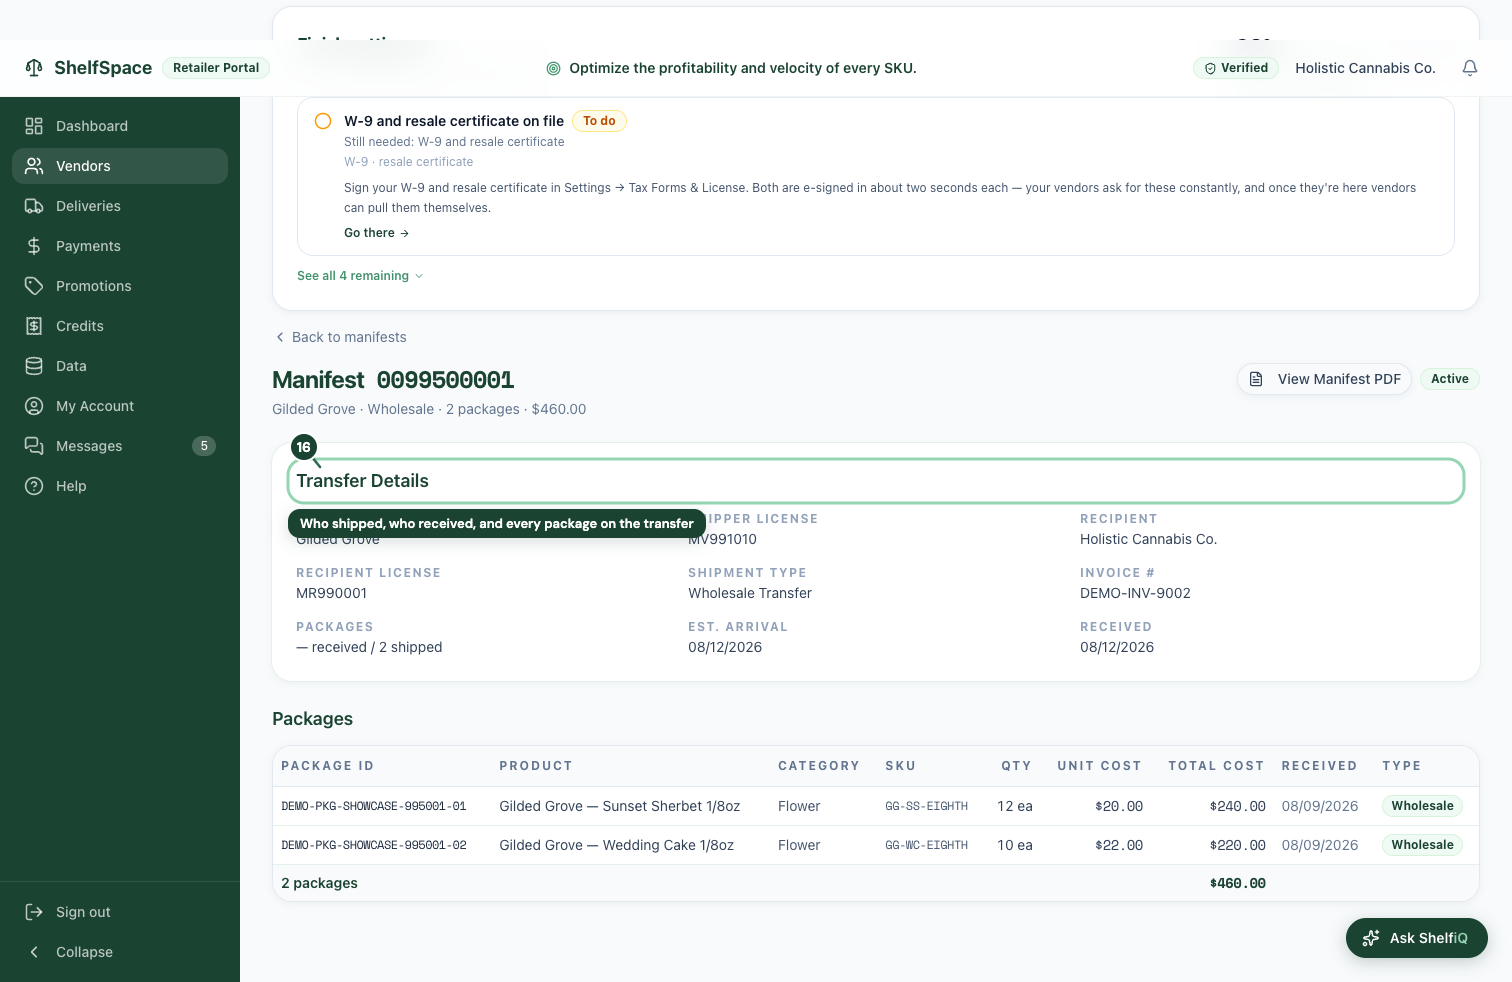
Who shipped, who received, and every package on the transfer
16Who shipped, who received, and every package on the transfer
This is the state's own record of the shipment -- who shipped it, who received it, and every package that was on the truck, pulled straight from your state sync rather than from the vendor's paperwork. ShelfSpace lines it up against the invoice for you and flags anything that doesn't match, so a bill for product that never arrived can't slip through. Open it from the delivery, or from the vendor's Manifests tab, any time you want to see exactly what the state says shipped.

Pay your vendors

A received wholesale delivery becomes a bill. You see the vendor's invoice, then pay it by check -- and the check's status tells you, honestly, whether the money has actually moved.

17

See everything you owe, by how overdue
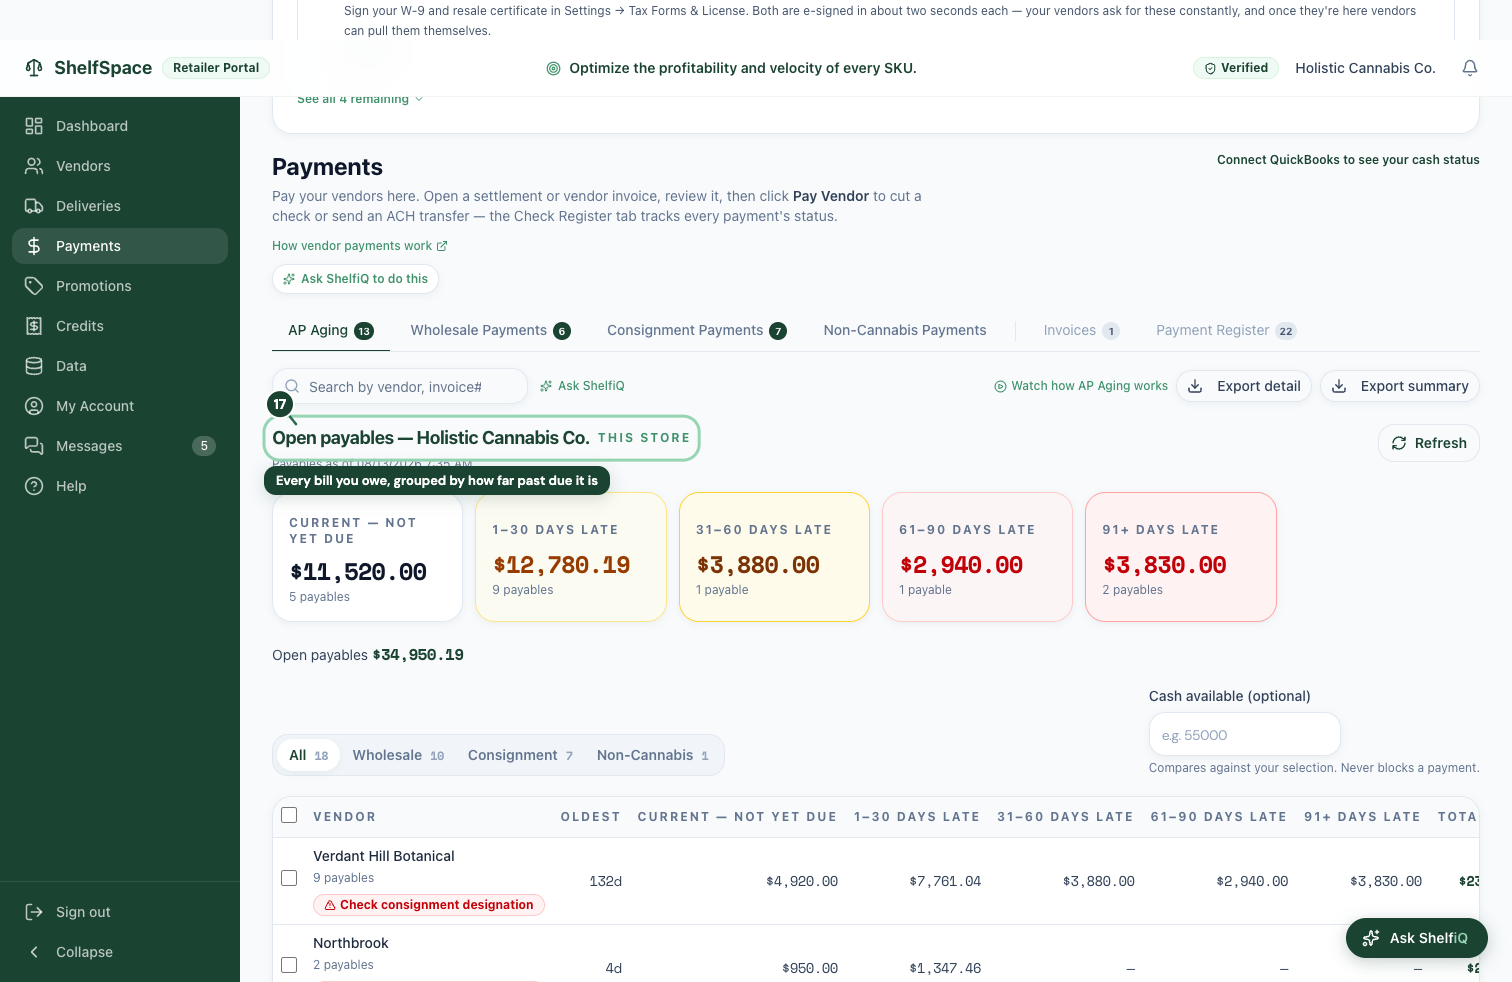
Every bill you owe, grouped by how far past due it is
17Every bill you owe, grouped by how far past due it is
The Payments screen opens here, on AP Aging -- everything you owe across wholesale, non-cannabis, and consignment in one table, grouped by how far past due it is. Each aging band shows the total and how many bills sit in it. Expand a vendor to see their individual invoices, and pay one bill or several at once right from this screen. It's the fastest way to answer 'what do I owe, and what's late?'
18

Pay your non-cannabis bills

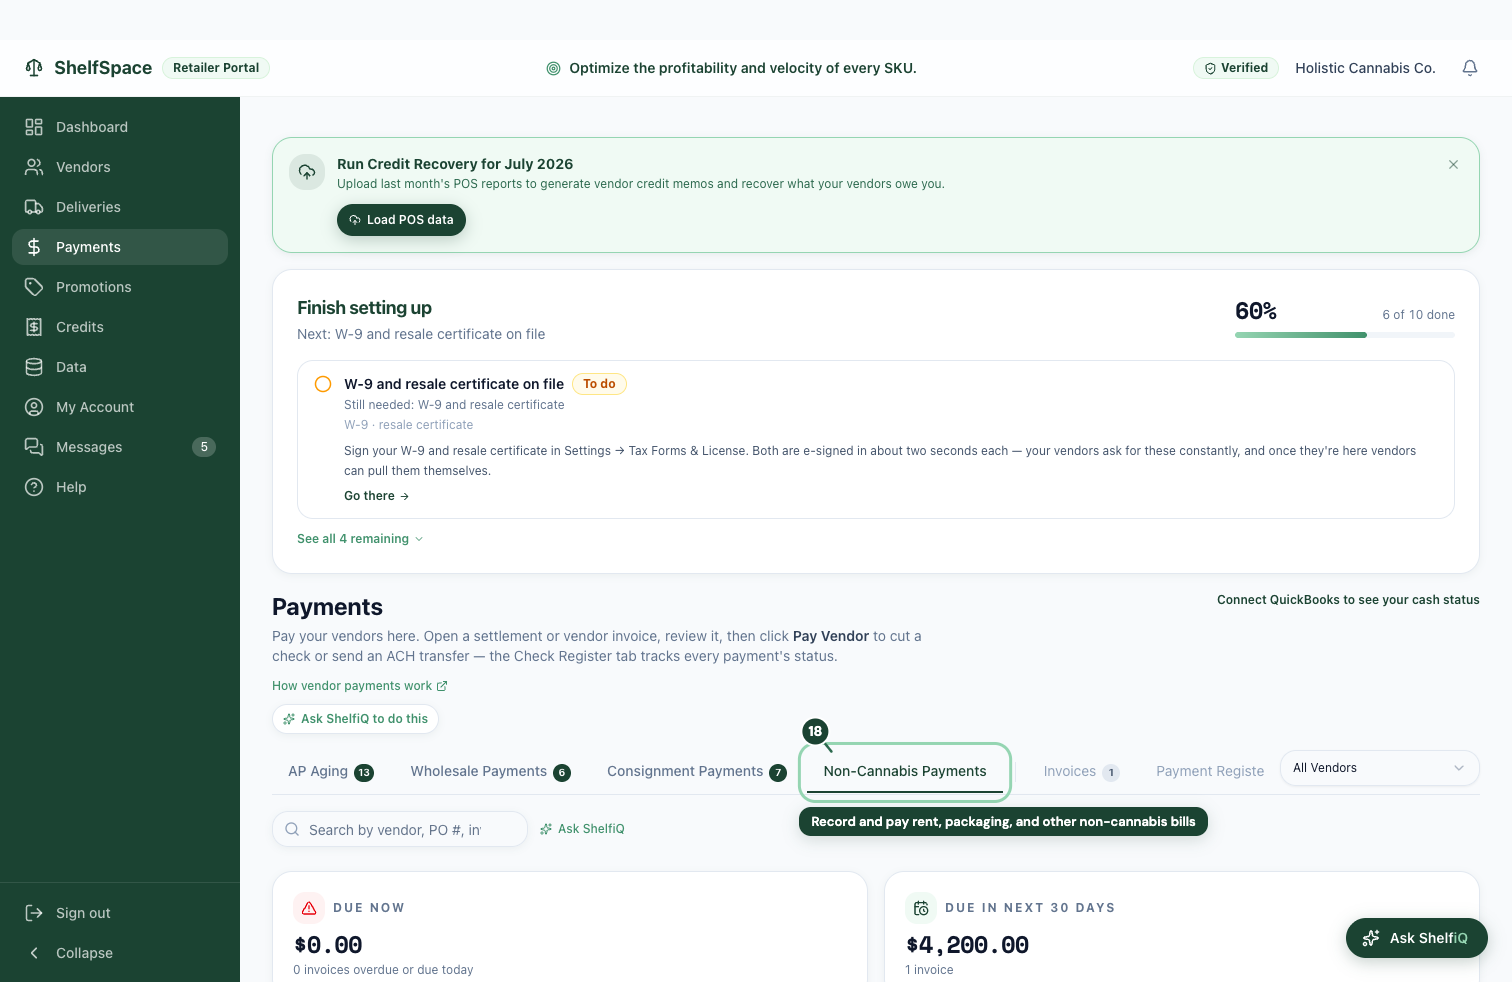
Record and pay rent, packaging, and other non-cannabis bills
18Record and pay rent, packaging, and other non-cannabis bills
Not every bill is cannabis. The Non-Cannabis Payments tab is where you record and pay everything else -- rent, packaging, supplies, services -- alongside your vendor bills, so all your payables live in one place. Add one with New Payment, then pay it by check or bank transfer like any other. These bills also roll into your AP Aging, so nothing slips through.
19

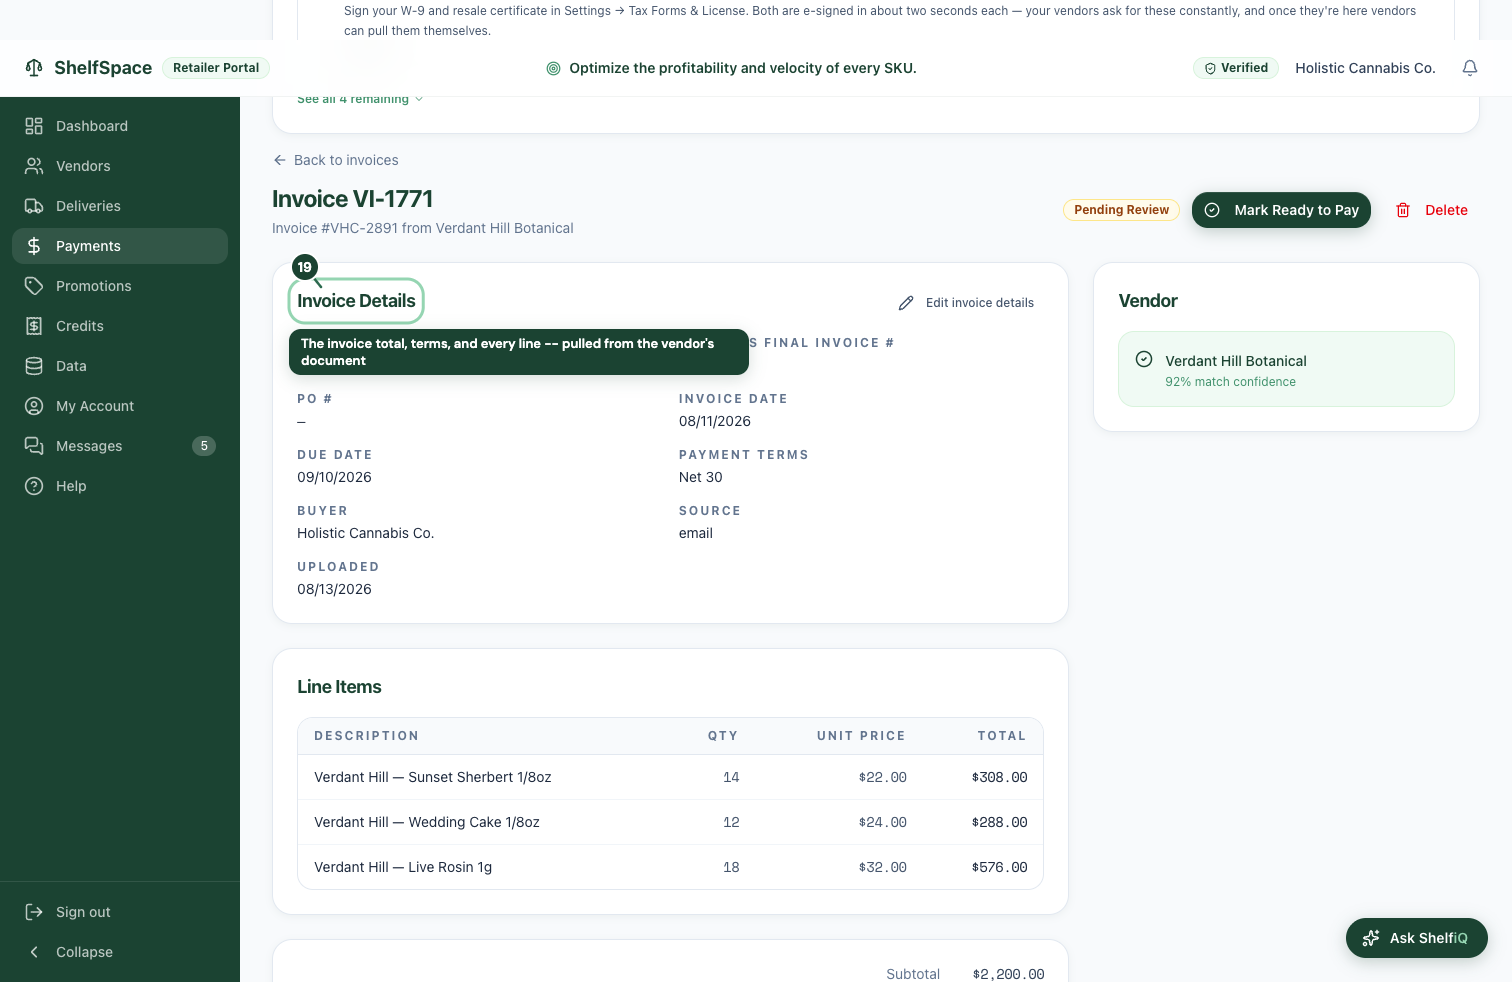
The vendor's bill, read for you

The invoice total, terms, and every line -- pulled from the vendor's document
19The invoice total, terms, and every line -- pulled from the vendor's document
Every vendor invoice is read and laid out for you here -- the total, the payment terms, and every line item -- whether it arrived by email or you uploaded it. ShelfSpace pulls these numbers off the vendor's own document, so you review a clean summary instead of squinting at a PDF. From here the invoice flows into the bill you'll pay; you never re-type a figure.
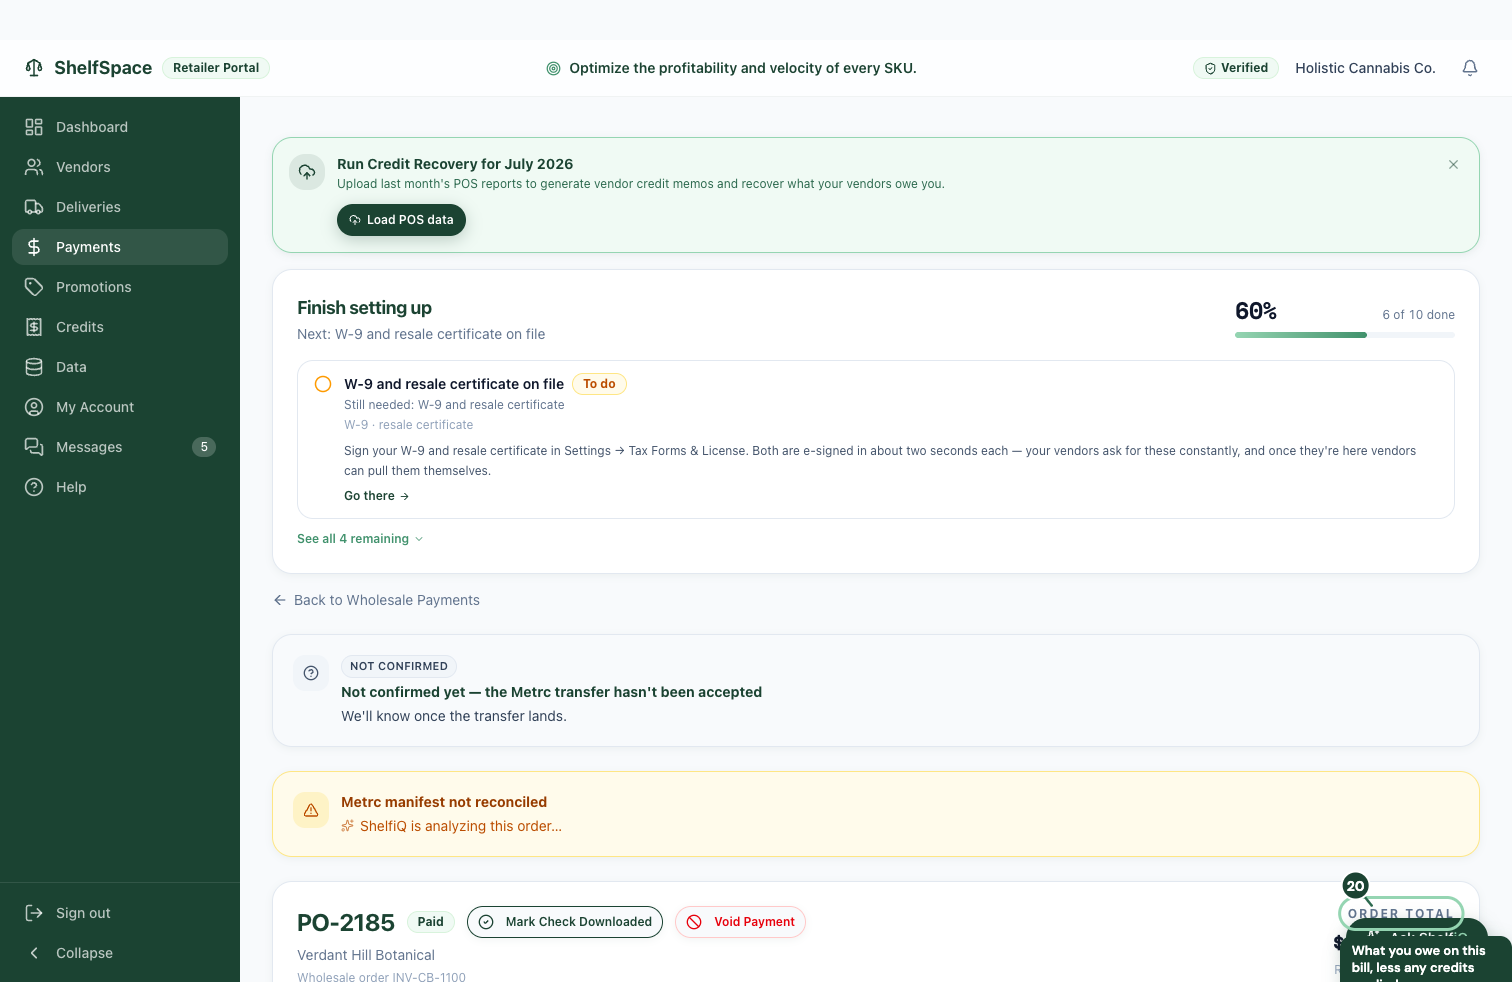
20

Pay a bill by check

What you owe on this bill, less any credits applied
20What you owe on this bill, less any credits applied
This is the bill for a received wholesale delivery. Pay it by check -- ShelfSpace prints the check and the vendor downloads it, or you mail it -- or by bank transfer if you've set that up. Your vendor gets an email the moment you send, logs in, and sees the check ready to deposit right away -- no waiting on the mail. You don't have to pay the whole bill at once, either -- pay it in full, or pay part now and settle the rest later, and the bill stays open with its remaining balance until it's cleared. After you send it, the status tells you the truth about where the money is: Issued -- not yet downloaded means the check is cut and waiting for the vendor to pull it, Downloaded means they pulled the PDF, and Cleared -- the only status that confirms the money actually left your account -- appears once your bank feed confirms the debit. A check can sit Downloaded for weeks before it clears, so don't read Downloaded as paid.
Sending the payment
AutomaticSchedule a bill to pay on a date you pick, or set a vendor up on a repeating schedule, and the check goes out on its own on that day -- no click needed when the day comes.
ManualYou send each check yourself, from the bill, whenever you're ready to pay it.

Inventory

This chapter is for the inventory lead -- the person who receives product and checks it in. Your account is deliberately focused: you get the deliveries screens, plus settings and help, and nothing else. Receiving is the job, so that's what you see.

Receive and check in product

Everything you need is on the deliveries screens. You take in each shipment and check it against the state's record -- the payment and settlement screens aren't part of this seat.

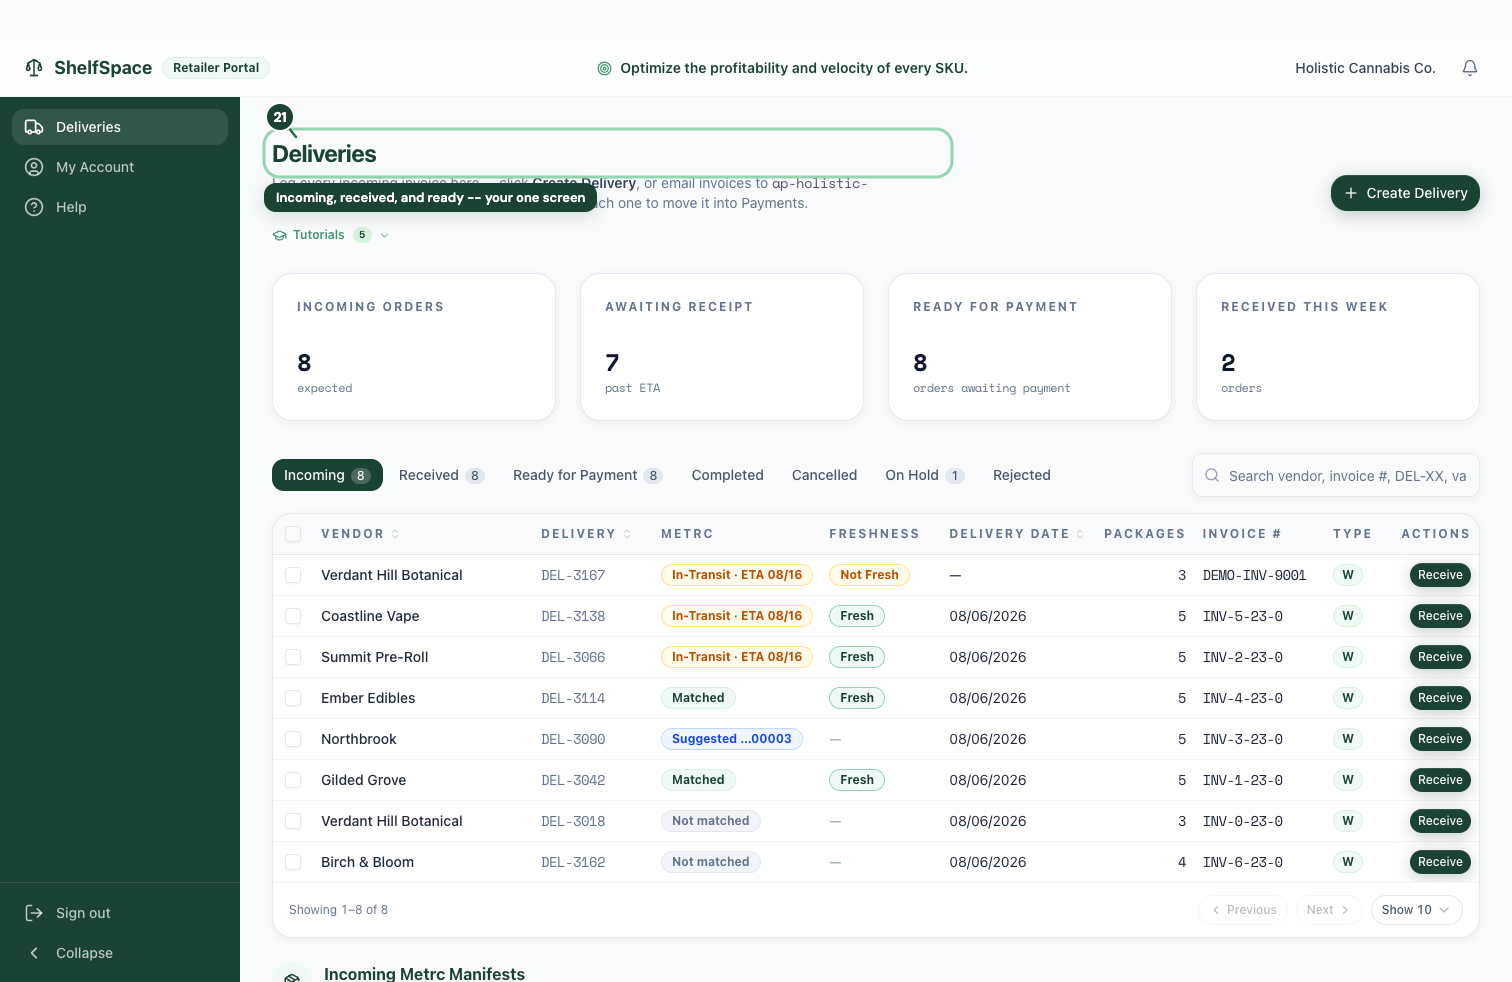
21

Your whole workspace, on one screen

Incoming, received, and ready -- your one screen
21Incoming, received, and ready -- your one screen
This is where your day happens. Incoming shipments land here on their own -- from your state sync, and from any invoice a vendor emails in -- and you take each one in from this screen. Your menu on the left is short on purpose: Deliveries, plus My Account and Help. The payment, settlement, and vendor-terms screens belong to the owner, so this seat doesn't carry them -- less to wade through, and no way to send money by mistake.
22

Take in a shipment and check it against the state
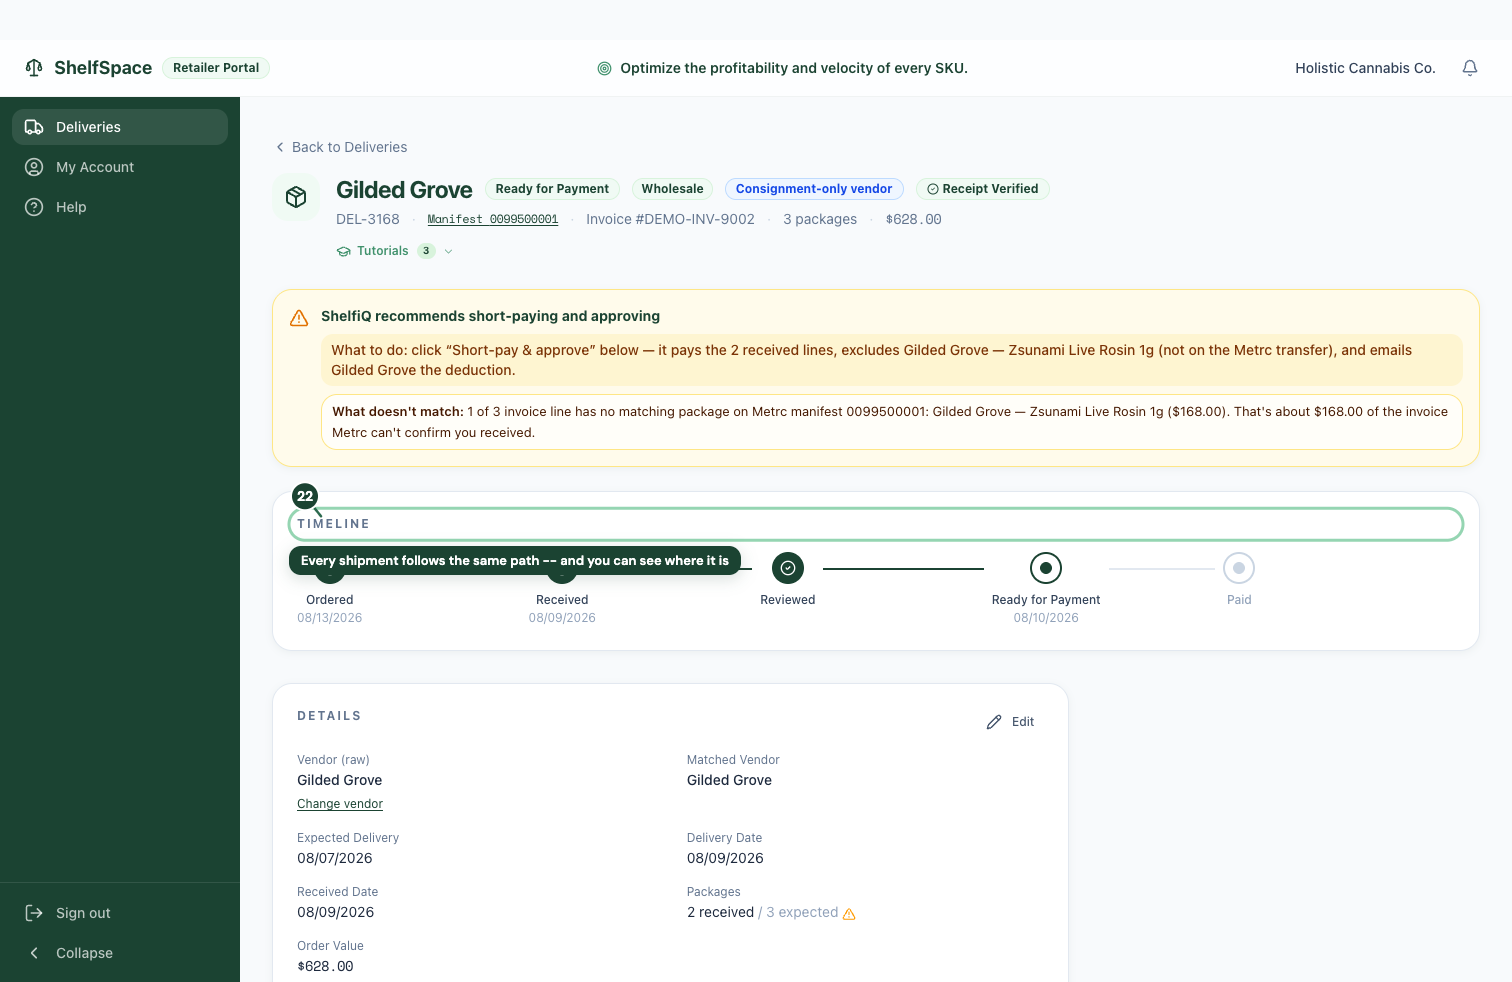
Every shipment follows the same path -- and you can see where it is
22Every shipment follows the same path -- and you can see where it is
Open a shipment to receive it. You confirm what actually arrived and check it line-by-line against the state's manifest, flagging anything that doesn't match before it's accepted -- your check that a bill for product that never showed up can't slip through. What you don't do from this seat is pay: once a shipment is received, the owner or an accounts-payable teammate handles the bill. Receiving and paying stay in separate hands, on purpose.

Bookkeeper

This chapter is for the bookkeeper or outside accountant. You can see every number and push it to QuickBooks, but you don't move money: approving payouts, sending checks, and setting terms stay with the owner. Read, reconcile, report -- that's this seat.

Read and export the books

Every figure the business runs on is here to read and export. You can push it to QuickBooks; you can't change what it says.

23

Every number, in one place -- and exportable
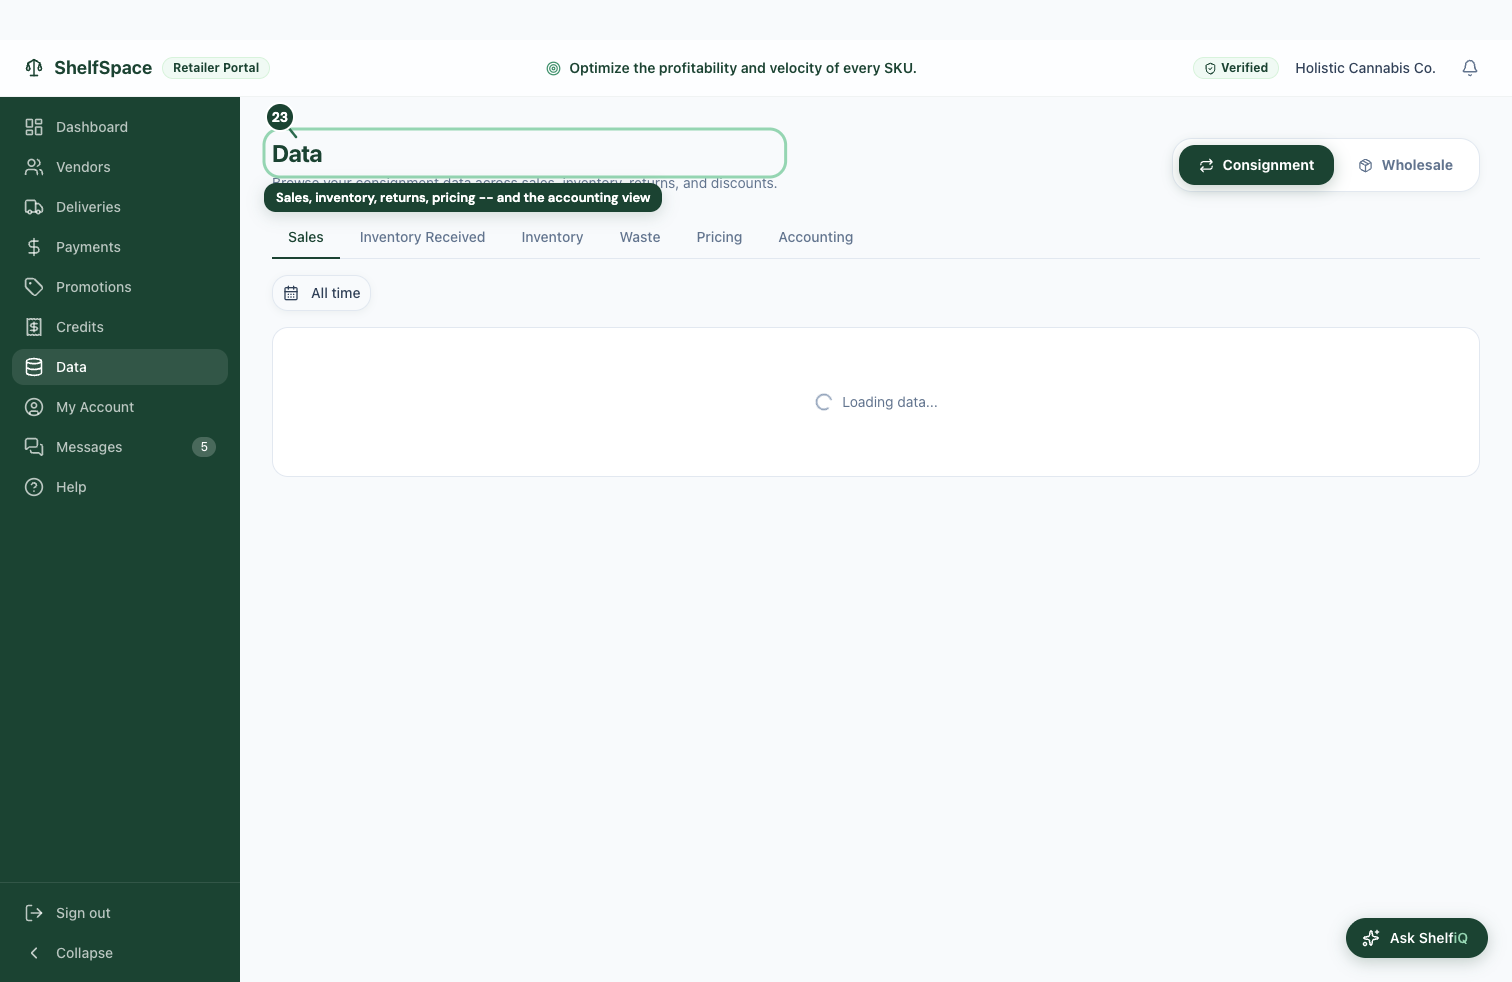
Sales, inventory, returns, pricing -- and the accounting view
23Sales, inventory, returns, pricing -- and the accounting view
This is the books, laid out to read. Browse sales, inventory, returns, and pricing, and open the Accounting tab for the ledger view. Export any of it to a spreadsheet, or push it straight to QuickBooks -- keeping your books in sync is exactly what this seat is built for. What it can't do is move money: you reconcile and report, you don't send payments or approve payouts.
24

Prove where every consigned unit went

Every consignment invoice, reconciled to the unit
24Every consignment invoice, reconciled to the unit
The Invoice Payoff tab, under the Consignment view, reconciles every consignment invoice down to the unit: how much you received, how much has sold, how much came back or was destroyed, and how much is still on the shelf -- each unit traced back to the invoice it arrived on. Every invoice reads Open, Partial, or Closed, so you can see at a glance which are fully accounted for and which still have product moving. Anything that doesn't reconcile is flagged for review, never hidden to make a total look clean. One click exports an audit-ready PDF you can hand to a state examiner. If you've set up consignment but haven't received product on consignment yet, the tab stays empty until your first consignment delivery lands.
25

What you owe ShelfSpace, line by line
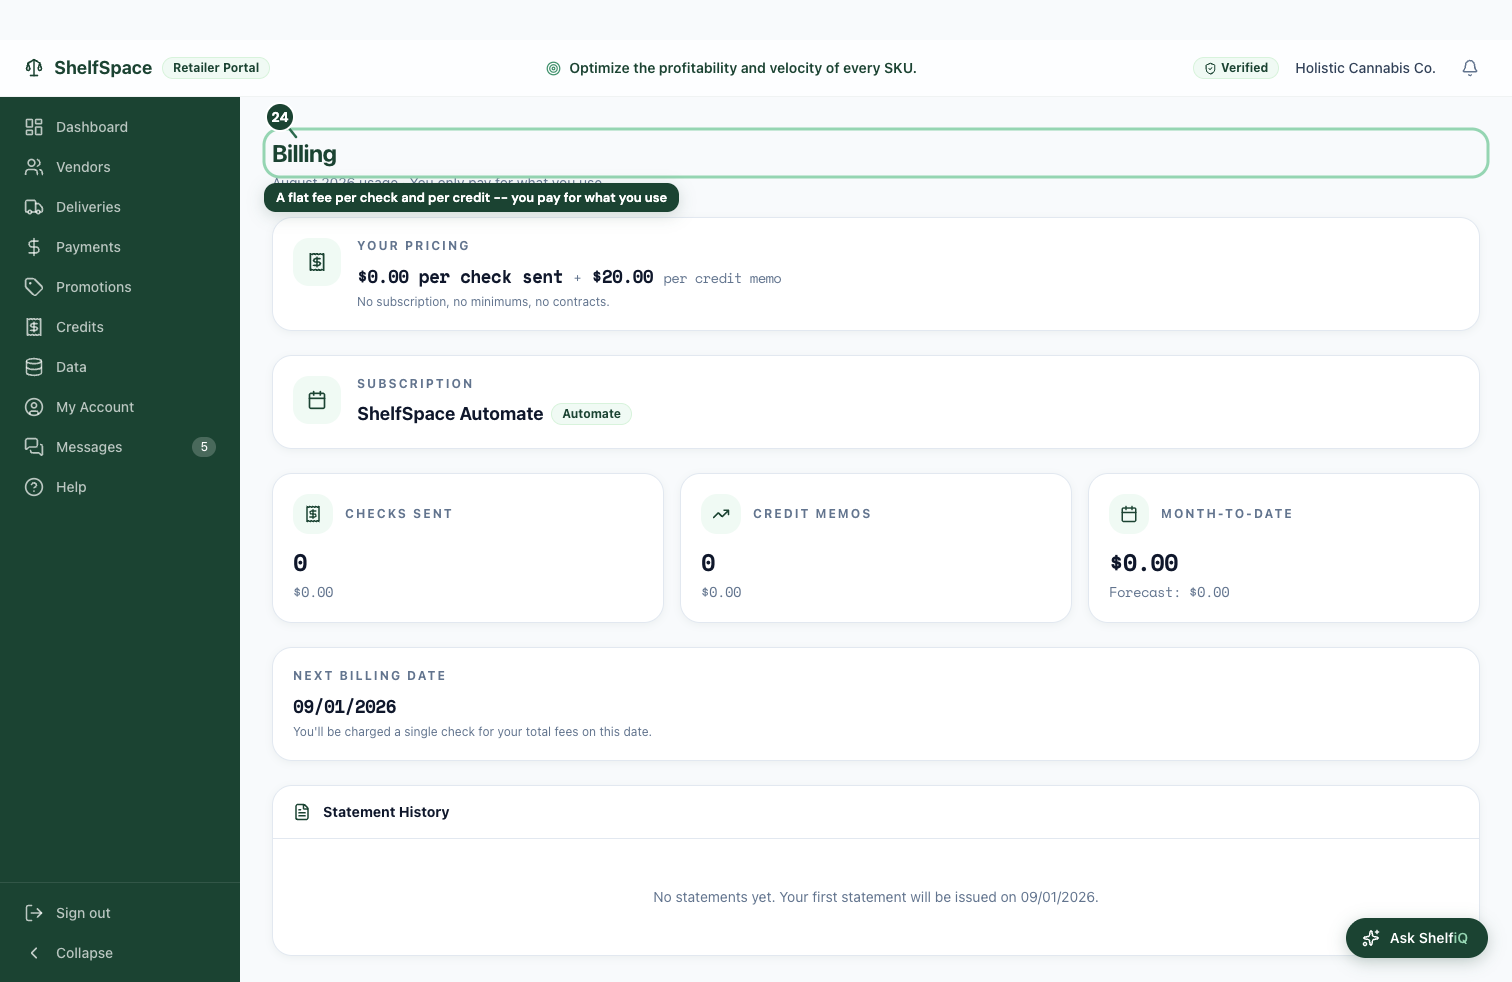
A flat fee per check and per credit -- you pay for what you use
25A flat fee per check and per credit -- you pay for what you use
This is what ShelfSpace charges you, with the current period's usage spelled out so you can reconcile it against your bank. It's a flat fee for each check sent and each credit applied, so you pay for what you use. If you haven't sent a check or applied a credit yet this period, it reads zero; the line items fill in as you go.
26

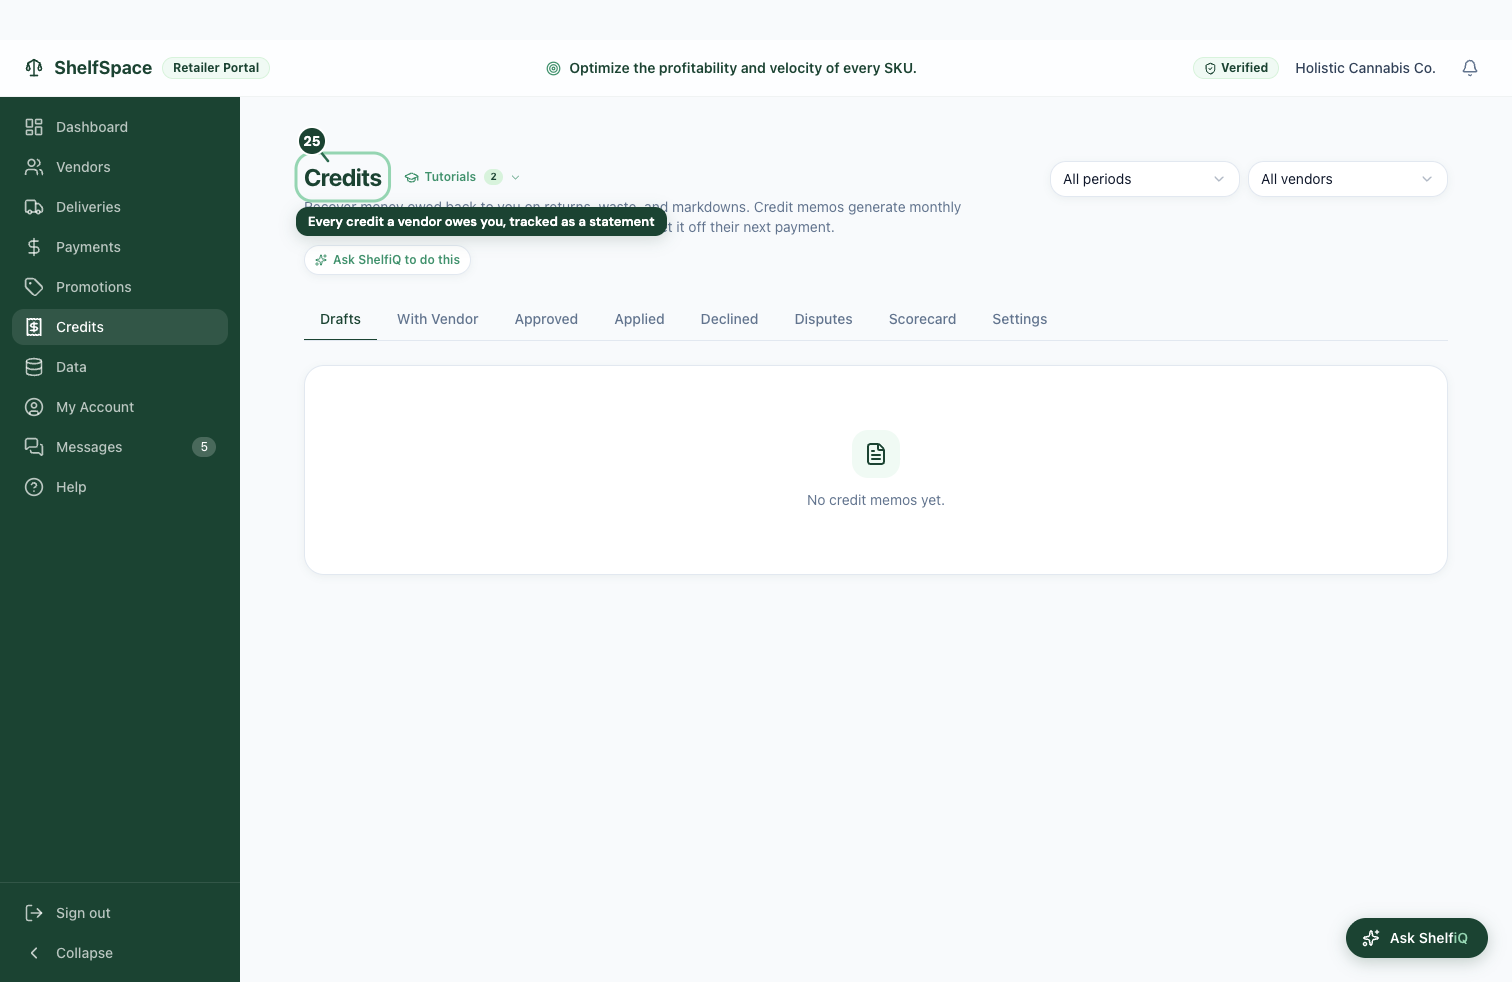
Vendor credits, ready to reconcile

Every credit a vendor owes you, tracked as a statement
26Every credit a vendor owes you, tracked as a statement
Every credit your vendors owe you -- for customer returns, destroyed product, and shared markdowns on aged inventory -- is tracked here, and each one doubles as that vendor's monthly statement. You review them and fold the totals into your books. Approving, sending, and negotiating a credit stay with the owner; from this seat you read them and reconcile.

Read-Only (Viewer)

One seat sits a notch below the bookkeeper: Read-Only. It's a distinct role, and it's the strictest one.

27

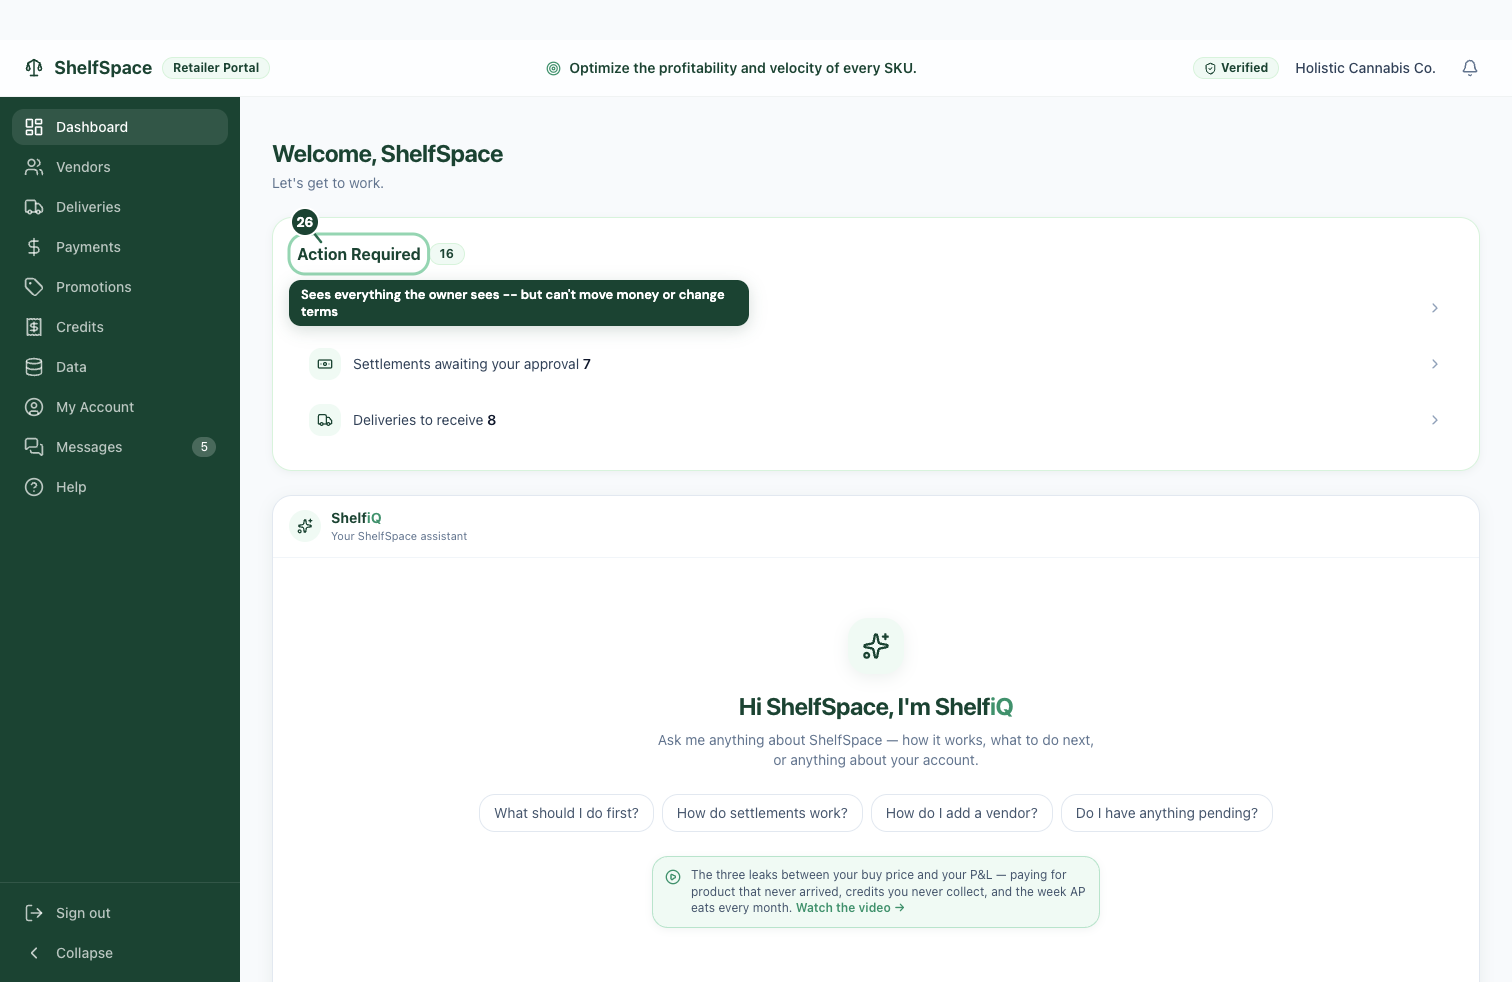
The full picture, nothing to click

Sees everything the owner sees -- but can't move money or change terms
27Sees everything the owner sees -- but can't move money or change terms
The Read-Only seat is for anyone who should watch the business without running it -- an outside accountant, an advisor, a silent partner. It opens every screen in this guide exactly as the owner sees them, but the buttons that move money or change your records -- approving a payout, sending a check, setting a vendor's terms -- are greyed out, and clicking one just explains that an admin has to make that change. (The one thing this seat can still adjust is a vendor's nickname, a label that makes them easier to find.) Give it to someone who should see the numbers without being able to act on them.

Full Feature Reference

Every remaining screen, one entry each. The chapters above cover your day-to-day; this is the rest of the app in one place, so you can find a screen you haven't needed yet. Grouped by what you're trying to do.

Grow your vendor roster

Bring vendors on, set the terms you pay them on, and make sure every brand's sales land on the right vendor.

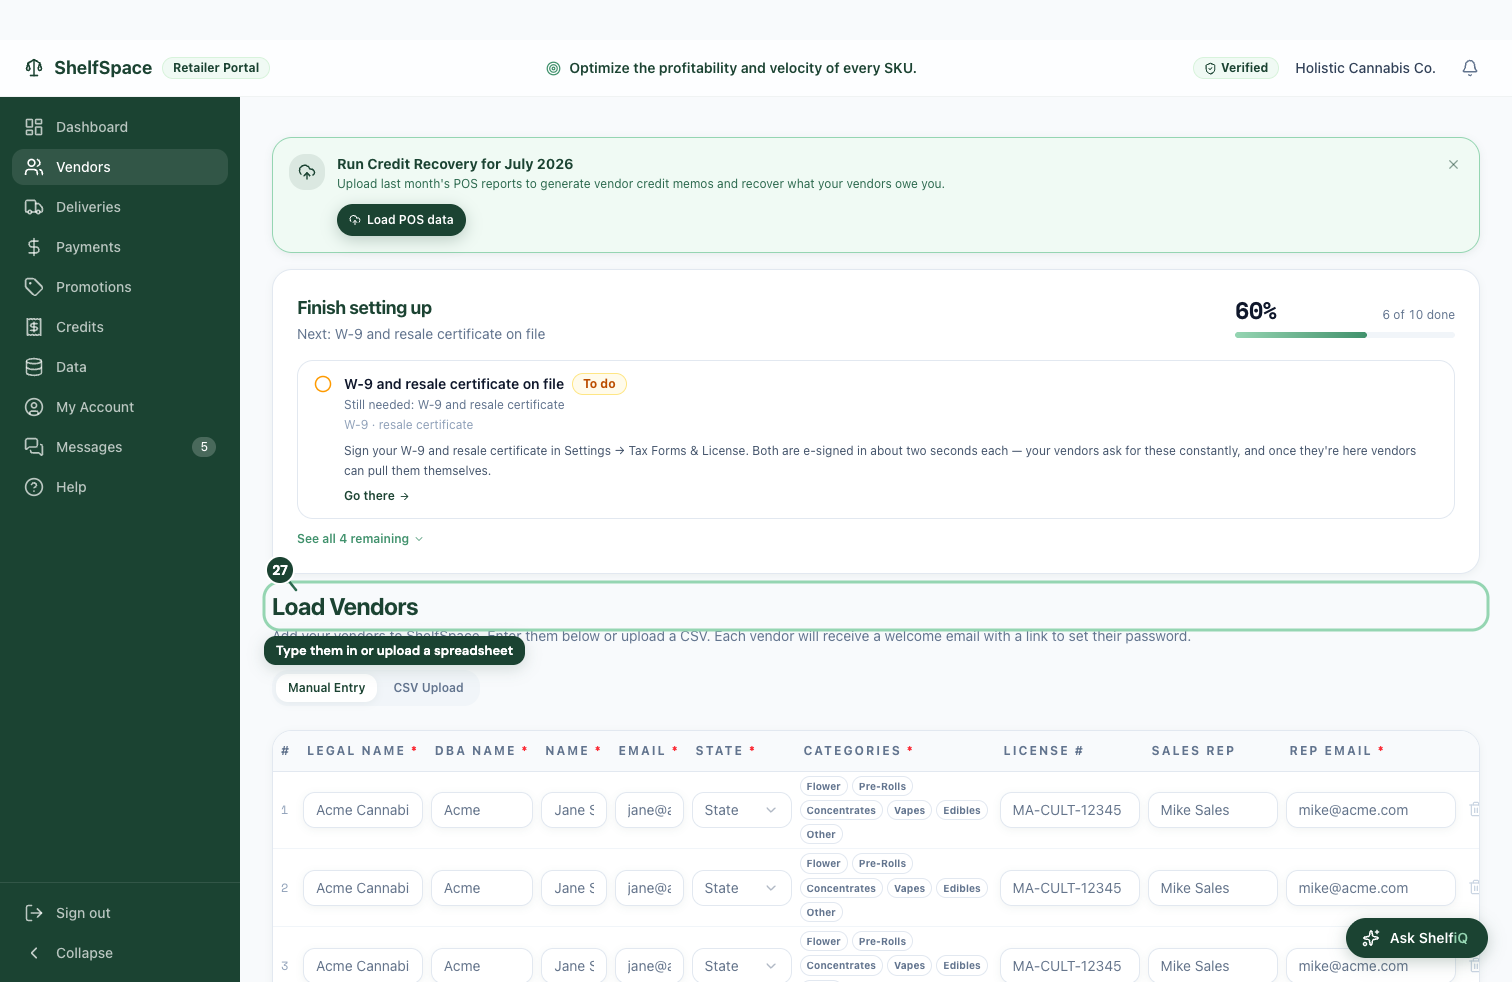
28

Load a batch of vendors at once

Type them in or upload a spreadsheet
28Type them in or upload a spreadsheet
Add many vendors in one pass from here. Enter them by hand or upload a spreadsheet, and each one gets a welcome email with a link to set their own password. Most vendors also appear on their own the first time their product lands in a delivery -- this screen is for loading a batch up front so you don't wait for that first shipment.
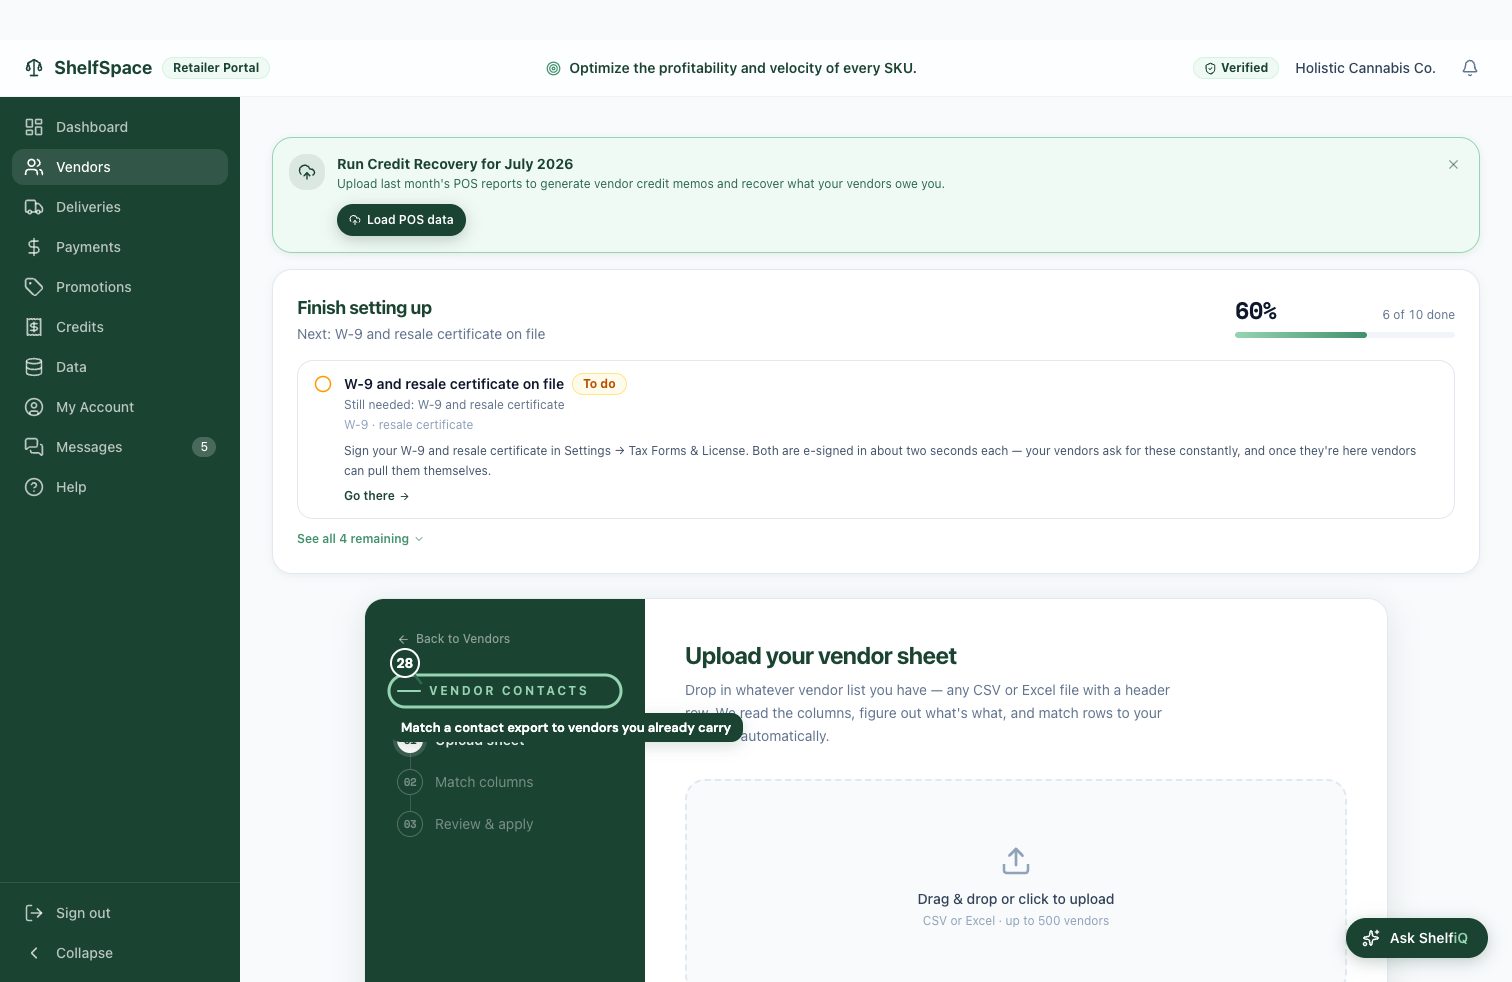
29

Import your existing contact list

Match a contact export to vendors you already carry
29Match a contact export to vendors you already carry
Bring an existing vendor contact list into ShelfSpace in one step. Upload a spreadsheet of names and emails, and ShelfSpace matches them to the vendors you already carry so their contact details fill in without retyping. Use it once when you're getting started, or any time you get a fresh export from another system.
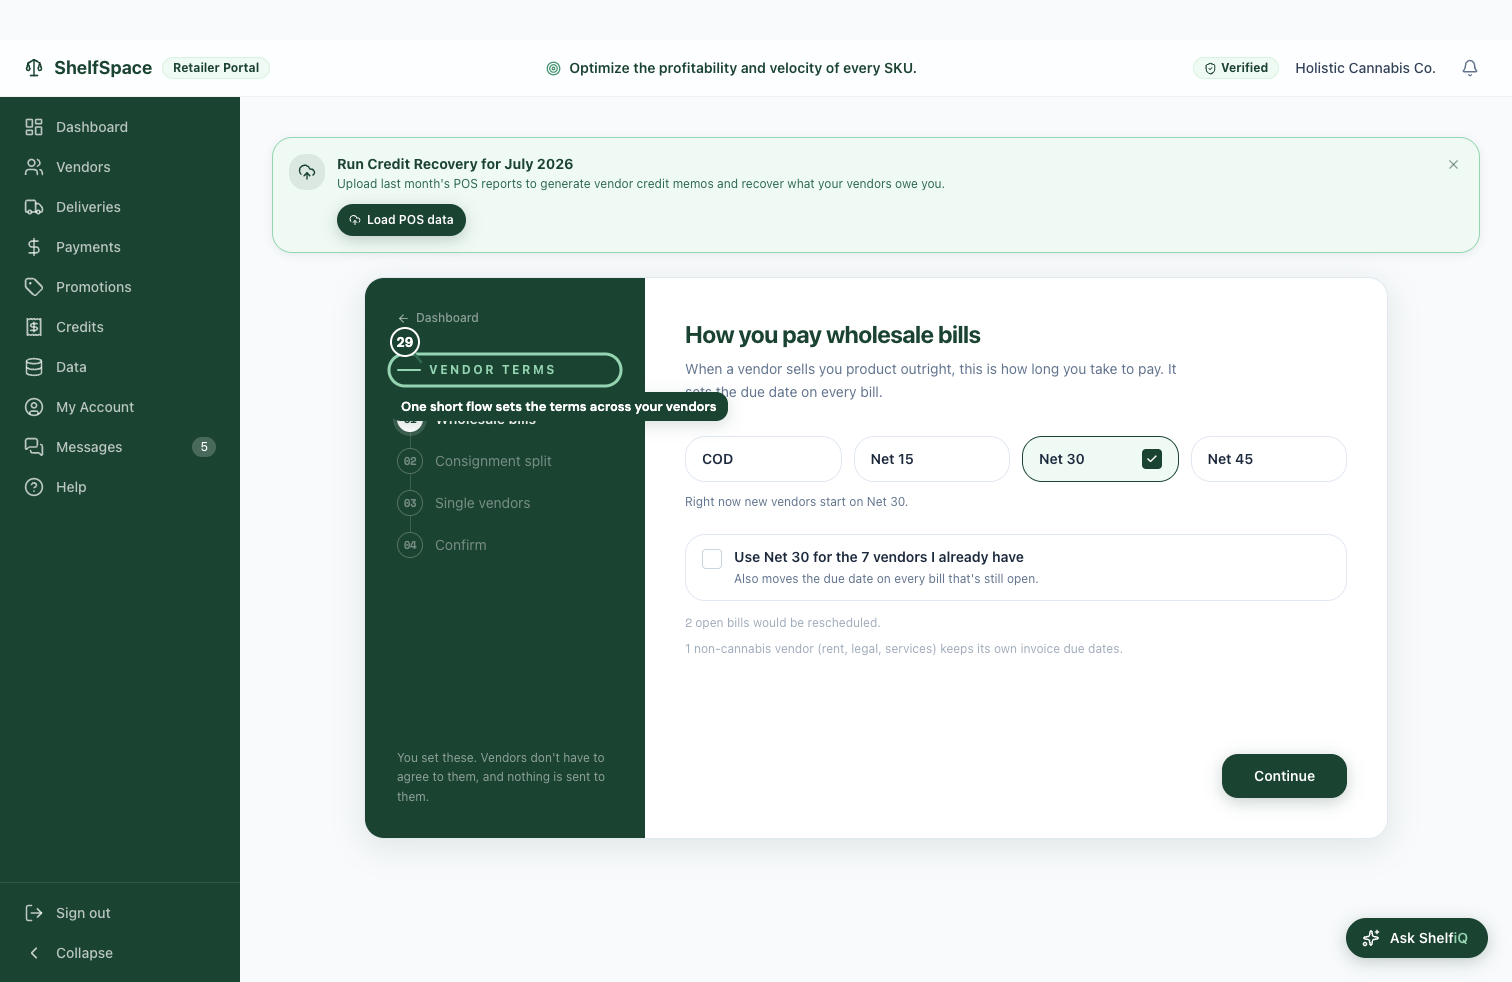
30

Set your default vendor terms

One short flow sets the terms across your vendors
30One short flow sets the terms across your vendors
Set the terms you pay vendors on, all at once. This short guided flow walks you through your standard profit split for product you sell on consignment and how many days you take to pay a wholesale bill, then applies them across your vendors. You can still override any single vendor from their own workspace afterward.
31

Credit the right brand when a distributor ships
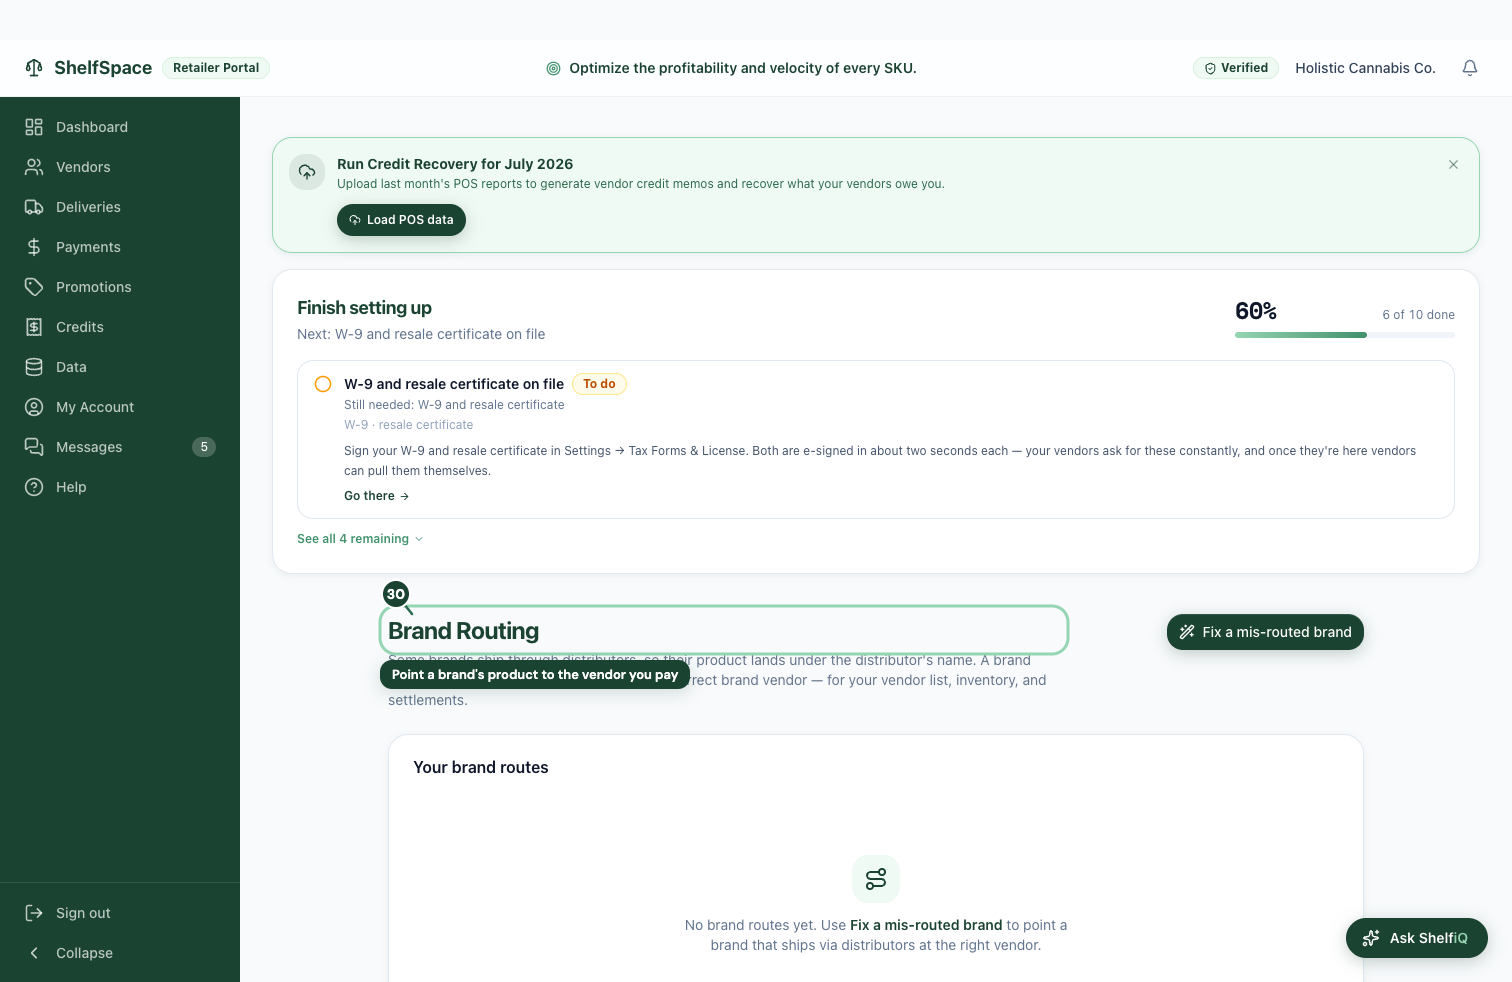
Point a brand's product to the vendor you pay
31Point a brand's product to the vendor you pay
Tell ShelfSpace which brand to credit when a product ships through a distributor. Some brands don't deliver to you directly -- a distributor does -- so their sales would otherwise be credited to the distributor instead of the brand. Add a rule here that points a brand's product to the right vendor, and future deliveries and payouts line up on their own.
32

Fix a mis-routed brand with a guided scan
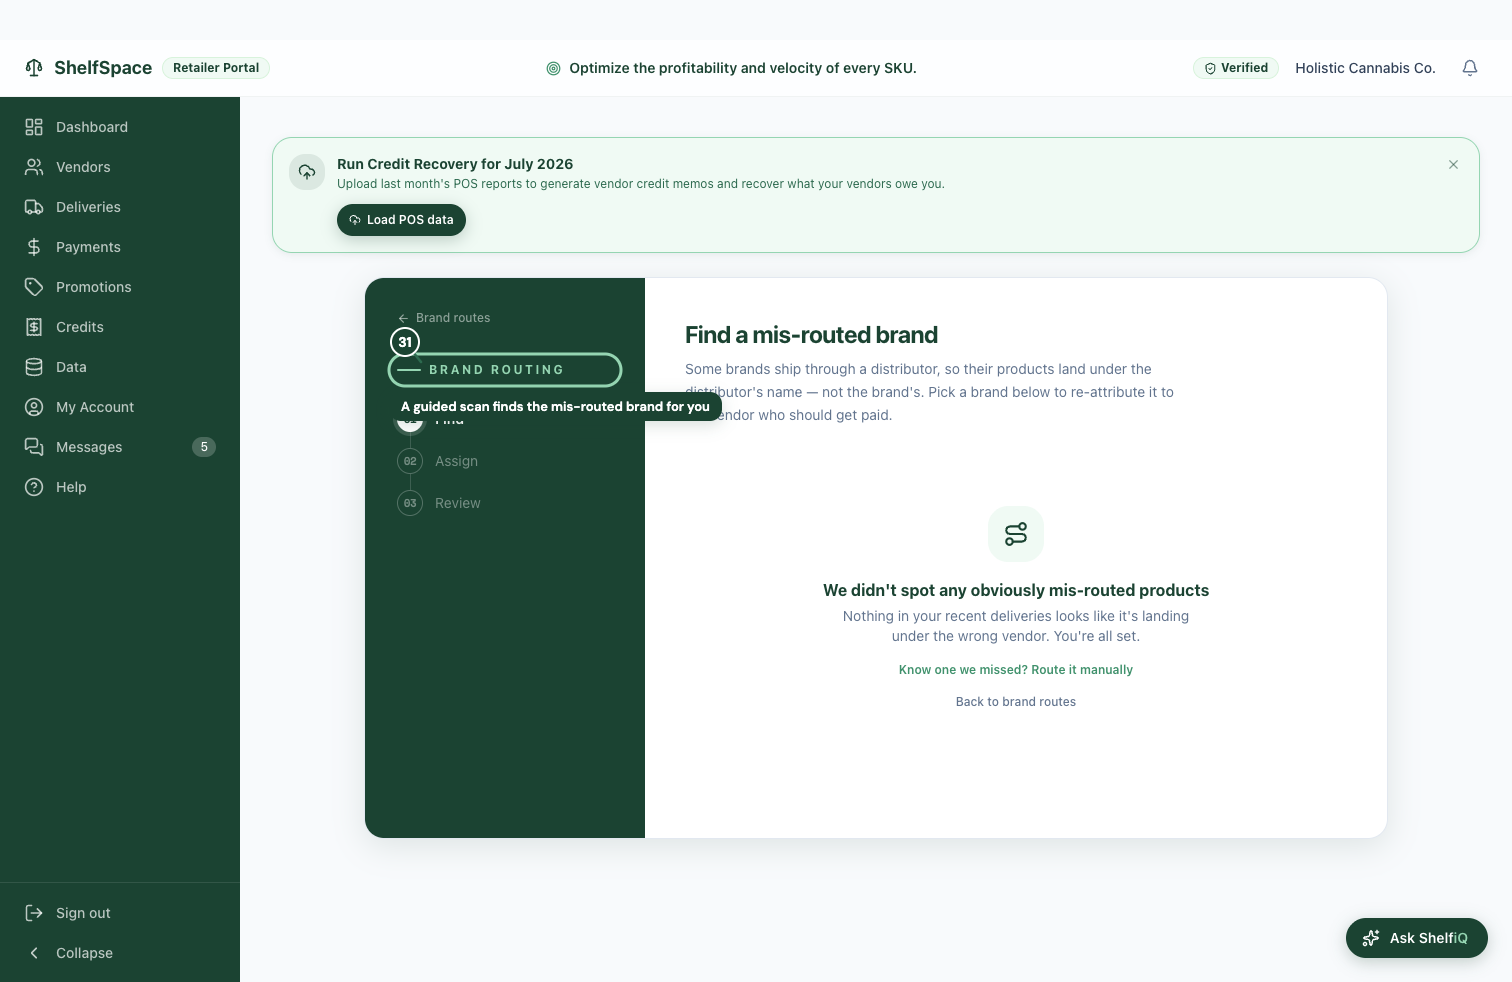
A guided scan finds the mis-routed brand for you
32A guided scan finds the mis-routed brand for you
Set up a brand rule without hunting through records -- this walks you through it. ShelfSpace scans your recent deliveries for a brand whose sales are landing on the wrong vendor, you pick who should actually get paid, and you review the fix before it takes effect. It's the fastest way to point a brand at the right vendor when a distributor ships it.

Credits, promotions, and markdowns

The money-recovery side of the app: what vendors owe you back, and the offers you run together.

33

Review the credits your vendors owe you
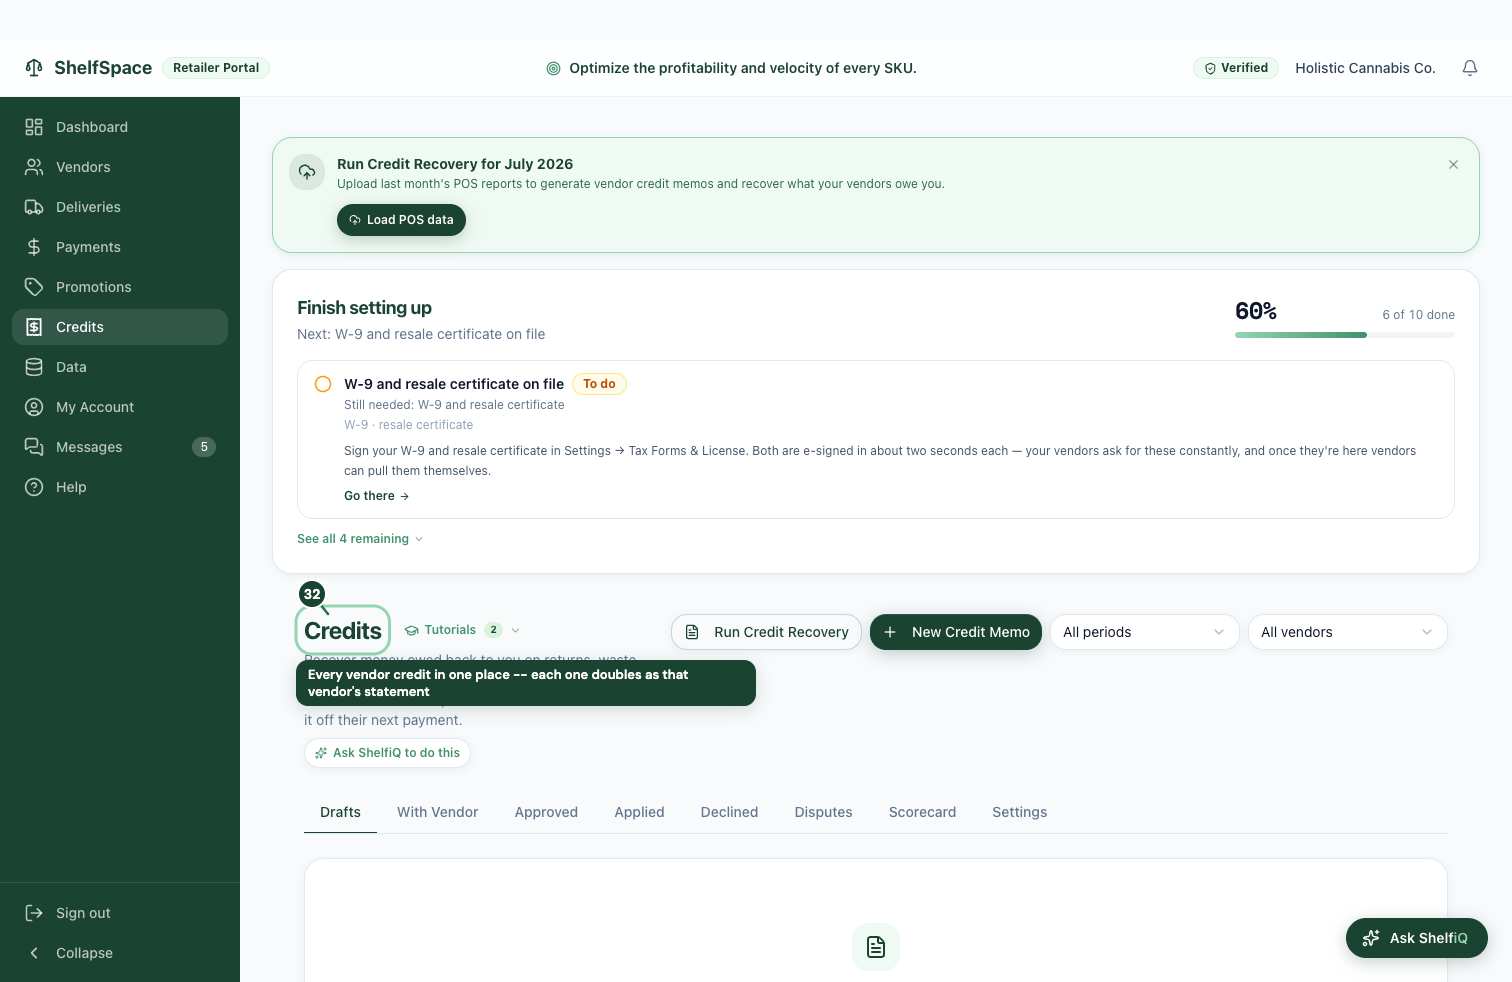
Every vendor credit in one place -- each one doubles as that vendor's statement
33Every vendor credit in one place -- each one doubles as that vendor's statement
Every credit a vendor owes you lives here -- for customer returns, destroyed product, and shared markdowns on aged inventory. Open any one to see exactly what it covers, line by line; each also doubles as that vendor's statement for the month. From here you review a credit, send it to the vendor, and -- once it's settled -- apply it against what you owe them, so nothing has to be re-keyed.
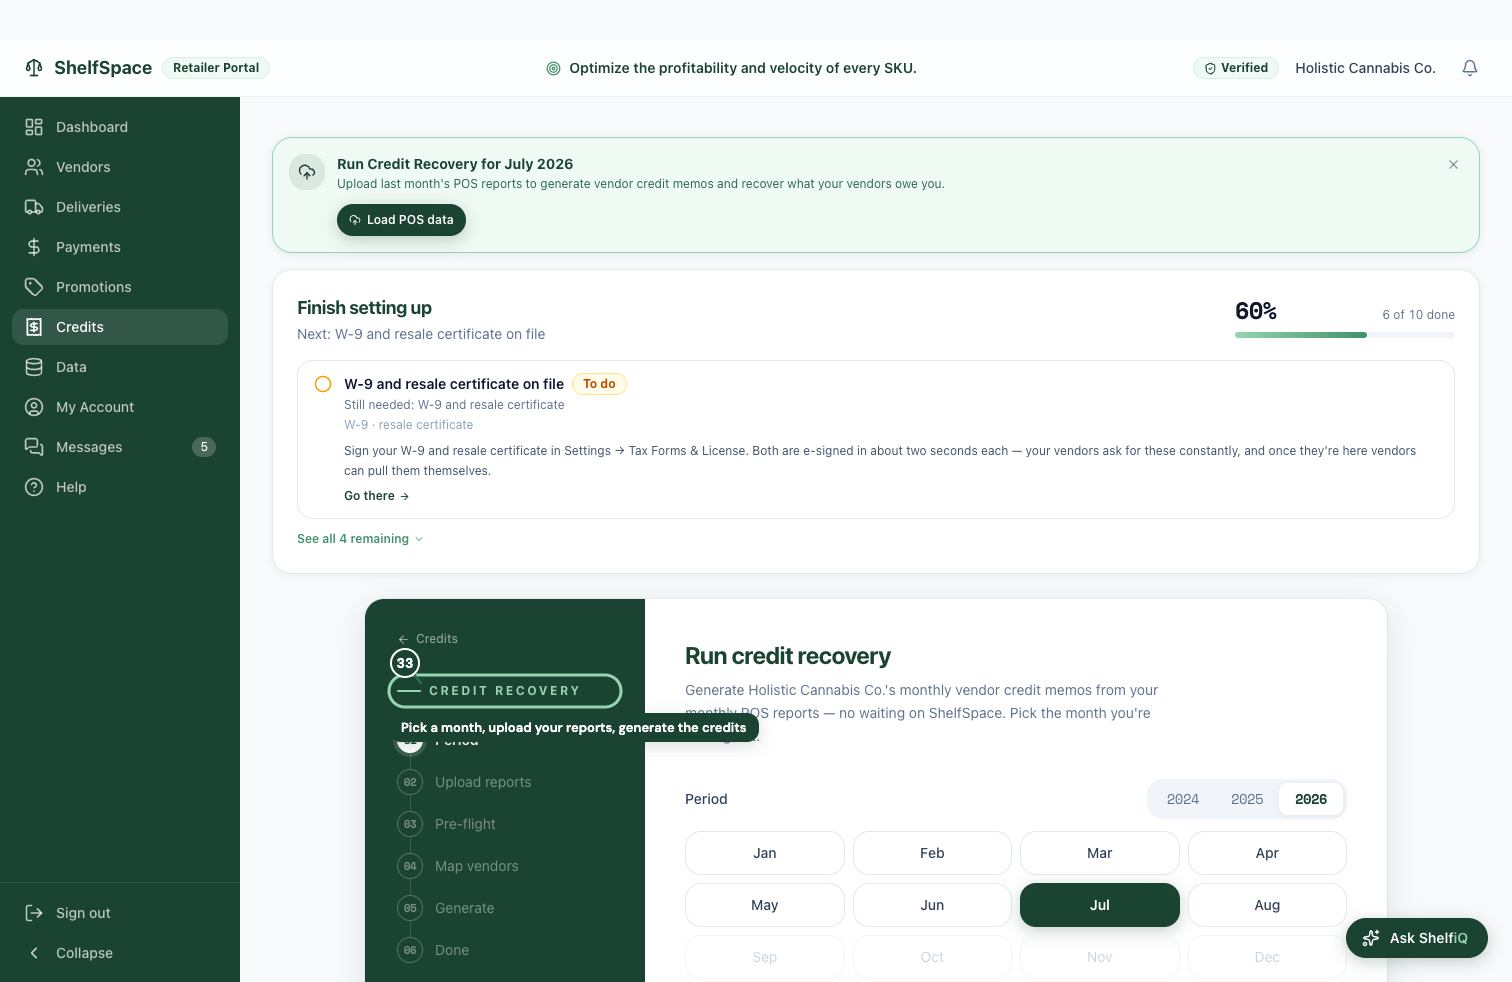
34

Run this month's credits yourself

Pick a month, upload your reports, generate the credits
34Pick a month, upload your reports, generate the credits
Generate this month's vendor credits without waiting on ShelfSpace. Pick the month you're closing out, upload your monthly point-of-sale reports, and ShelfSpace builds each vendor's credit from customer returns, product destroyed with the state, and any shared markdowns. It's the same monthly credit run, on your own schedule -- useful when you want to close the books early.
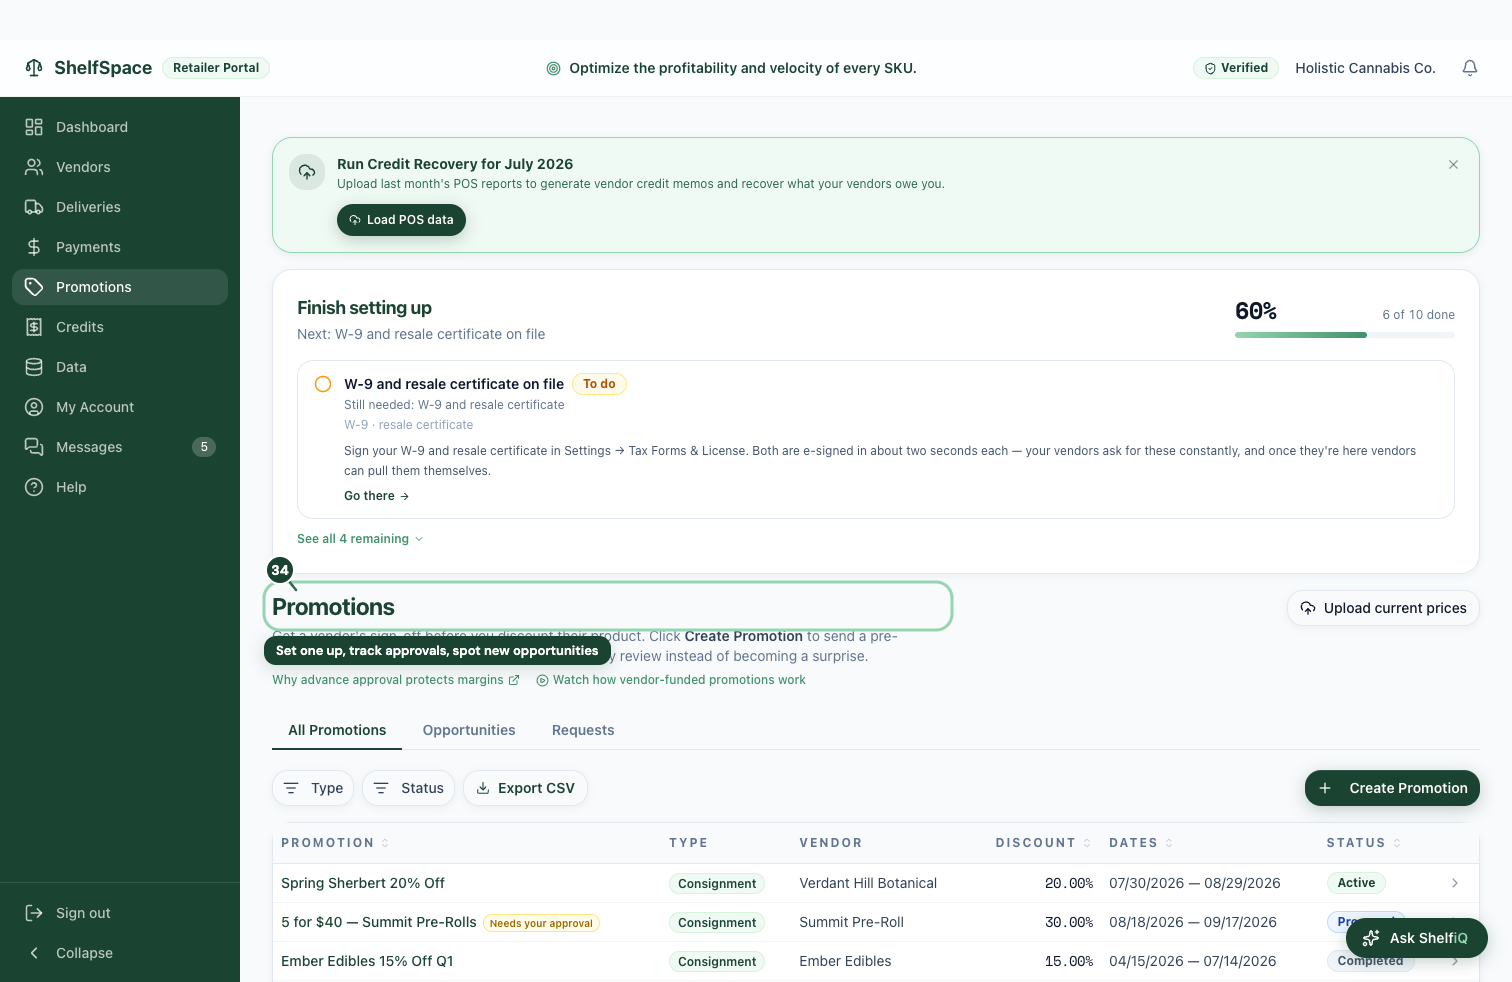
35

Run vendor-funded promotions

Set one up, track approvals, spot new opportunities
35Set one up, track approvals, spot new opportunities
Run and track promotions a vendor helps pay for, all in one place. Set up a new promotion, watch which ones are waiting on a vendor's OK, and see every past one. The Opportunities tab flags discounts you've already run that no vendor has signed off on yet -- ranked by how much you could still recover -- so you can turn them into a promotion and claim the vendor's share.
36

Mark down aged product with vendor help
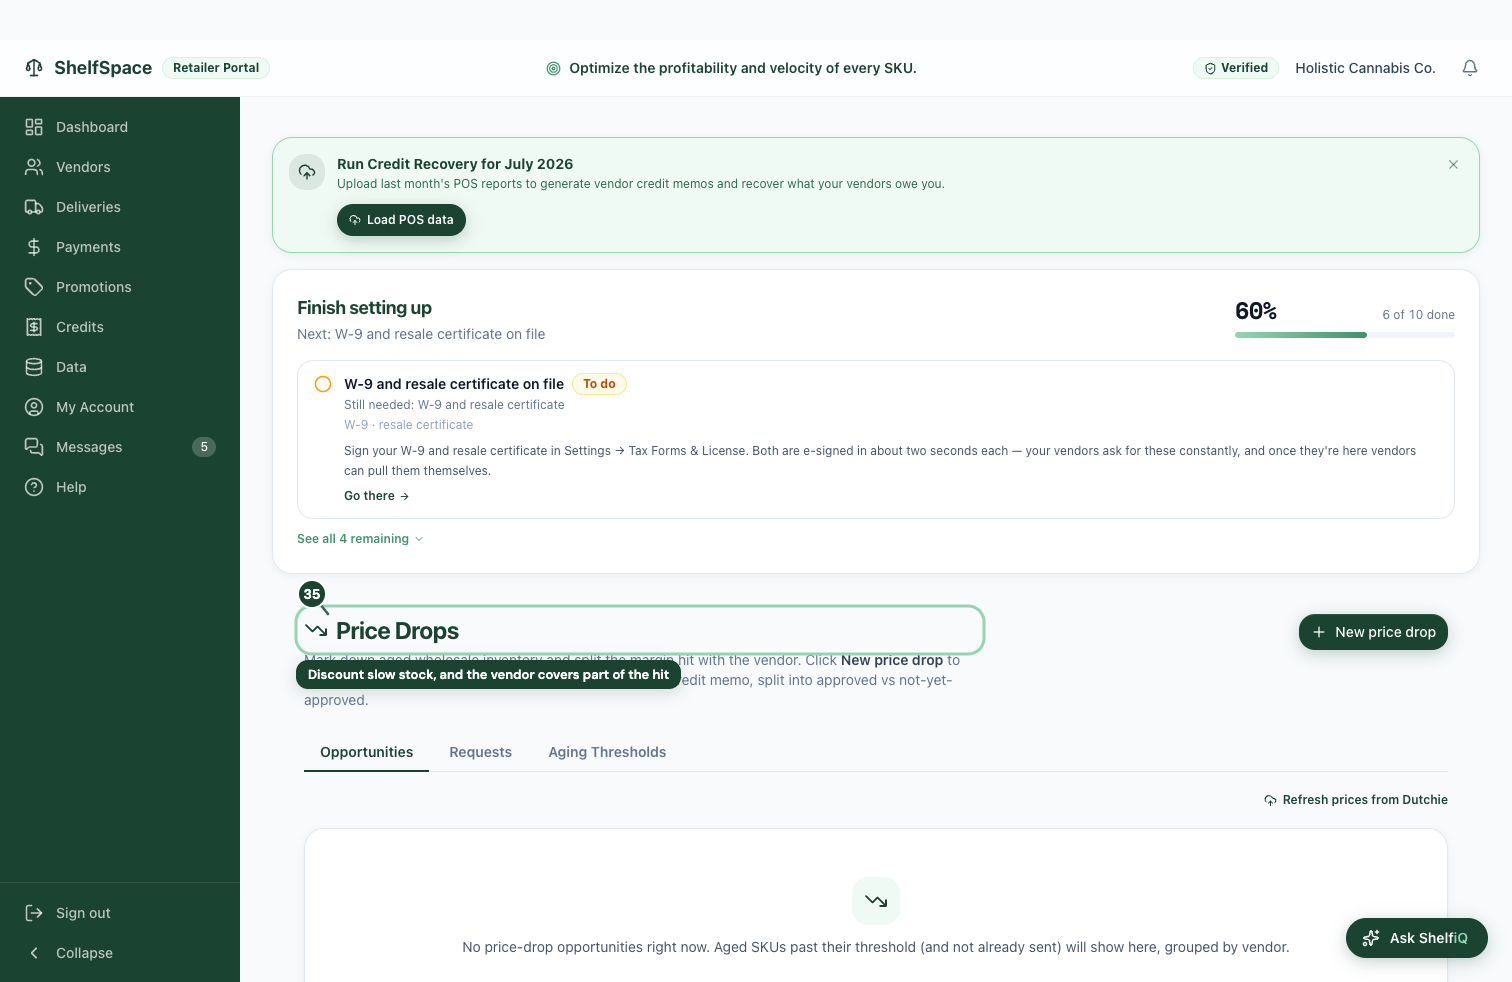
Discount slow stock, and the vendor covers part of the hit
36Discount slow stock, and the vendor covers part of the hit
Mark down product that's been on the shelf too long and share the loss with the vendor. A price drop lets you discount aged stock while the vendor covers part of the lost margin, so you move slow product without eating the whole markdown yourself. This screen lists every price-drop request and lets you set the age at which a product becomes a candidate.

Banking, plan, and messages

The account-level screens: how you pay, how your books connect, what your plan includes, and where vendor conversations live.

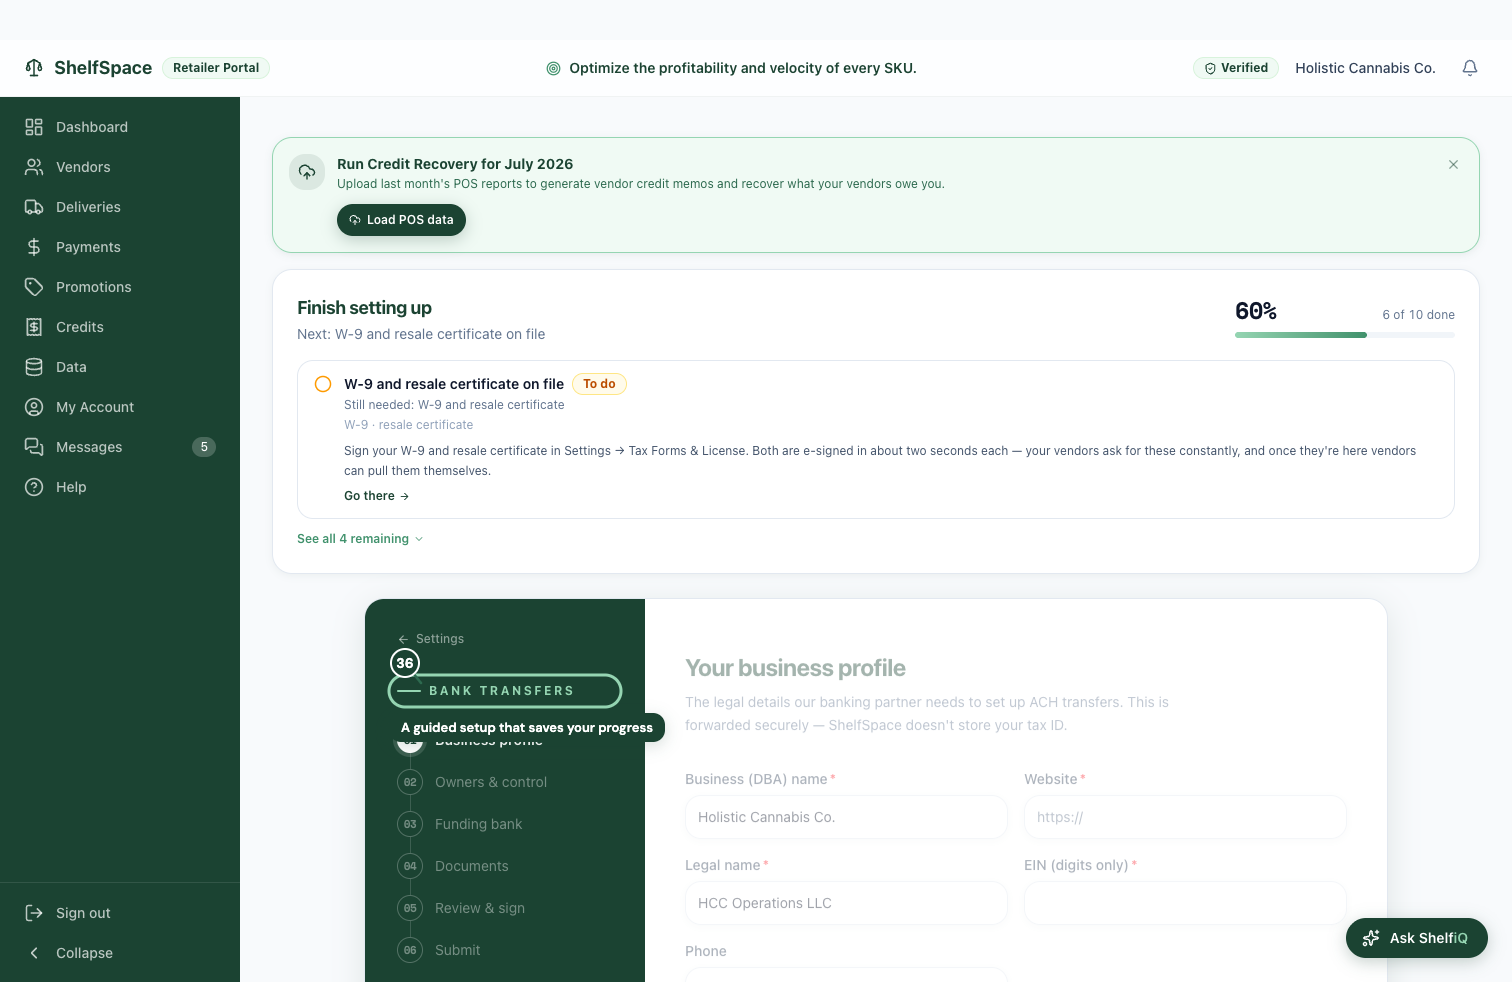
37

Set up paying by bank transfer

A guided setup that saves your progress
37A guided setup that saves your progress
Set up bank transfers so you can pay vendors straight from your account. This guided flow collects your business details, the bank account you'll pay from, and a few compliance documents -- then you can send payments by bank transfer instead of printing a check. It saves your progress, so you can finish it across more than one sitting.
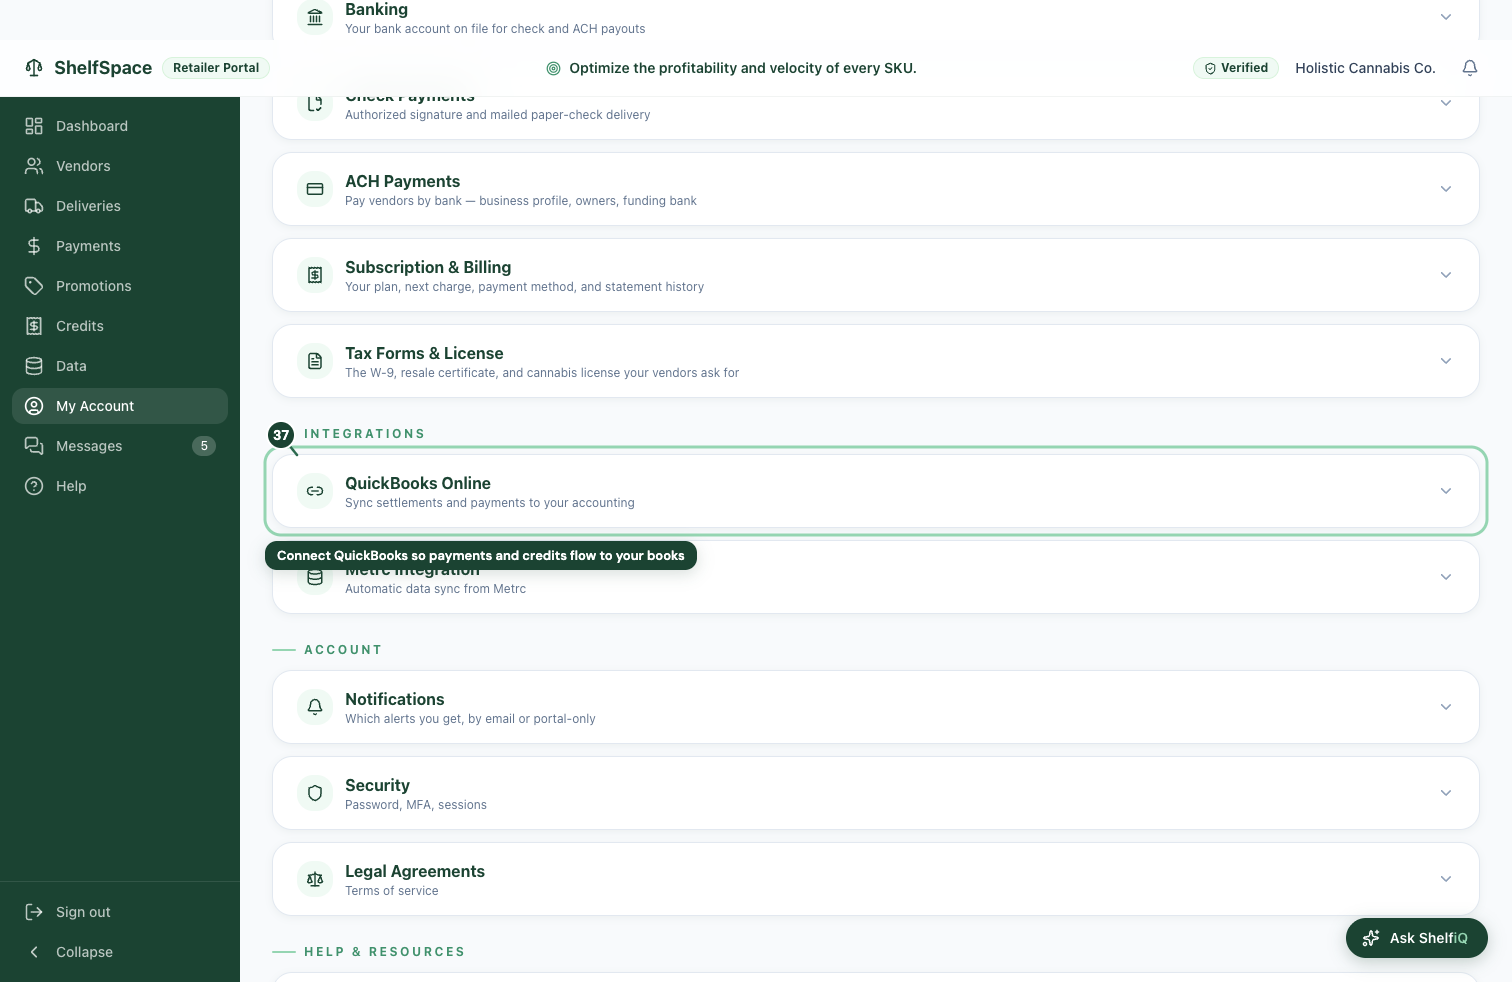
38

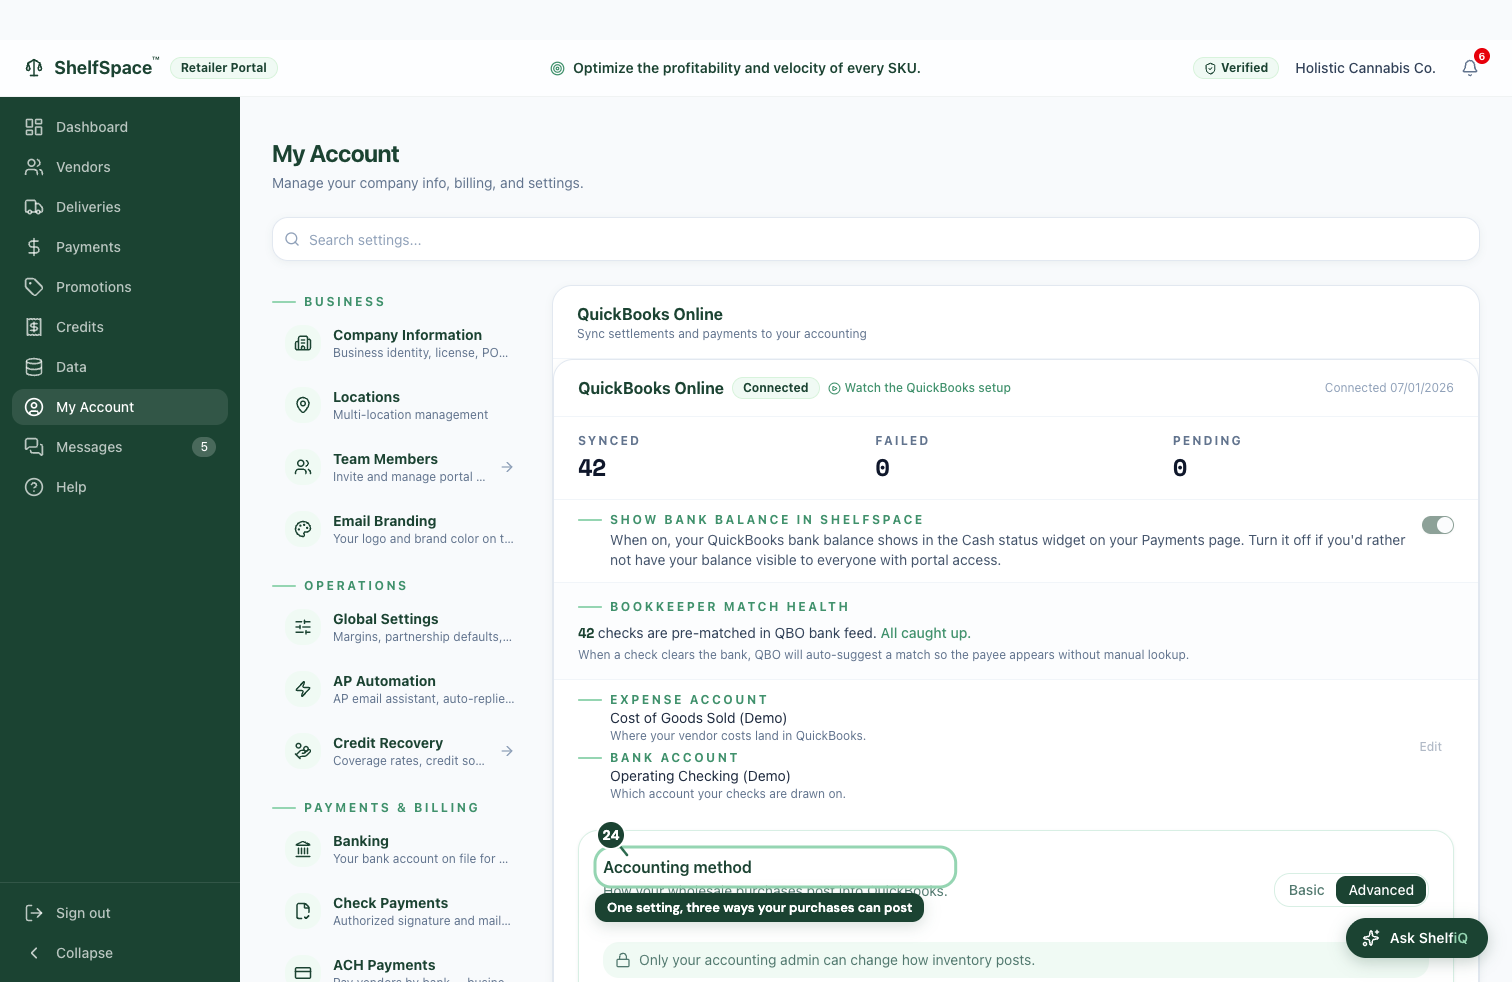
Connect your books to QuickBooks

Connect QuickBooks so payments and credits flow to your books
38Connect QuickBooks so payments and credits flow to your books
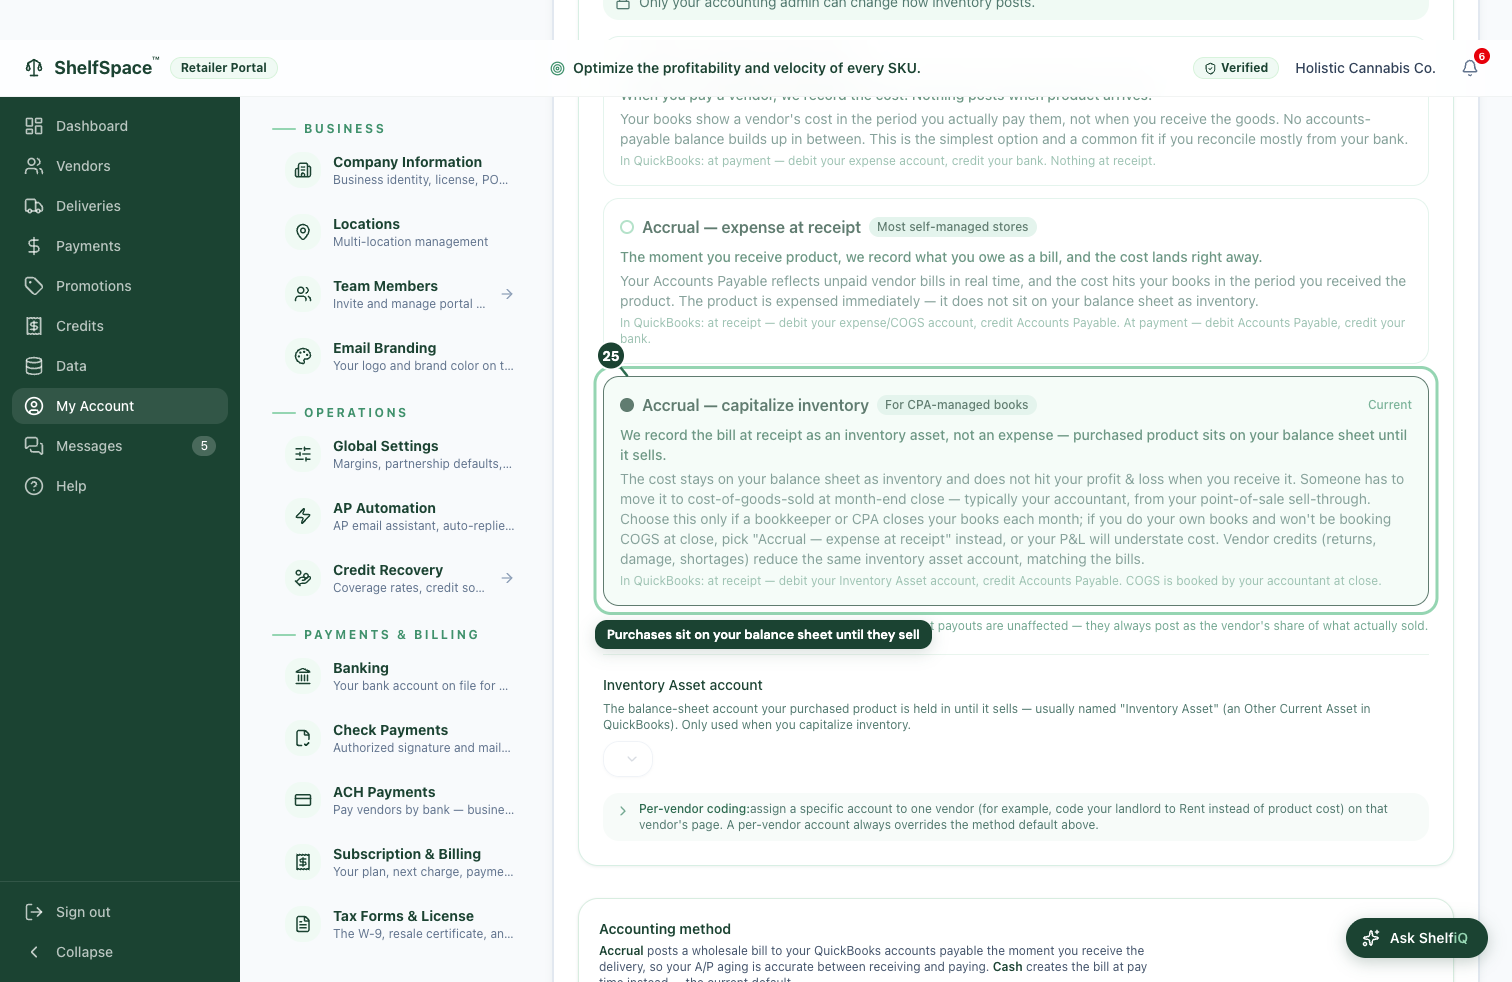
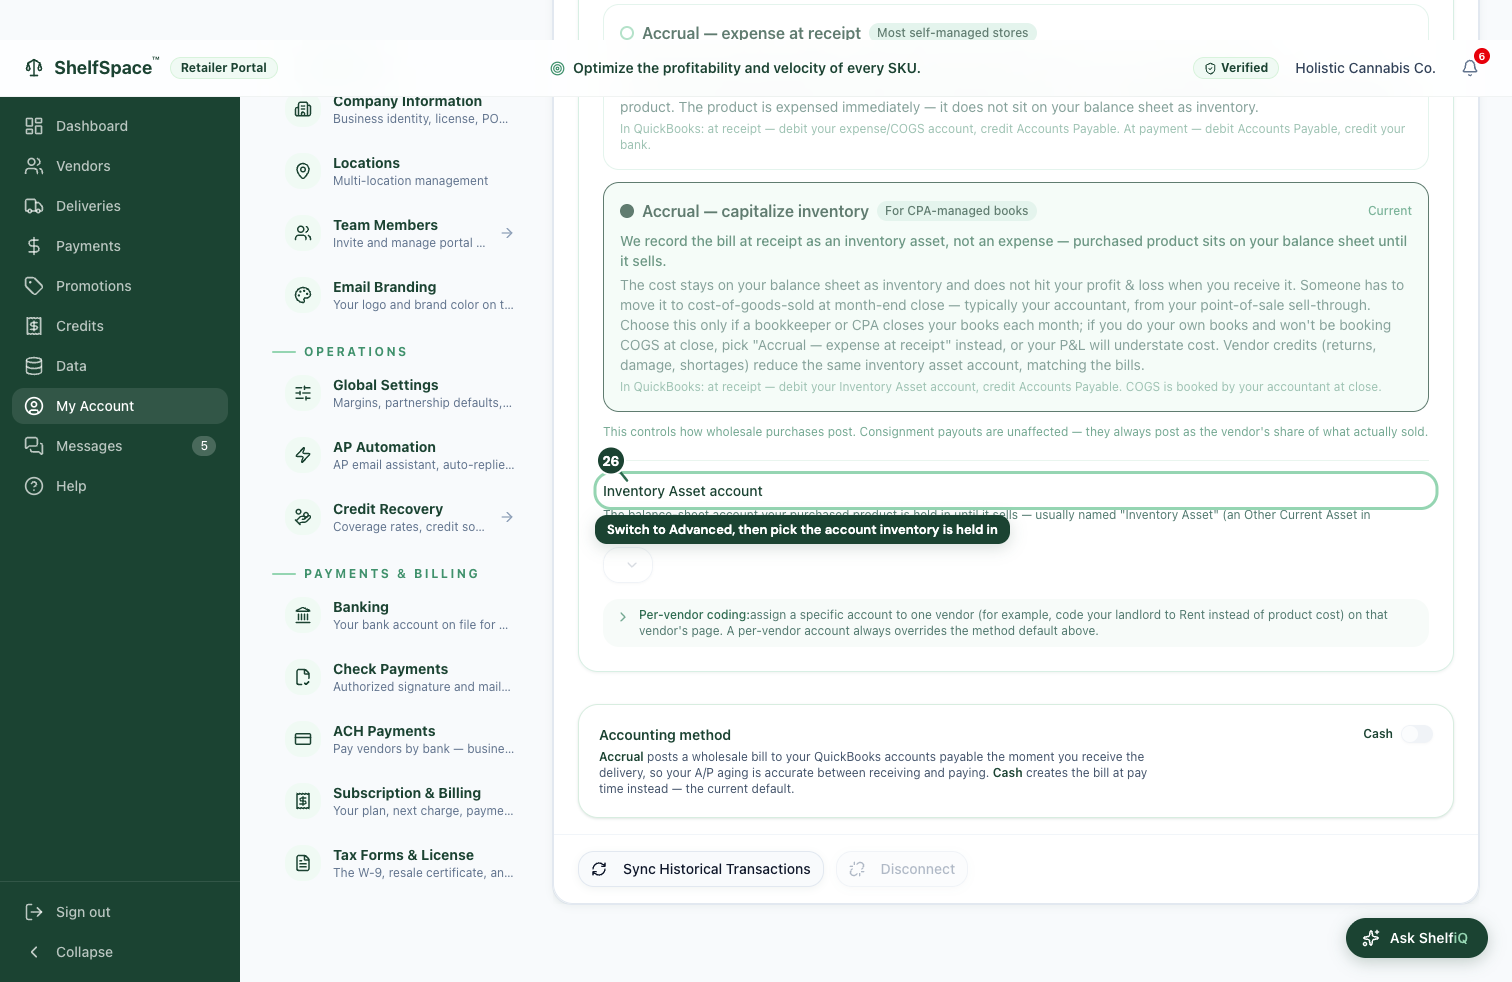
Open QuickBooks Online in Settings to connect your books. A one-time guided flow matches your ShelfSpace vendors to their QuickBooks records and lines up your bills, so every payment and credit lands in the right place -- and new activity syncs on its own after that. It also keeps your bookkeeper's QuickBooks bills from doubling up with invoices ShelfSpace already tracks, so you never pay the same expense twice.
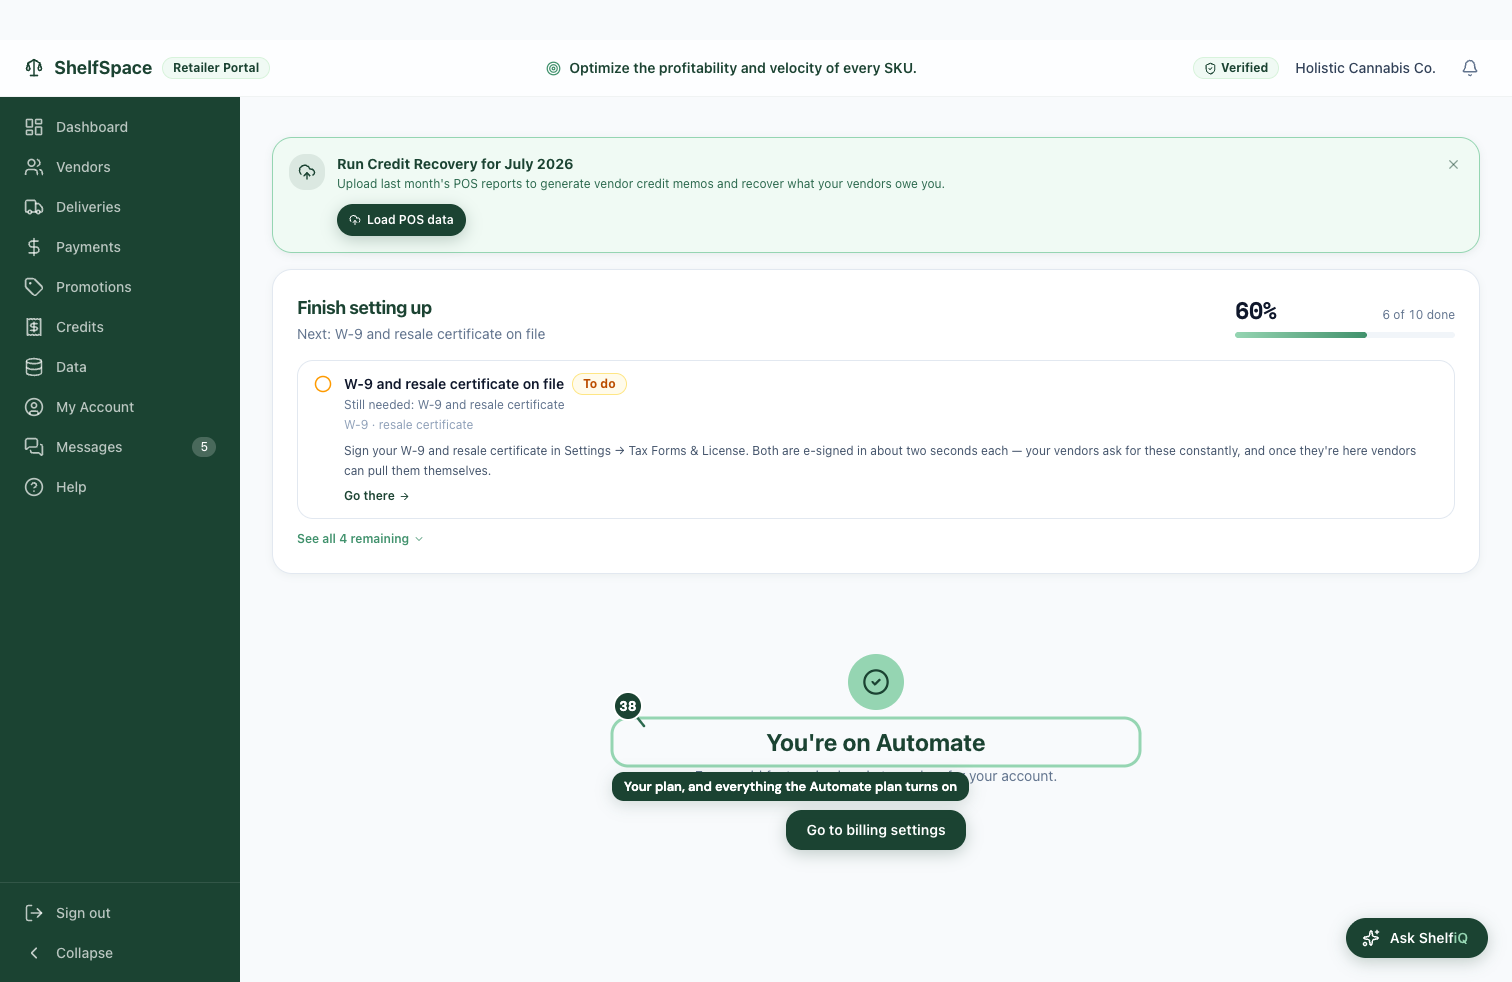
39

See and turn on the Automate plan

Your plan, and everything the Automate plan turns on
39Your plan, and everything the Automate plan turns on
See your plan and what Automate adds. Automate switches on the hands-off features -- things like scheduled payments and deeper shelf analytics -- for a flat monthly price, while the everyday features stay free. This screen shows the plan you're on and what each one includes, so you always know exactly what you're getting.
40

Every vendor conversation in one inbox
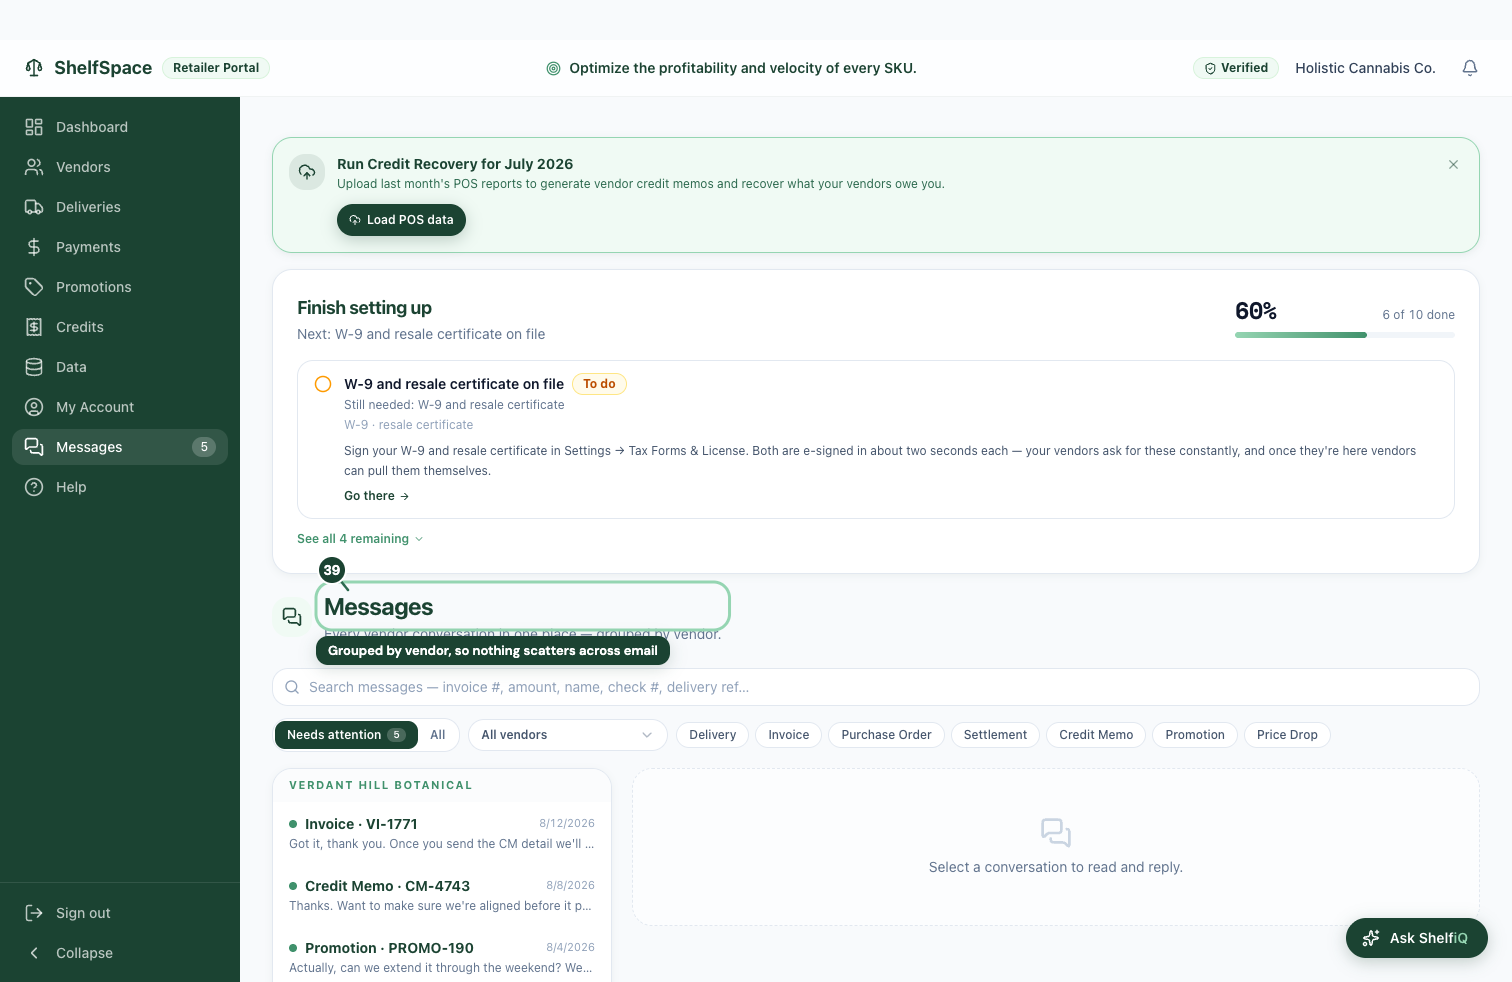
Grouped by vendor, so nothing scatters across email
40Grouped by vendor, so nothing scatters across email
Keep every vendor conversation in one inbox. Messages groups all your back-and-forth with each vendor together, so a question about a payment or a delivery stays with that vendor instead of scattering across email. Open a vendor on the left to read the full thread and pick up where you left off.